XCH Bridge Guide
Intro
A cryptocurrency bridge is a powerful tool that enables seamless transfers of digital assets between different blockchain networks, breaking down the barriers of blockchain interoperability. The first Chia blockchain bridge by Warp.Green is now available, paving the way for anyone to access XCH.
As the first of many bridges to come, Warp.Green marks an exciting milestone in our journey toward greater access to chia (XCH). To help you get started, here's a introductory guide on how to use the Warp.Green bridge.
The Warp.green Bridge
The Warp.green bridge is a messaging protocol that enables bridging assets between Chia and other blockchains. It is an open-source project located on GitHub. It was developed by Warp.green, which is not affiliated with Chia Network Inc.
This guide will show you how to send ETH from the Base blockchain (an Ethereum L2) to the Chia blockchain. The transfer will take a total of 15-20 minutes, though the initial setup could take considerably longer if you are not familiar with the technologies involved.
It is also possible to bridge assets from Ethereum to Chia, but we chose the Base chain for this guide because it tends to have lower fees.
In addition, it is possible to bridge assets in the other direction: from Chia to Ethereum/Base. This guide doesn't demonstrate this functionality, but the basic technique is quite similar.
Finally, note that the bridge is set up to allow for bridging any Chia or Ethereum asset. However, only a limited number of assets are currently supported. A list of supported assets is maintained at warp.green/bridge/assets.
Set up MetaMask
MetaMask is one of the most popular wallets for storing digital assets such as ETH, and it supports the Base blockchain. We will use MetaMask for this guide, so if you want to follow along, you will need to install it as a web browser extension. But don't worry – if you want to use a different Base wallet, the instructions will likely be similar.
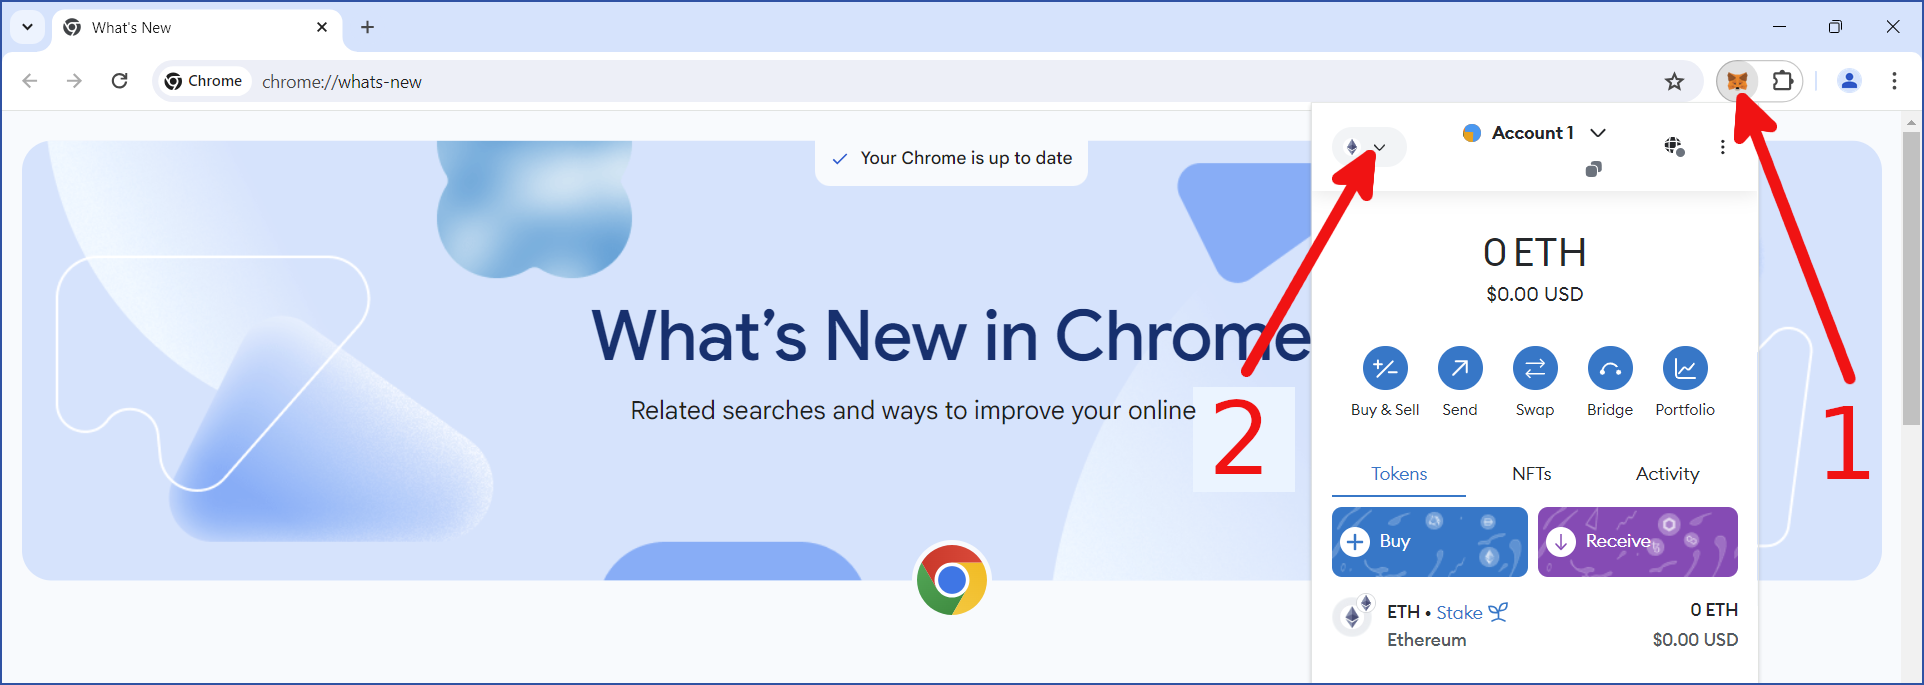
After you have installed MetaMask, click the browser extension button ("1" in the following image), then click the dropdown to change blockchains ("2"):
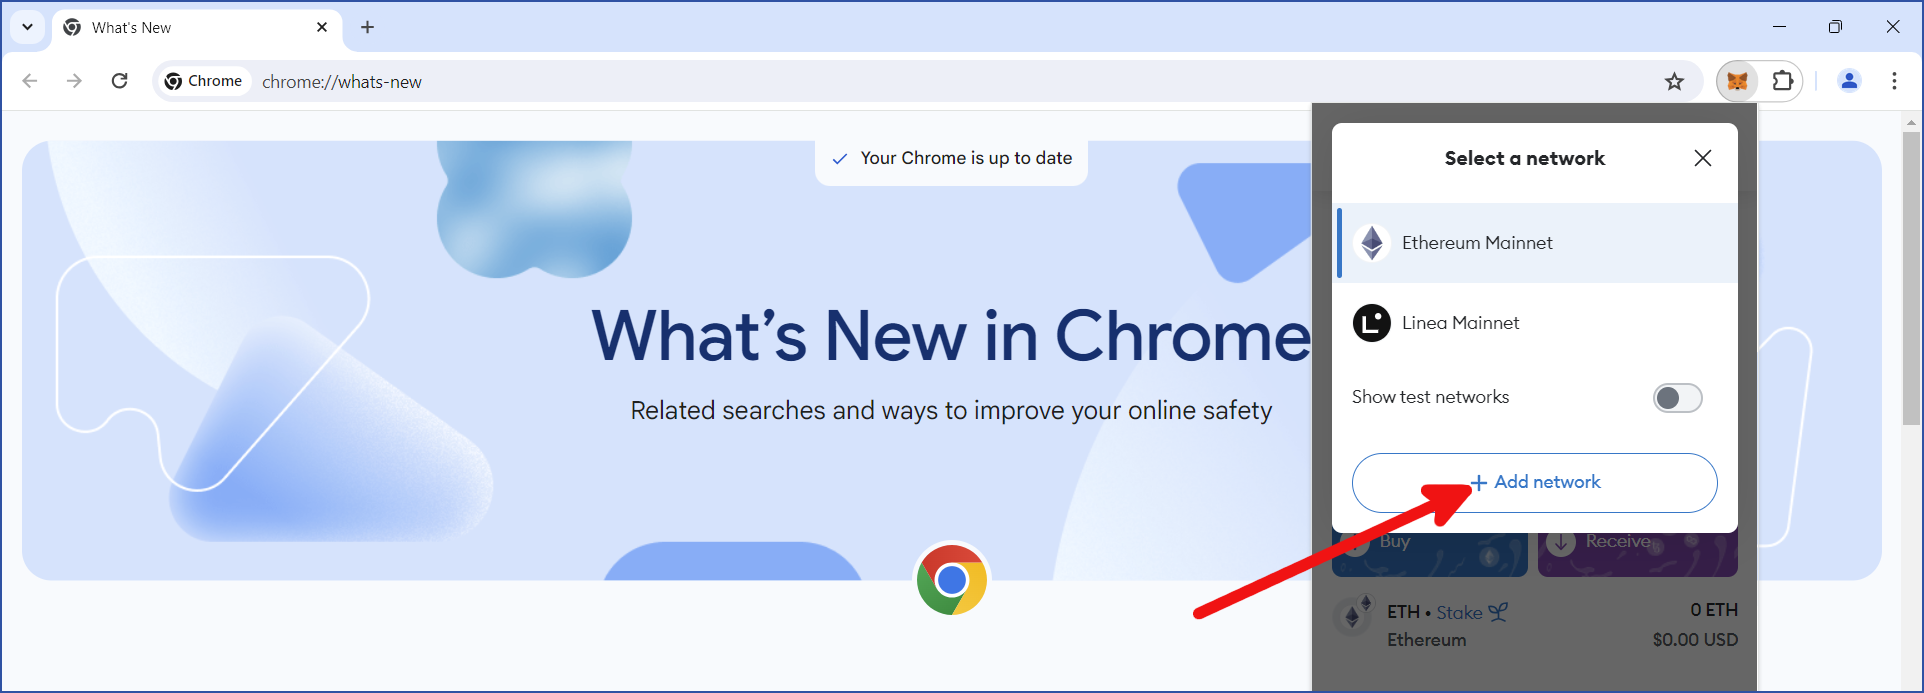
By default, Ethereum's mainnet will be selected. The Warp.green bridge will work with this network, but for this guide, we will use Base instead. Click + Add network:
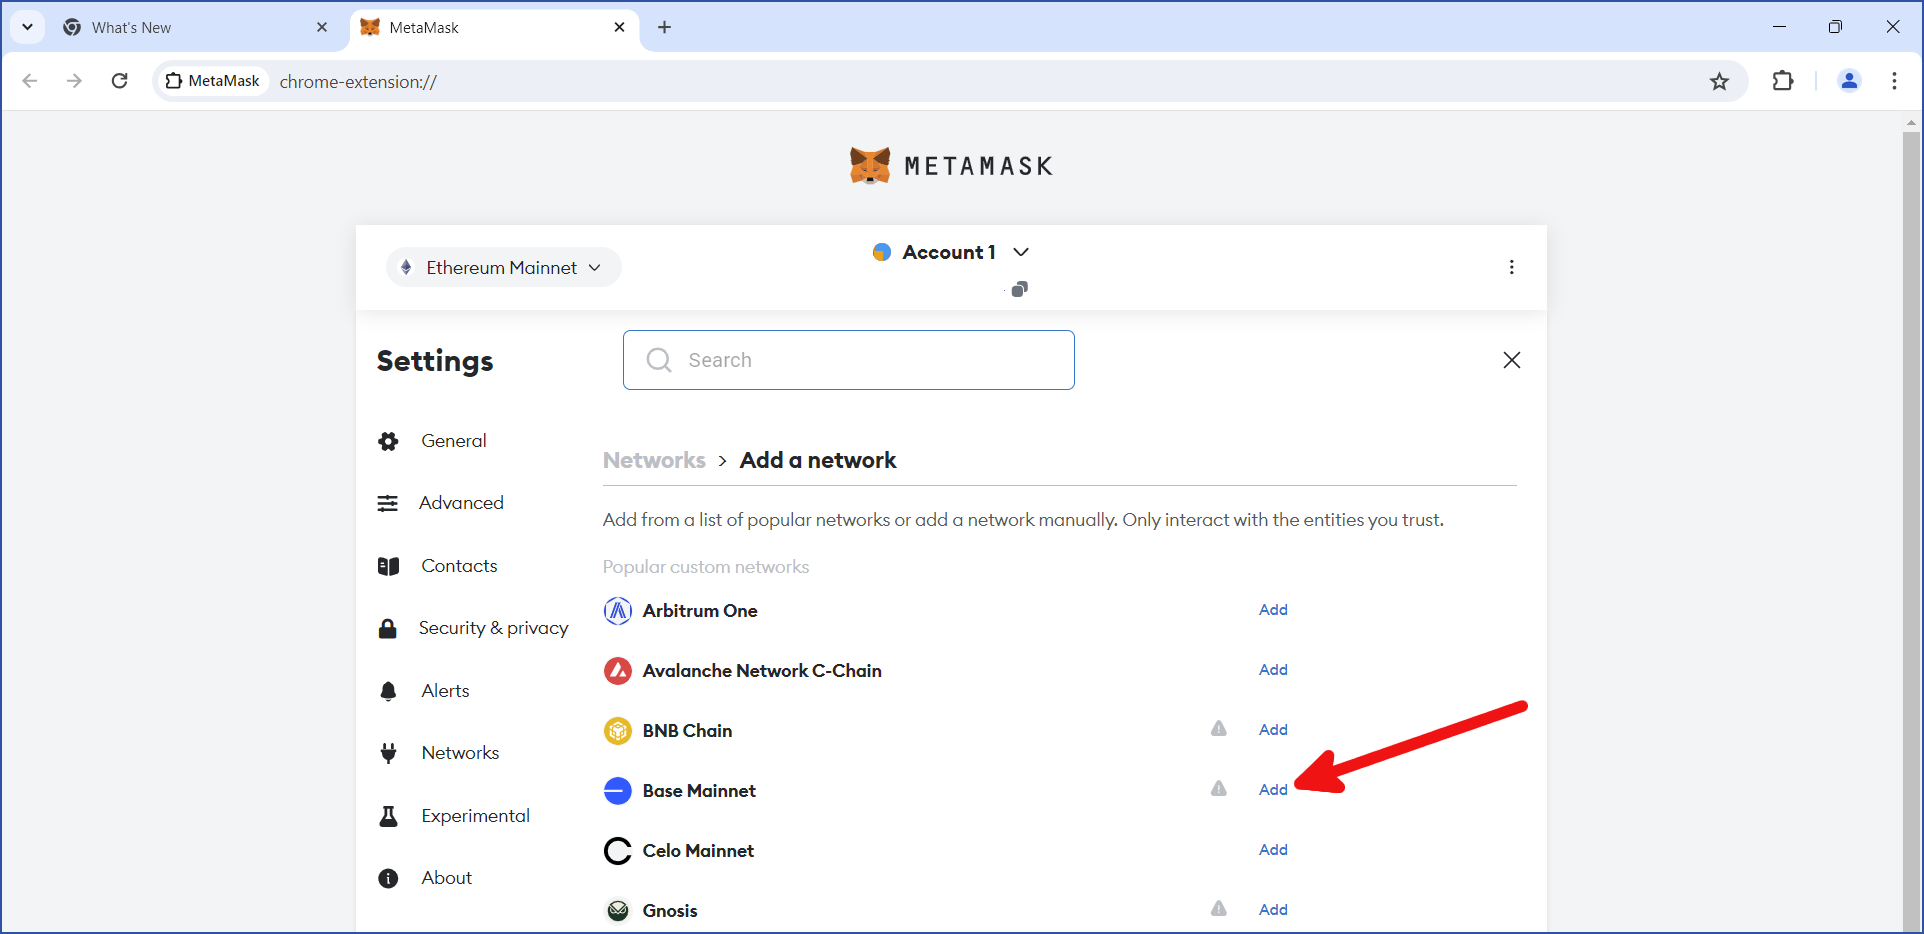
Several supported networks will be displayed. Locate Base Mainnet and click Add:
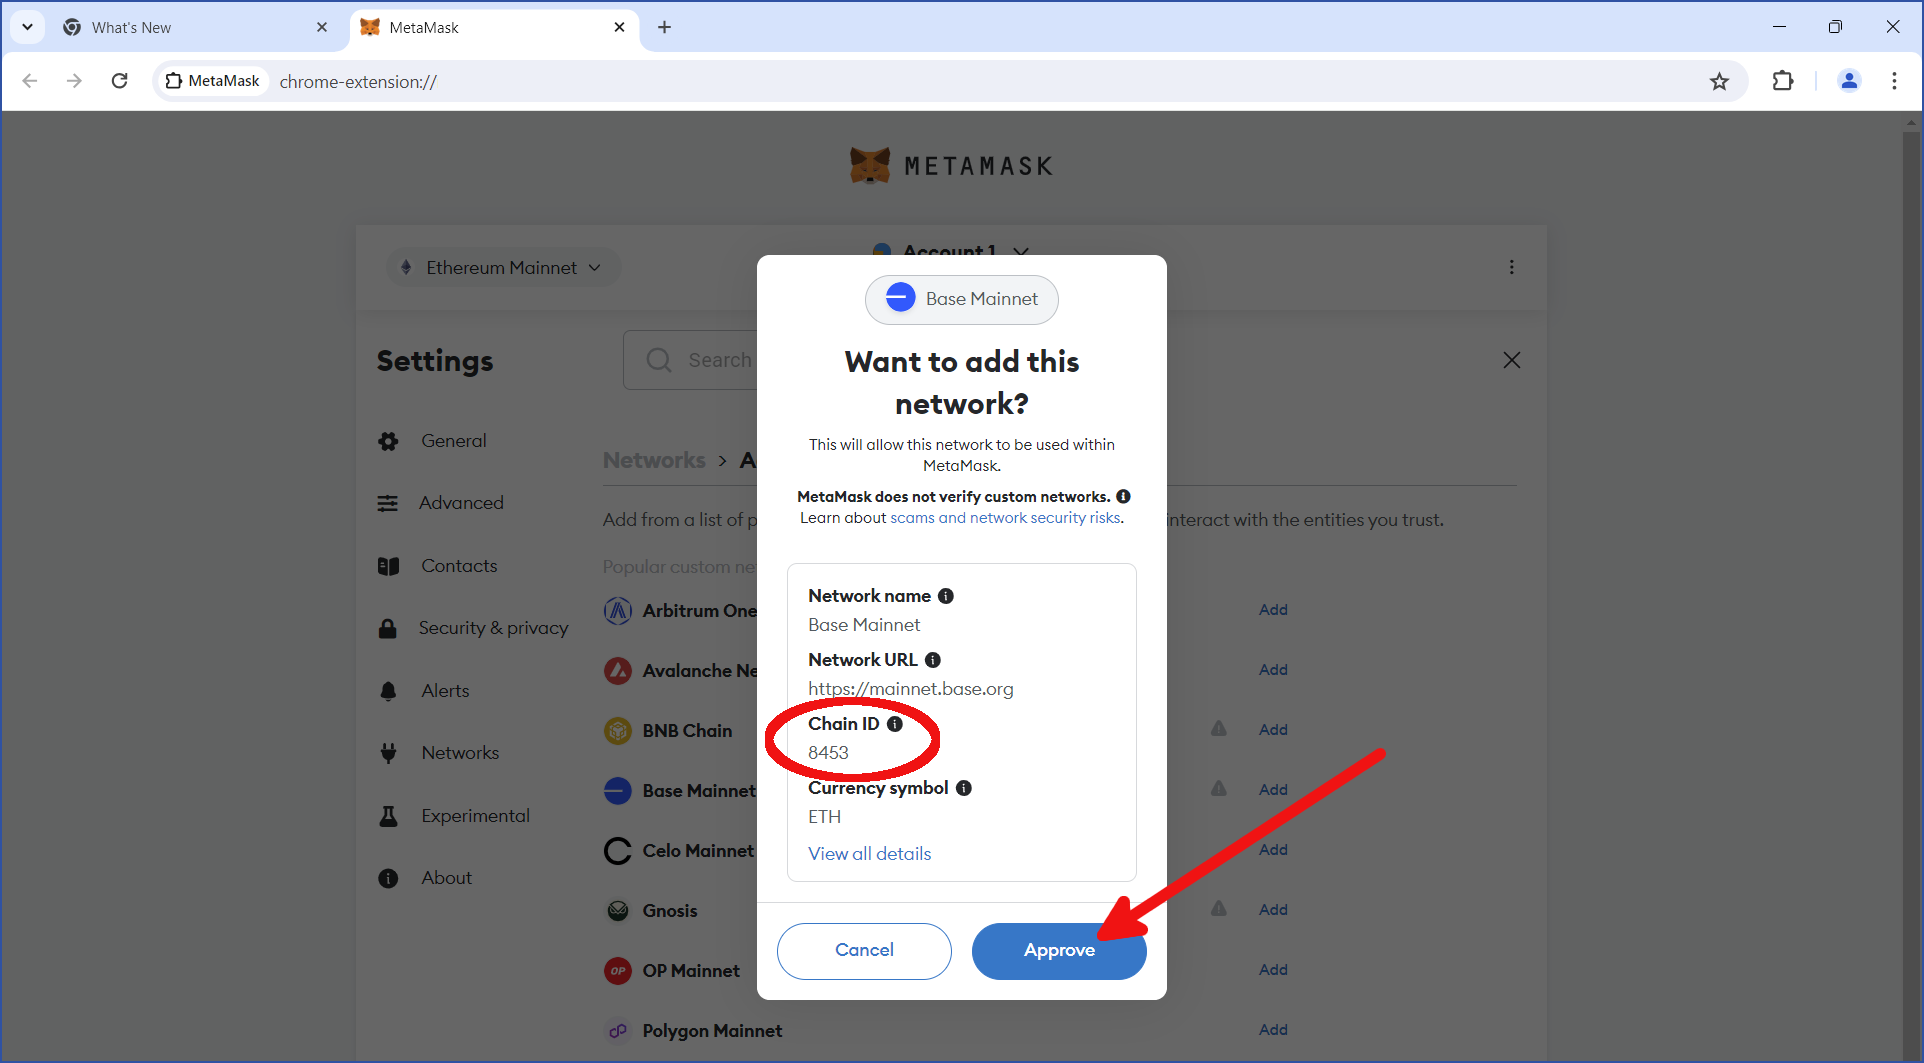
Verify that you are adding the correct network. The Chain ID for the Base mainnet is 8453. Make sure this number is shown, and click Approve:
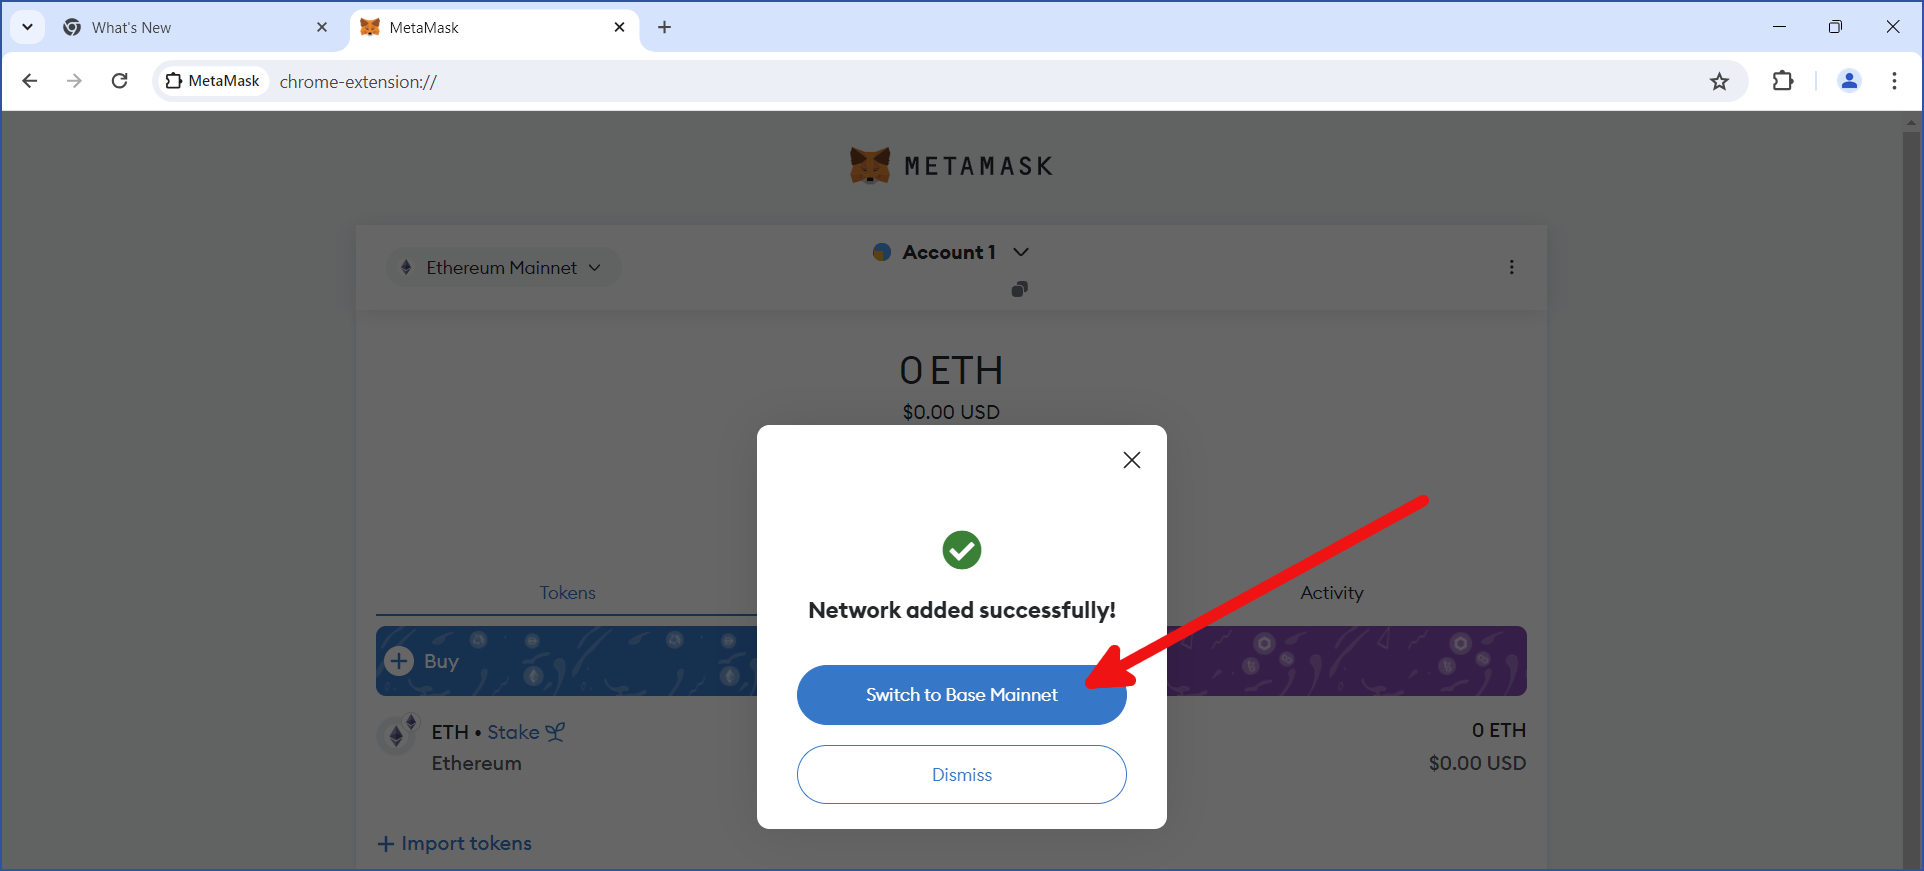
The network should be added successfully. Click Switch to Base Mainnet:
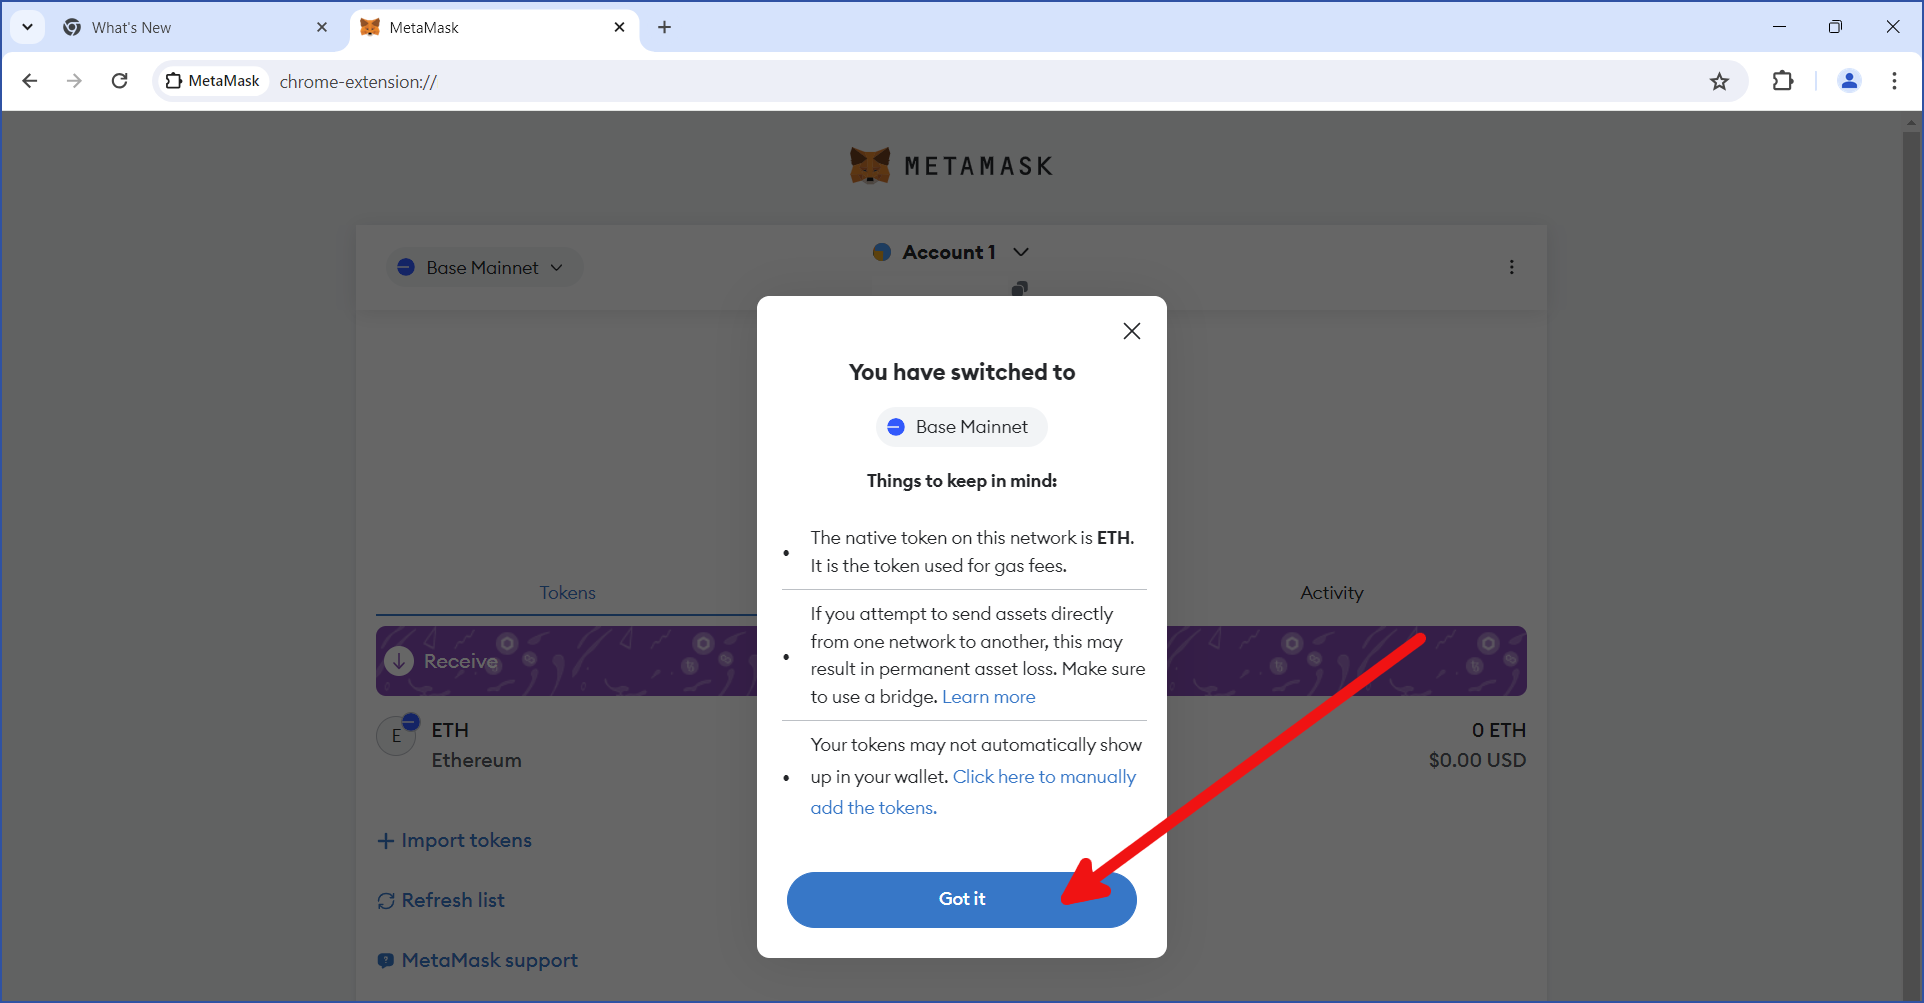
You will be given some important info about this network. Read this info carefully, then click Got it:
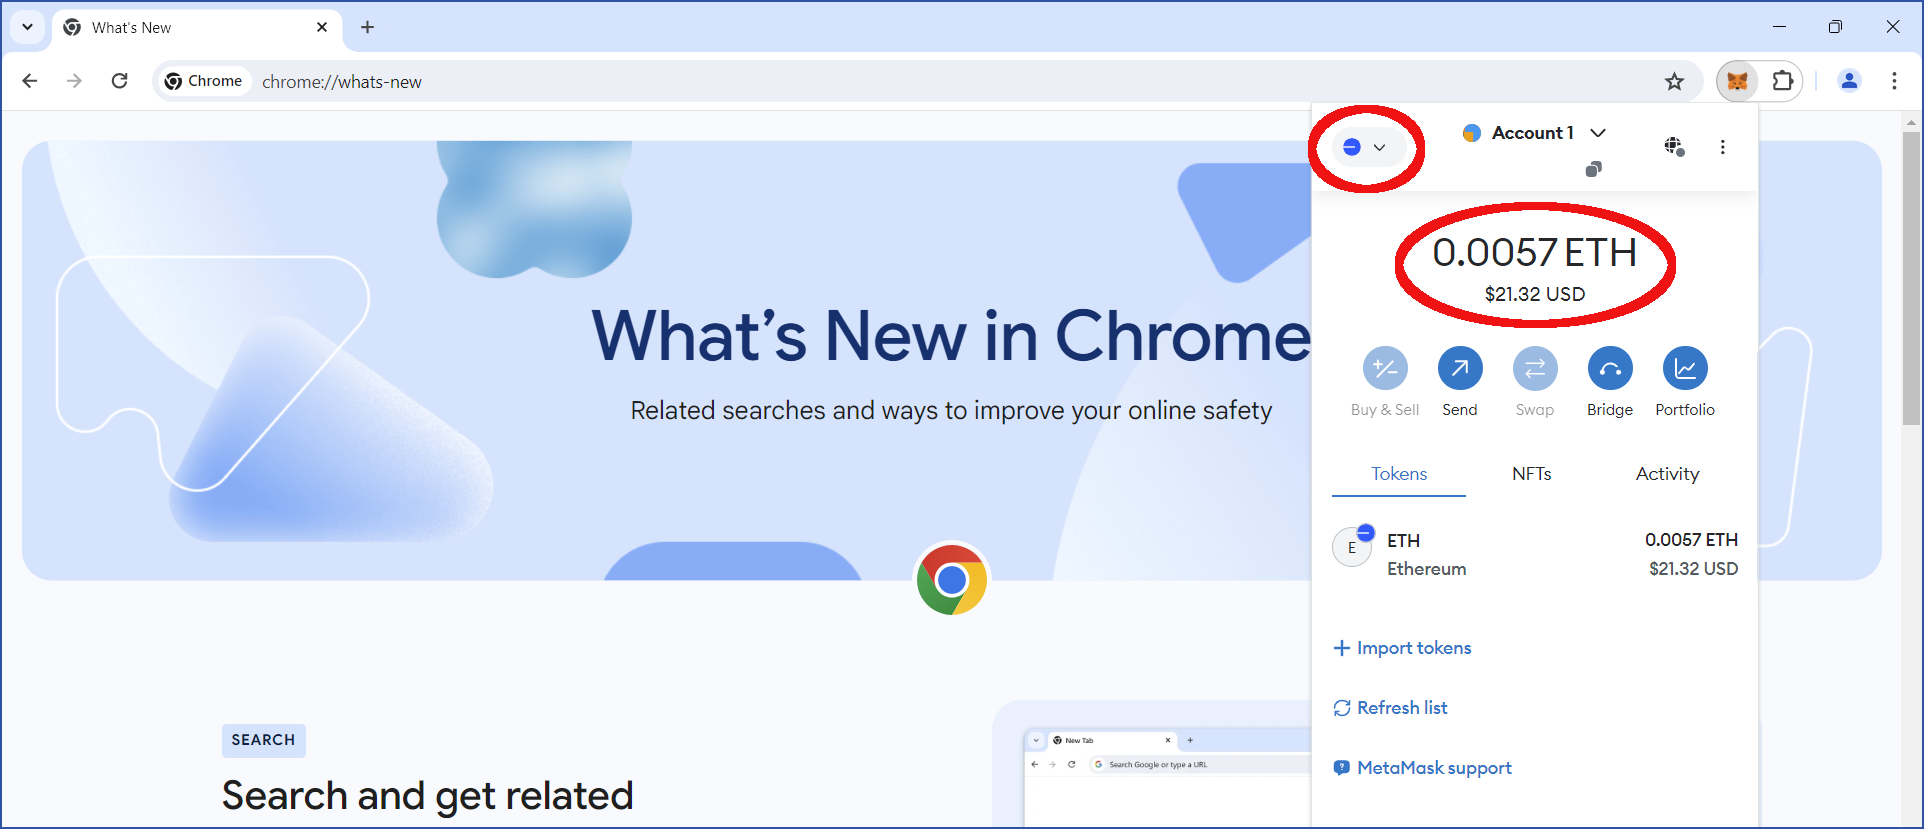
In order to use this wallet for the bridge, you will need to add funds. In this example, the MetaMask wallet was funded with 0.0057 ETH on the Base blockchain:
After your Ethereum wallet has been funded, you can set up a Chia wallet.
Set up a Chia wallet
While several Chia wallets exist, currently the bridge only supports wallets that use WalletConnect, as well as Goby. For this example, we will use the Chia reference wallet. See our wallet guide for instructions on setting up this wallet.
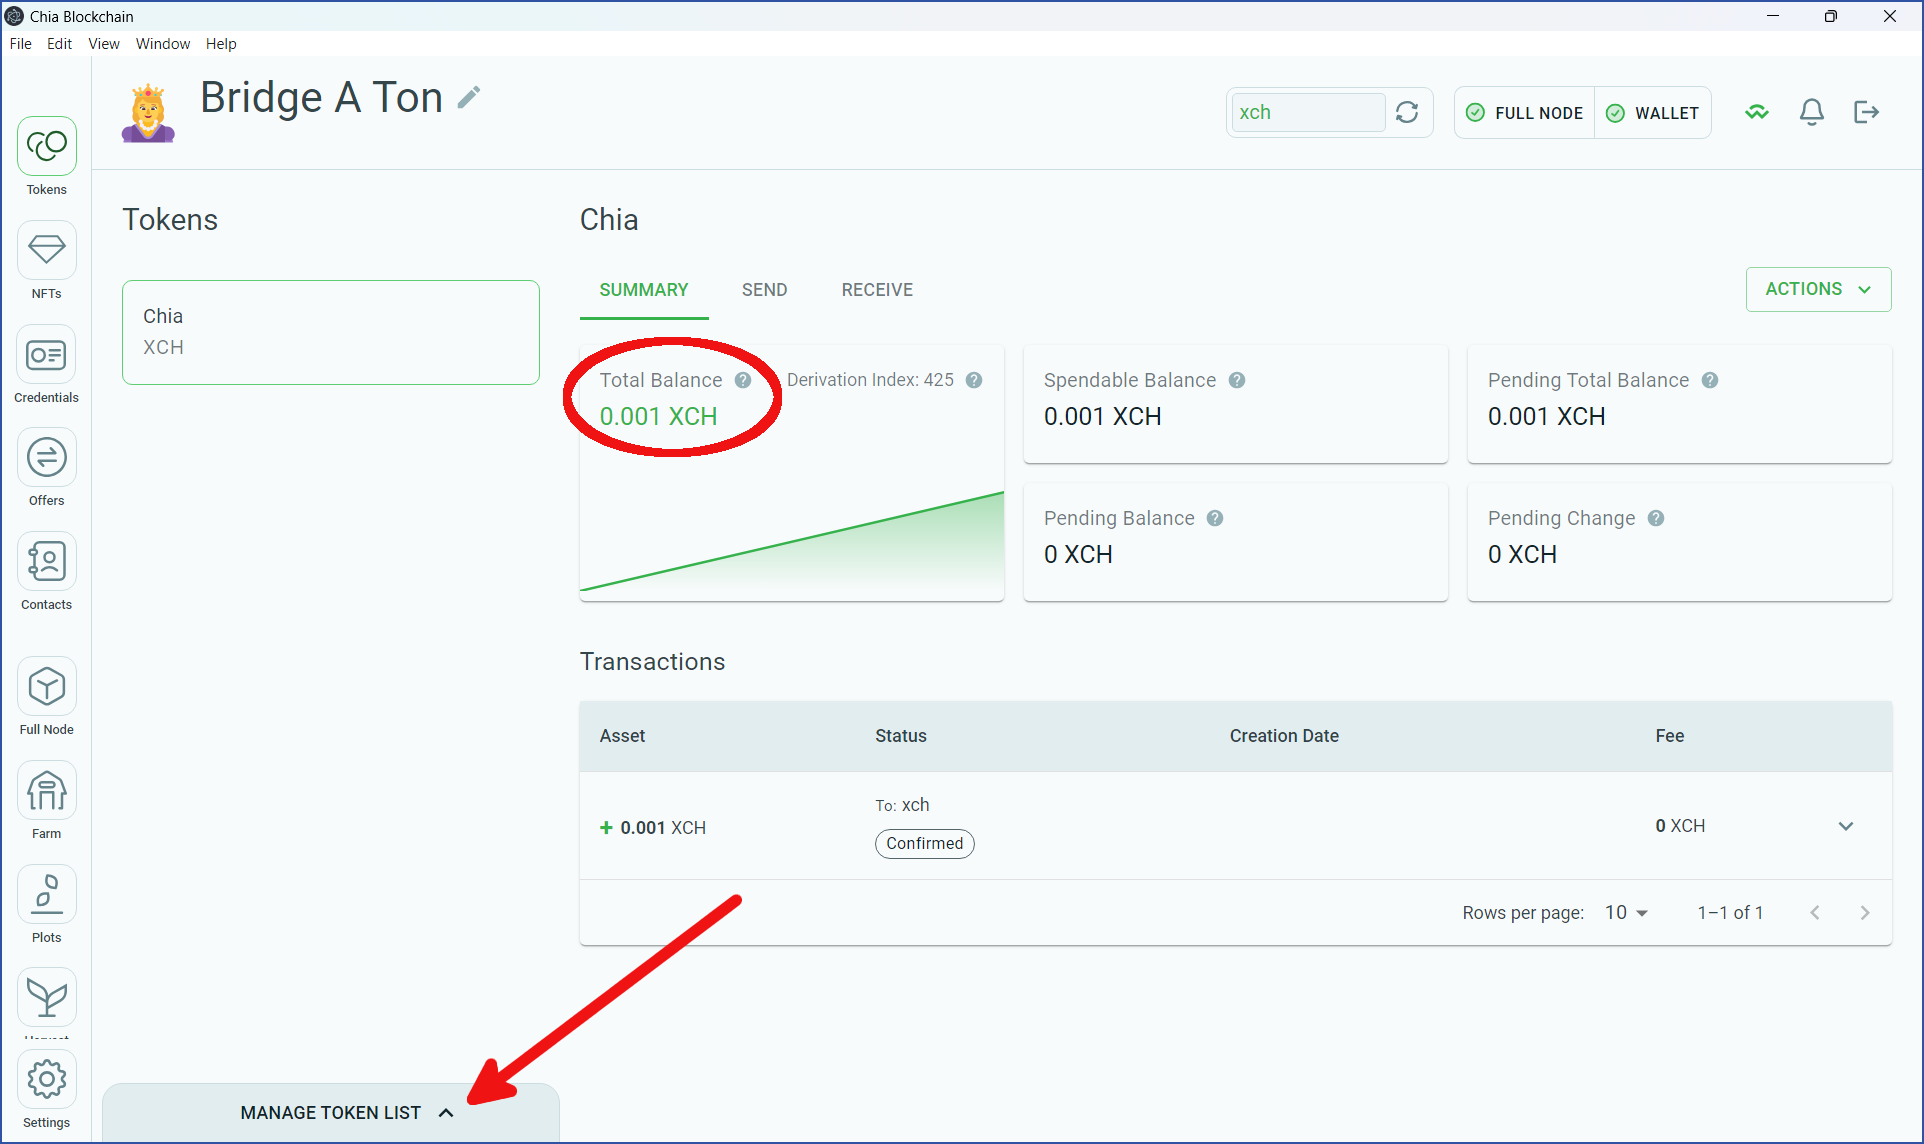
You will need to add some XCH to the reference wallet in order to pay fees. In the image below, the wallet contains 0.001 XCH. Typically, this amount will be sufficient.
We're going to send a wrapped form of ETH to the Chia reference wallet. If you are using Chia 2.3.1 or later, your wallet will automatically recognize the wrapped ETH, but it's still a good idea to add this asset manually.
Regardless of which blockchain you are using, when you receive a bridged token, it will be a "wrapped" version of the native token. The Warp.green bridge calls its tokens "warped" instead of "wrapped". There is no material difference between these two terms; they can be used interchangeably.
Click MANAGE TOKEN LIST:
Locate Base Warped milliETH and click the slider to enable this asset. Feel free to double-check that the asset's ID matches the one from the asset list on Warp.green's website:
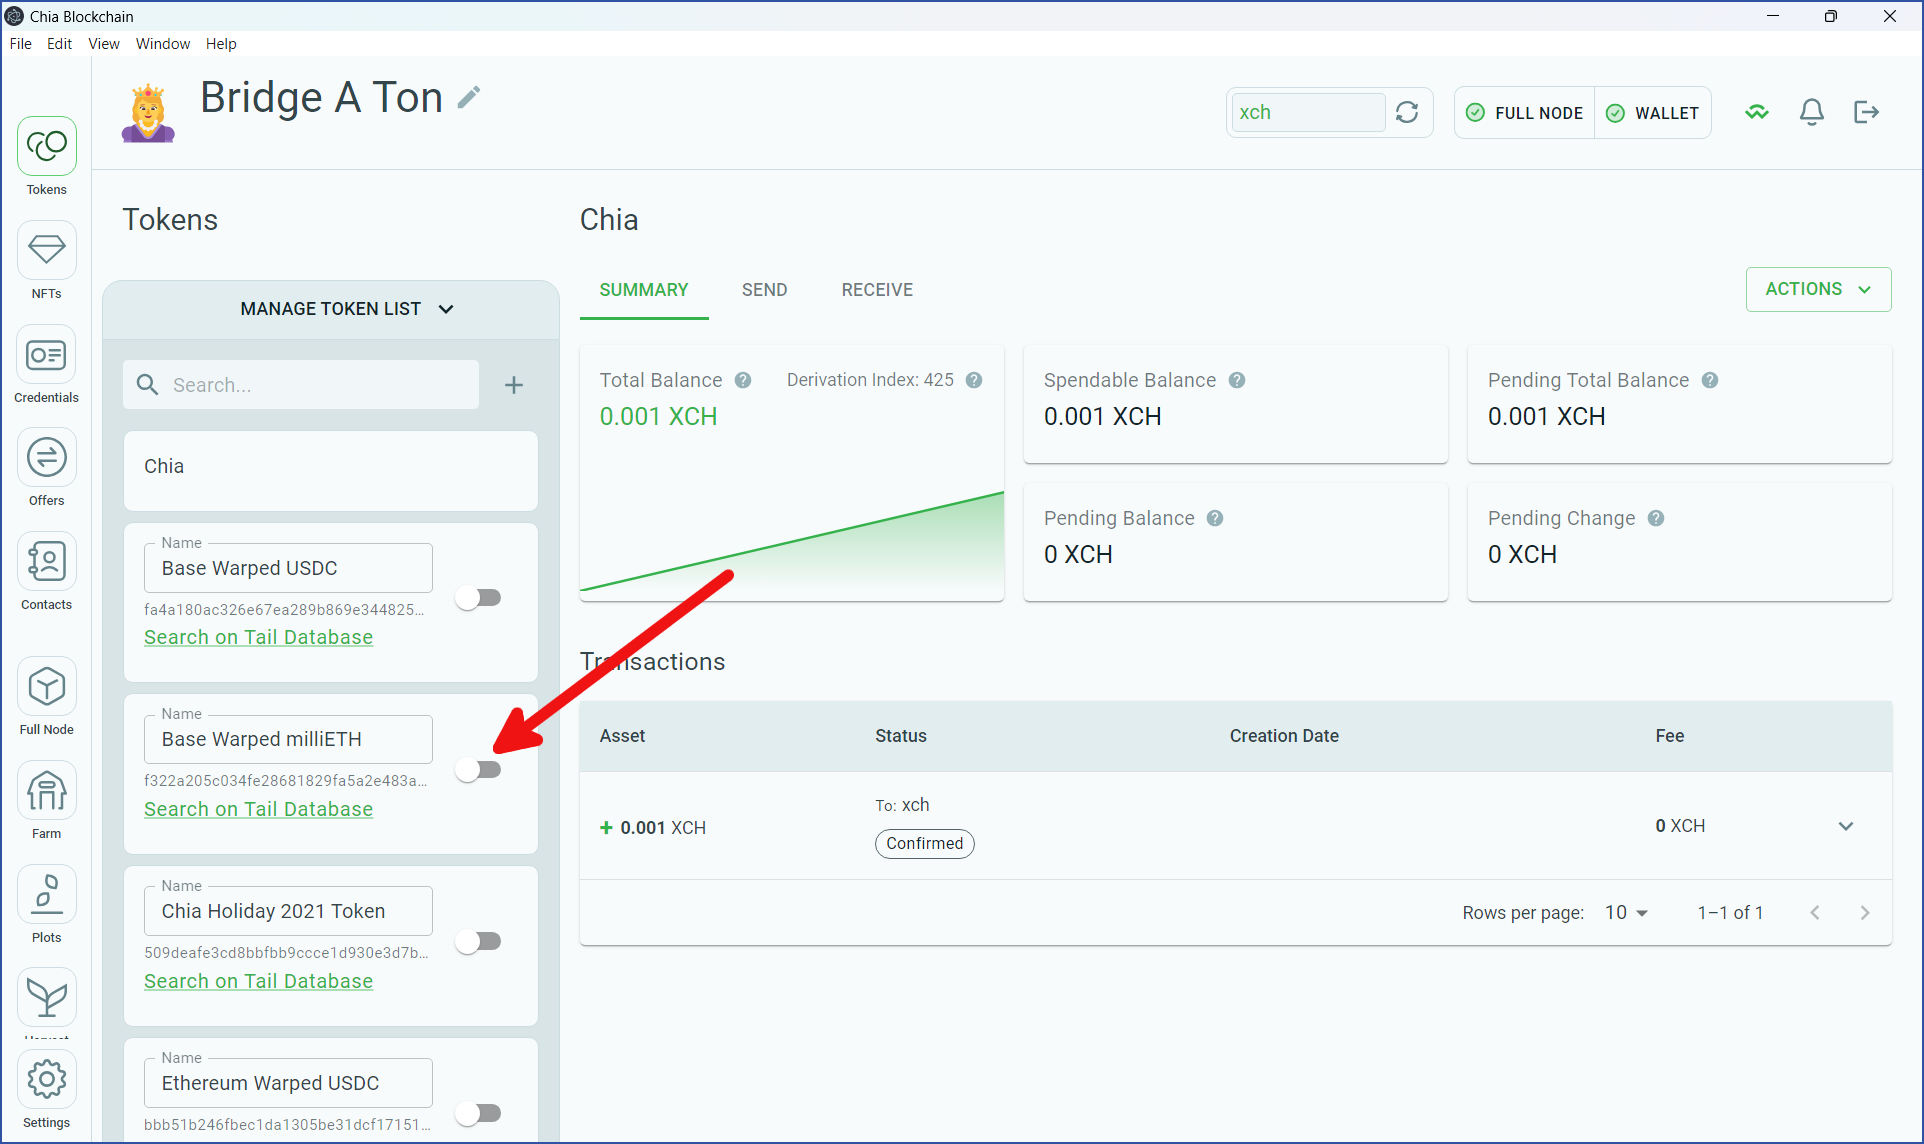
Your wallet will add Base Warped milliETH:
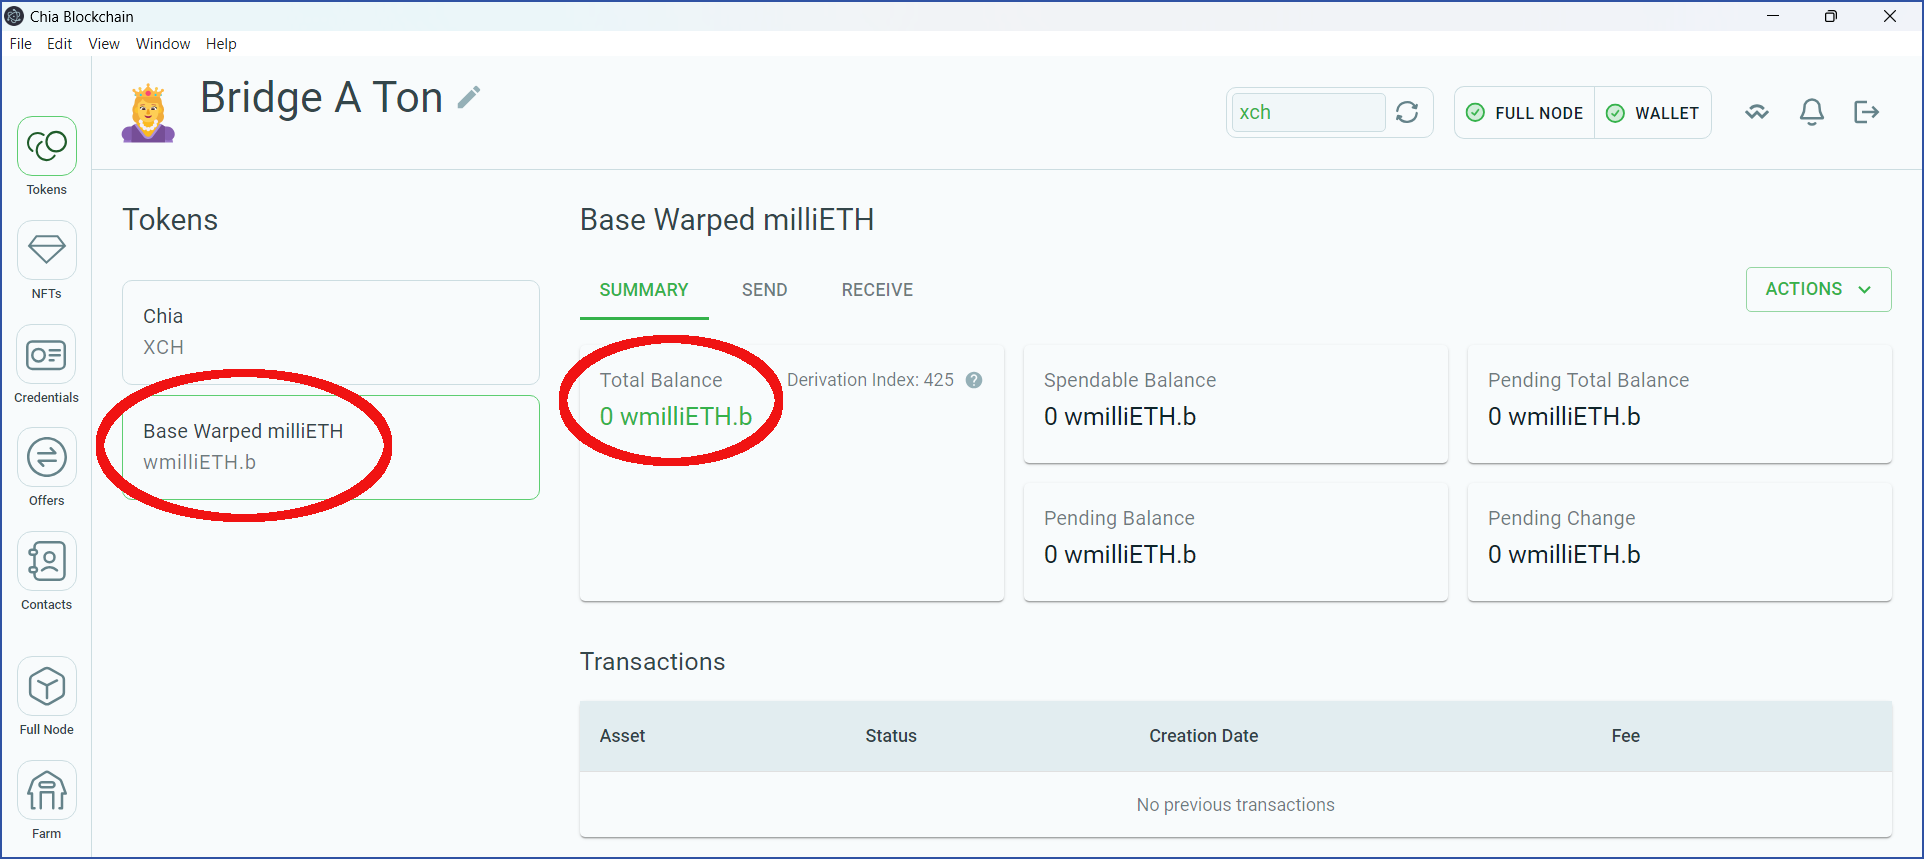
One Base Warped milliETH is the equivalent to 1/1000 of one ETH. This denomination was chosen due to the differences in decimals on Chia and Ethereum.
Connect your wallets to the bridge
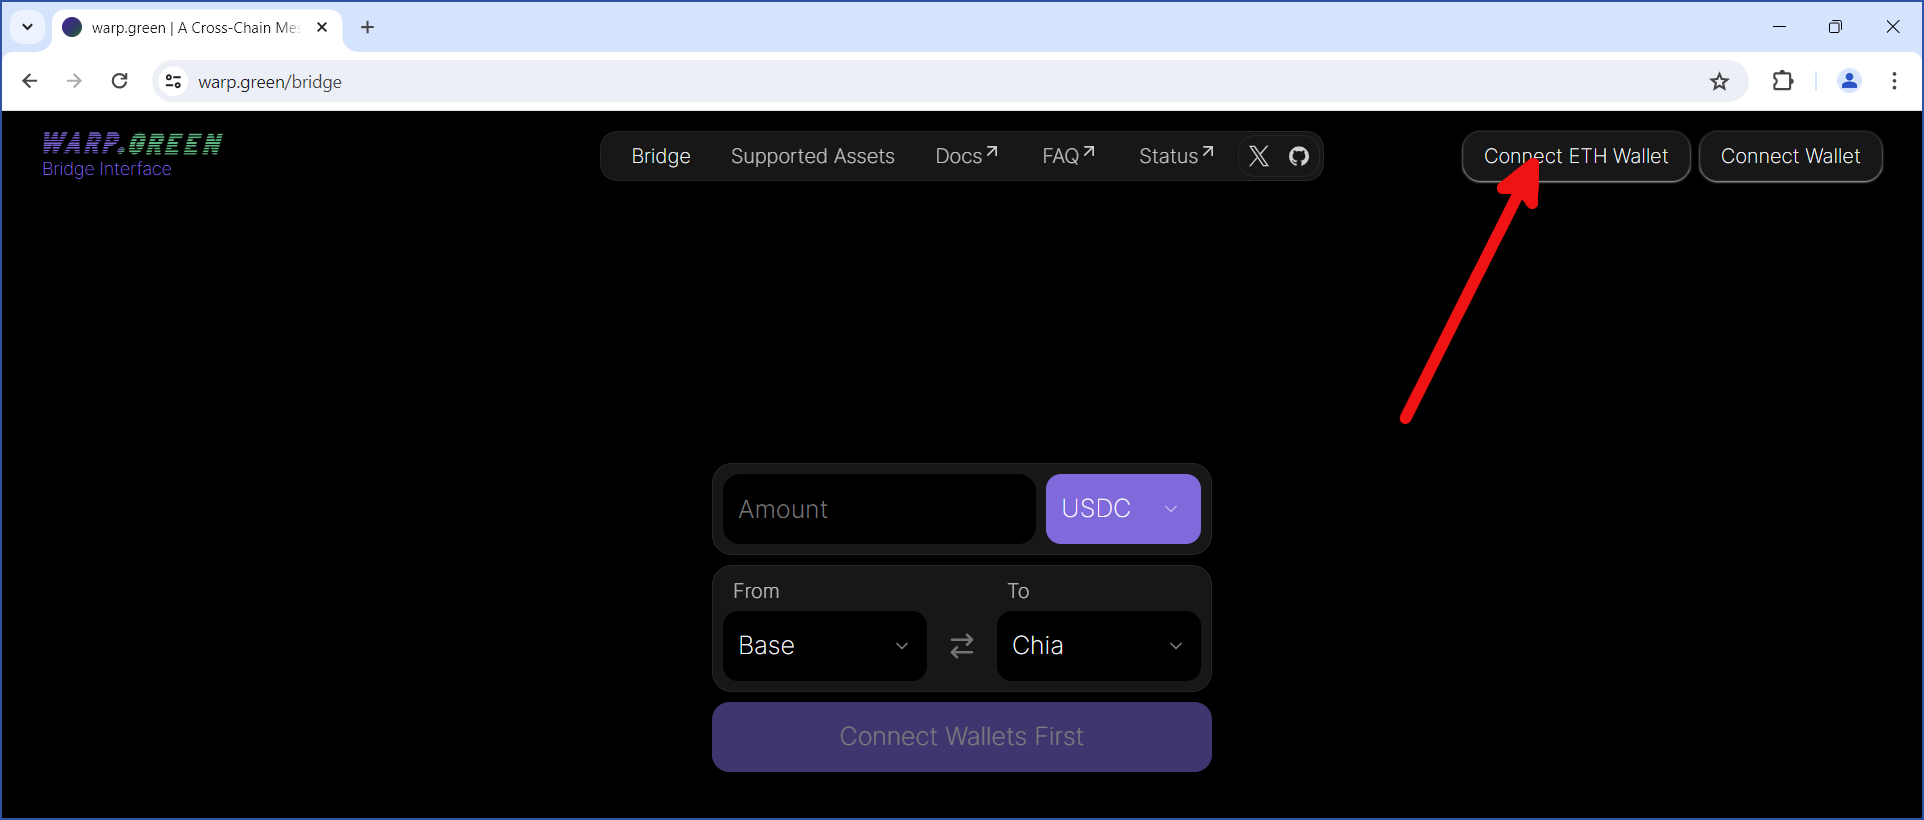
Using the same browser where you installed MetaMask, browse to warp.green/bridge. In order to use the bridge, you will need to connect both of your wallets.
Connect your ETH wallet
Click Connect ETH Wallet:
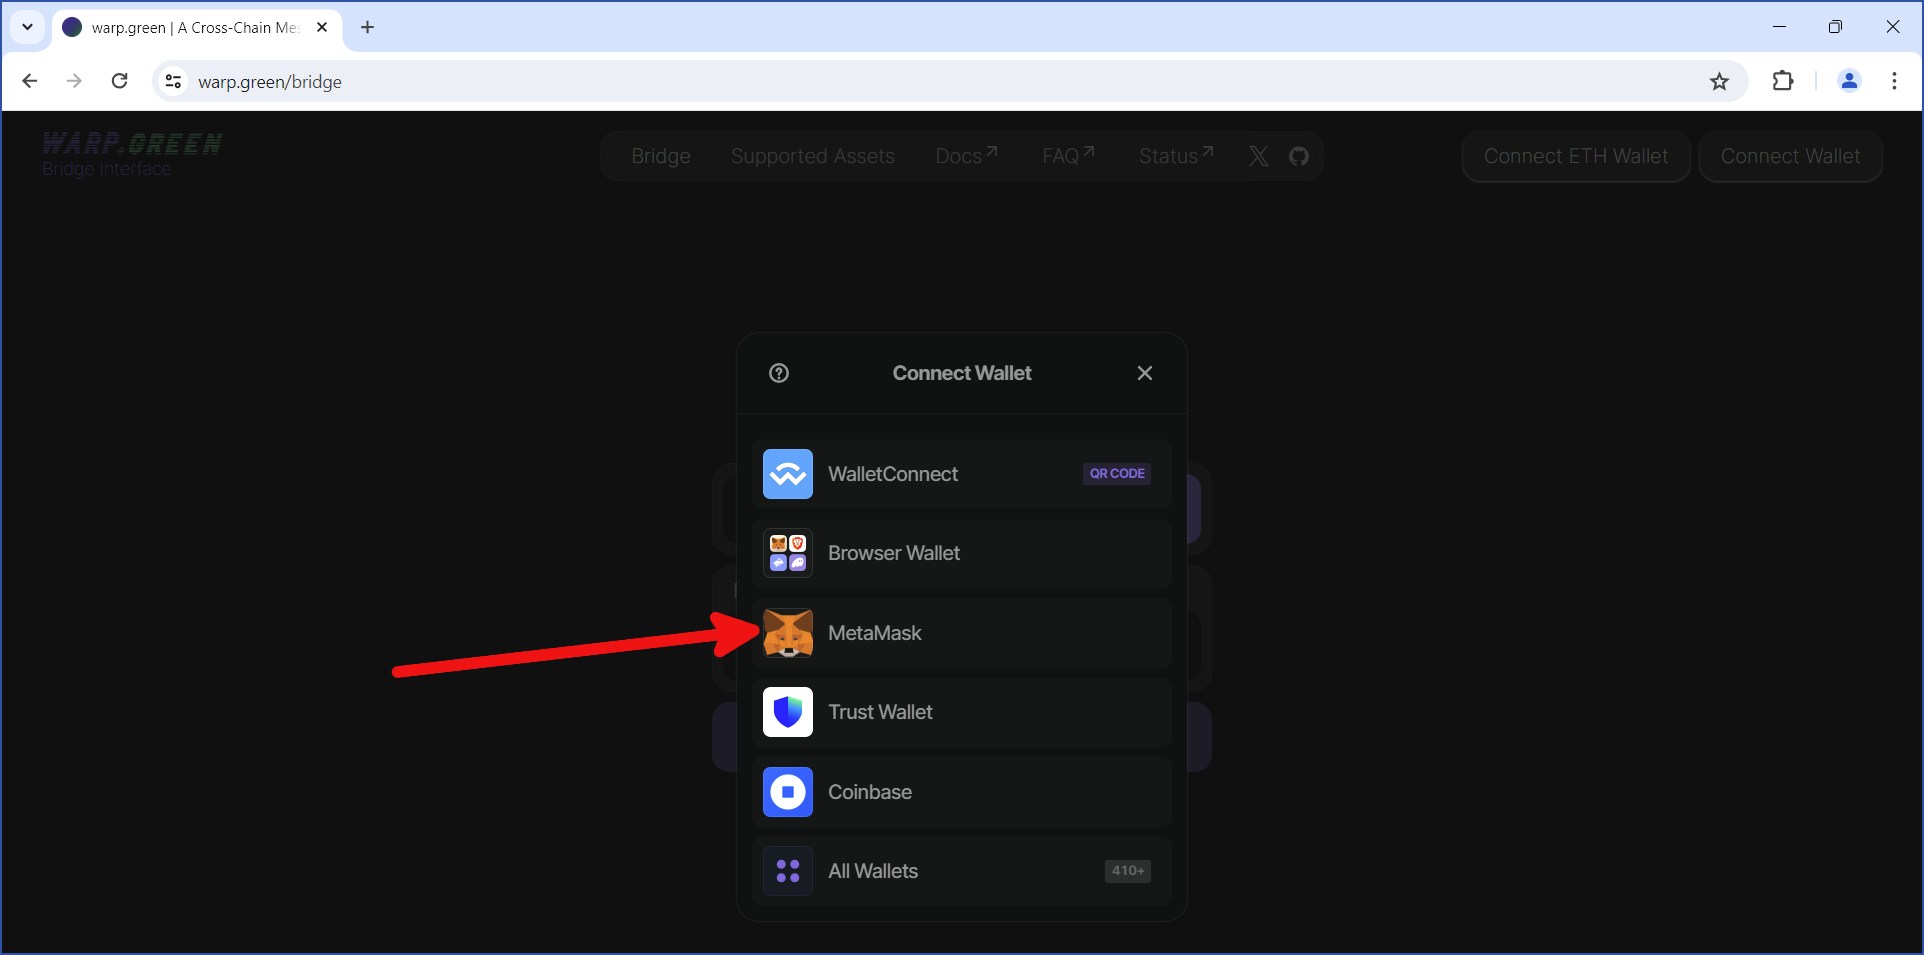
Click MetaMask (or whichever wallet you used on the Ethereum side):
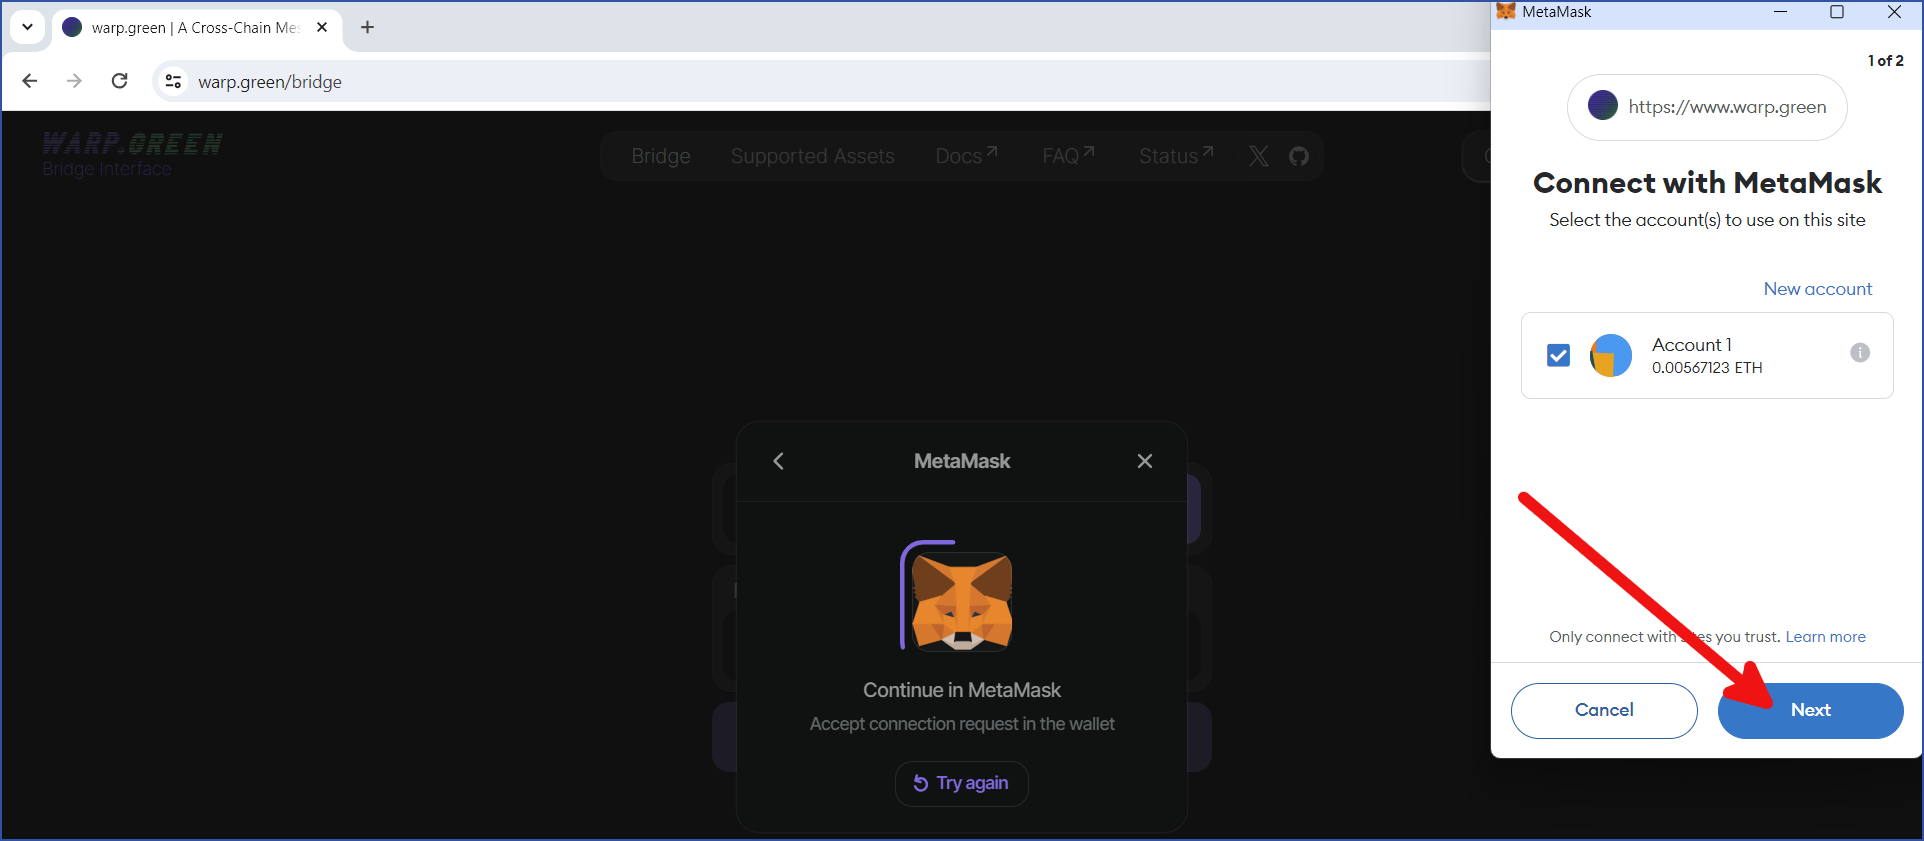
Select the account(s) you want to connect to the bridge. If you just installed MetaMask, there will only be one account. Click Next:
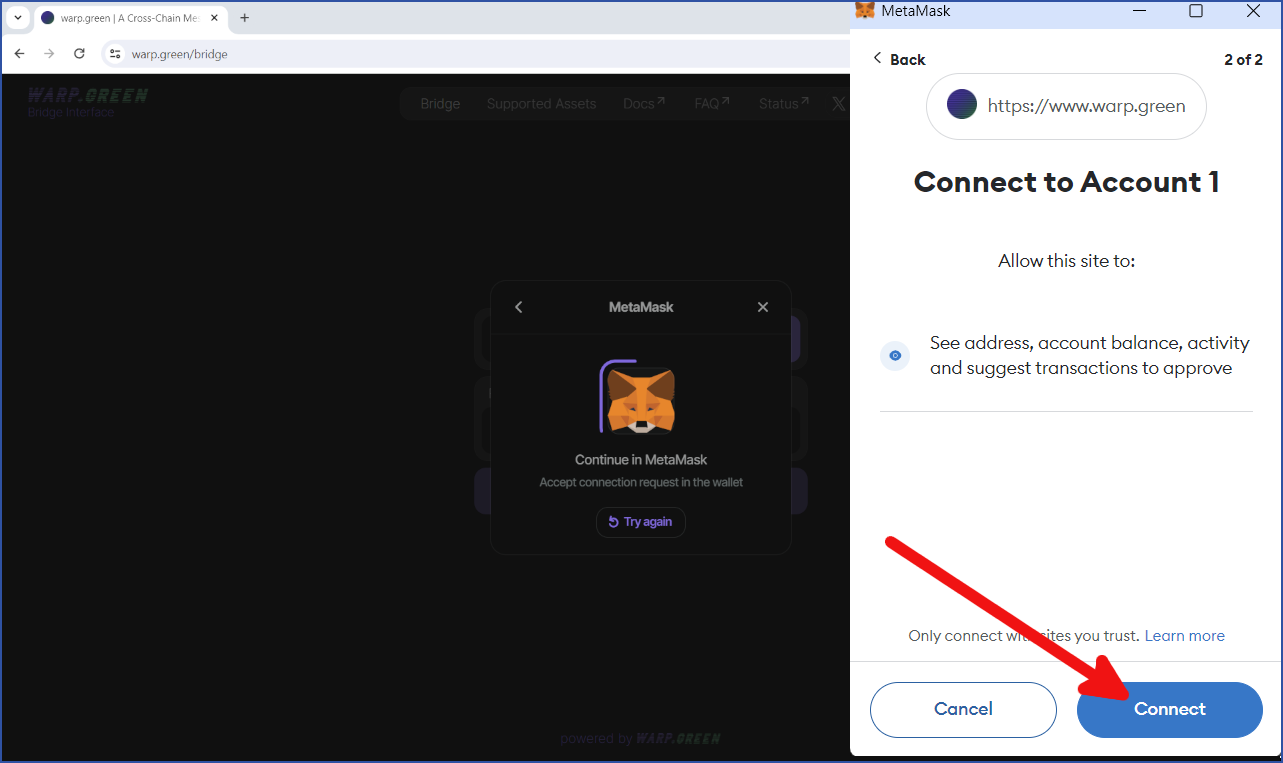
Click Connect to connect your MetaMask wallet to the bridge:
Your MetaMask wallet is now connected to the bridge.
Connect your Chia wallet
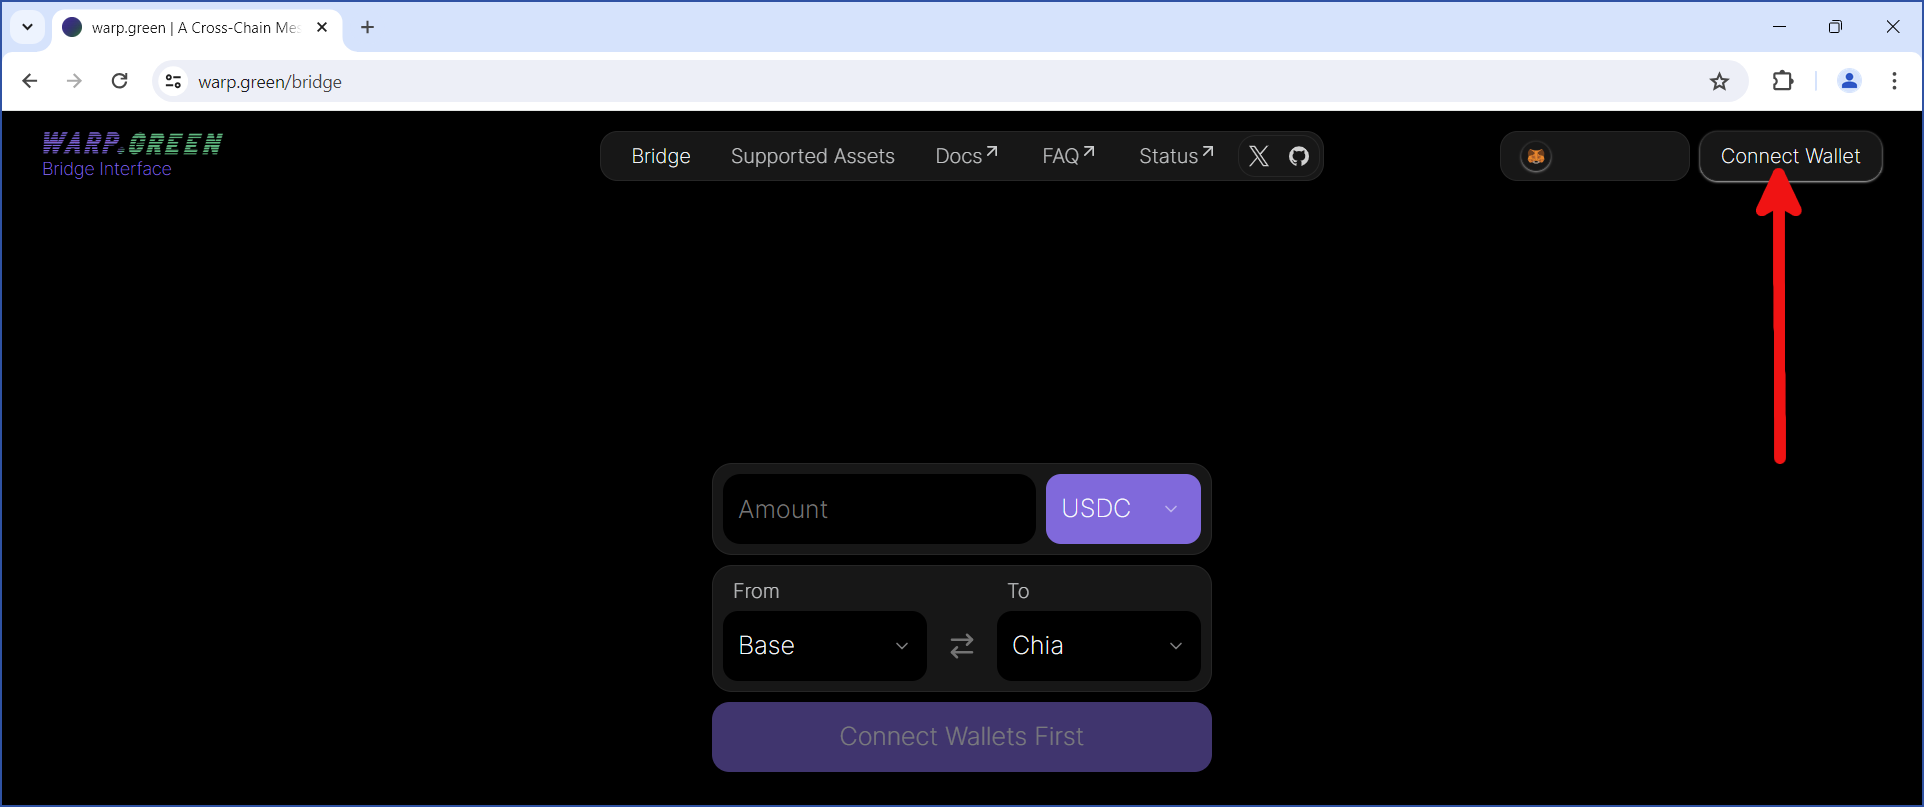
Click Connect Wallet:
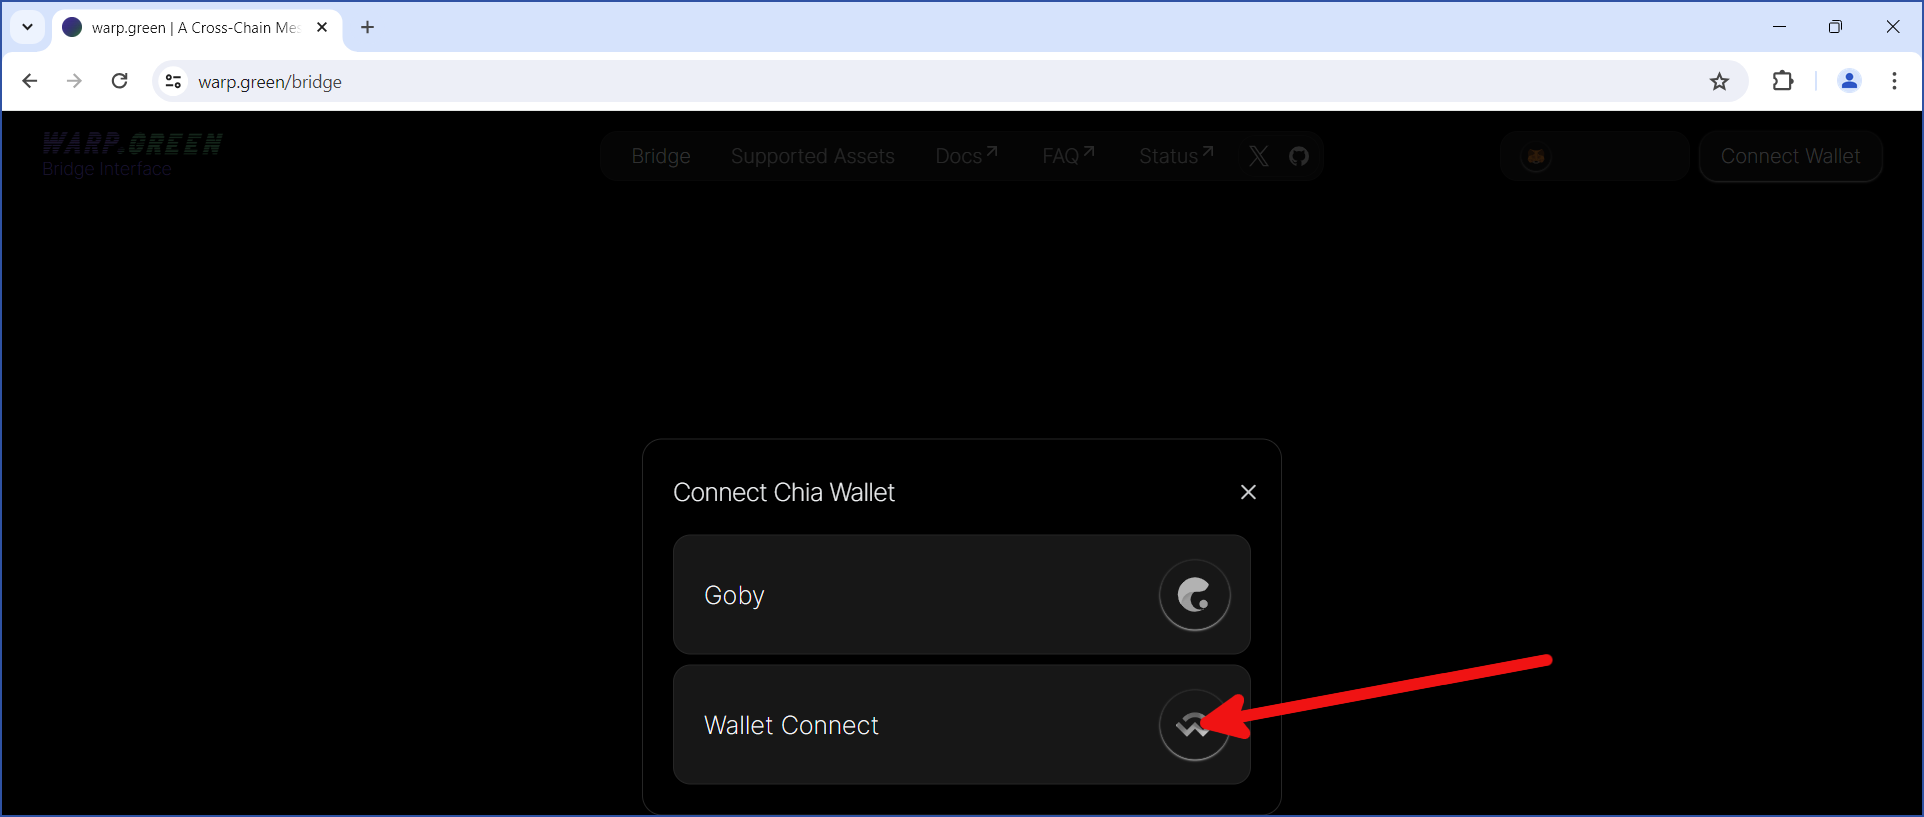
Click Wallet Connect if you are using the Chia reference wallet:
You will be shown a QR code (not shown here). In this example, we'll click the Copy Link button.
Next, open your reference wallet, click the WalletConnect icon ("1" in the image below), then click ADD CONNECTION ("2"):

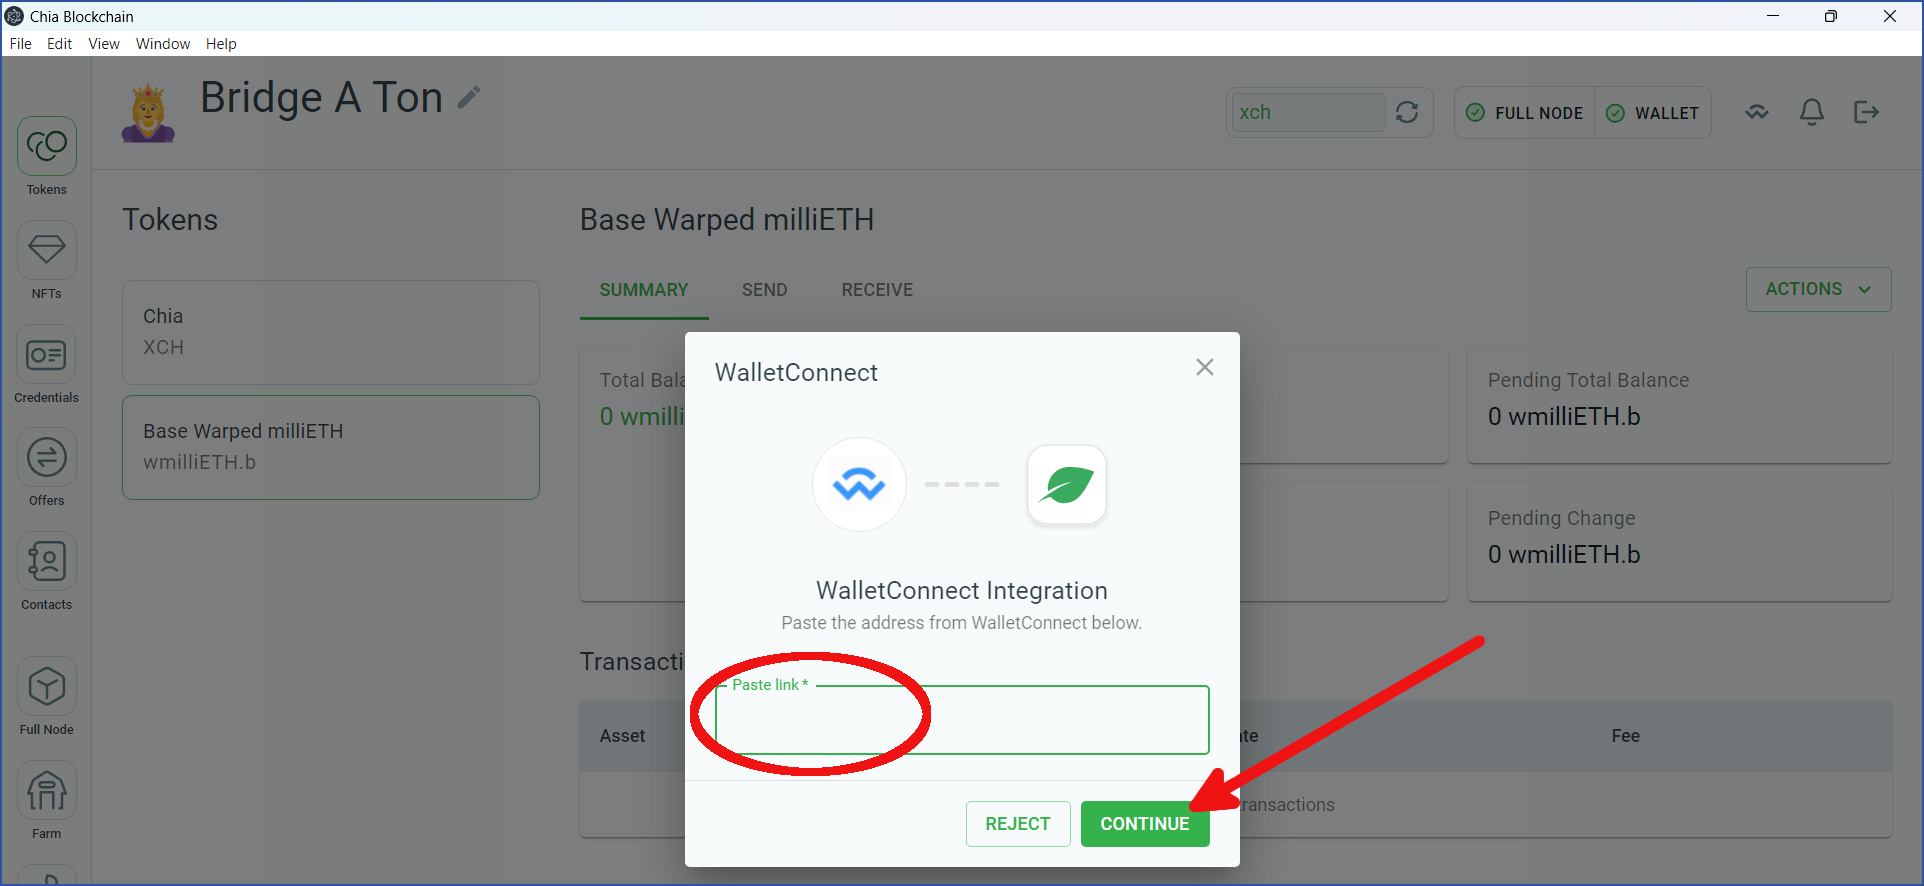
Paste the link you previously copied, and click CONTINUE:
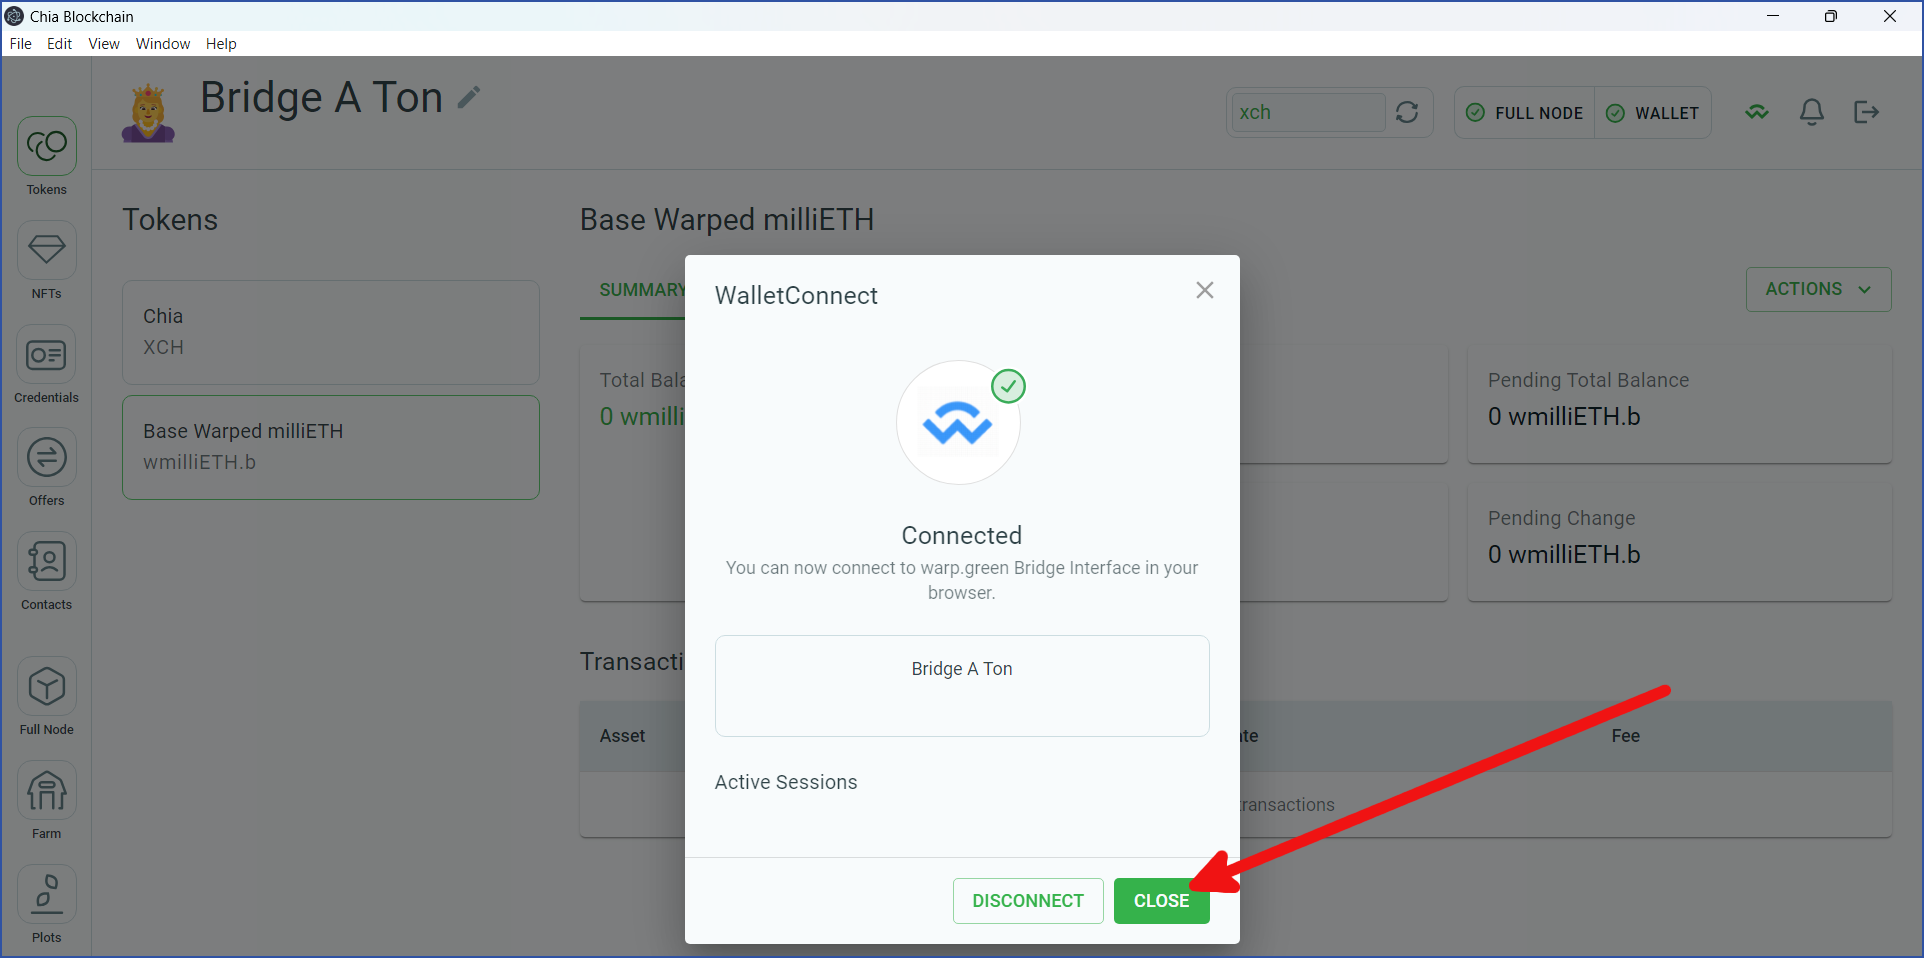
Your Chia reference wallet will now be connected to the bridge. Click CLOSE:
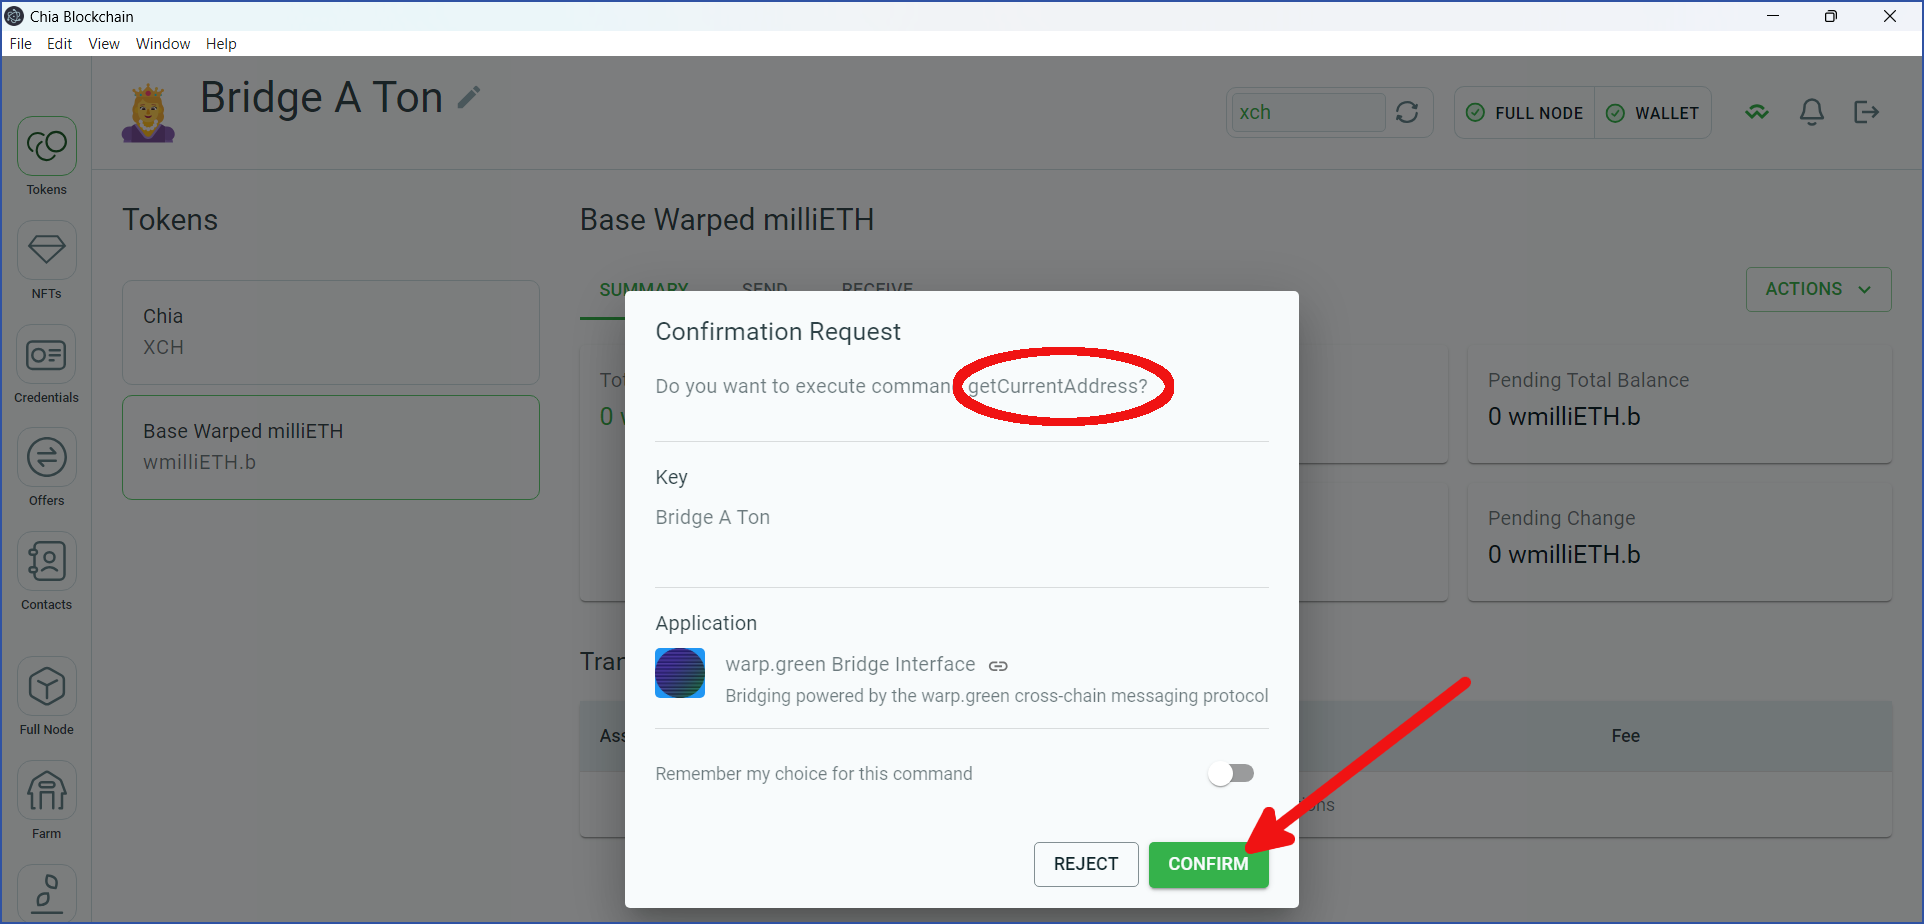
The bridge will request an address from your wallet. It may perform other requests as well. Click CONFIRM for each request:
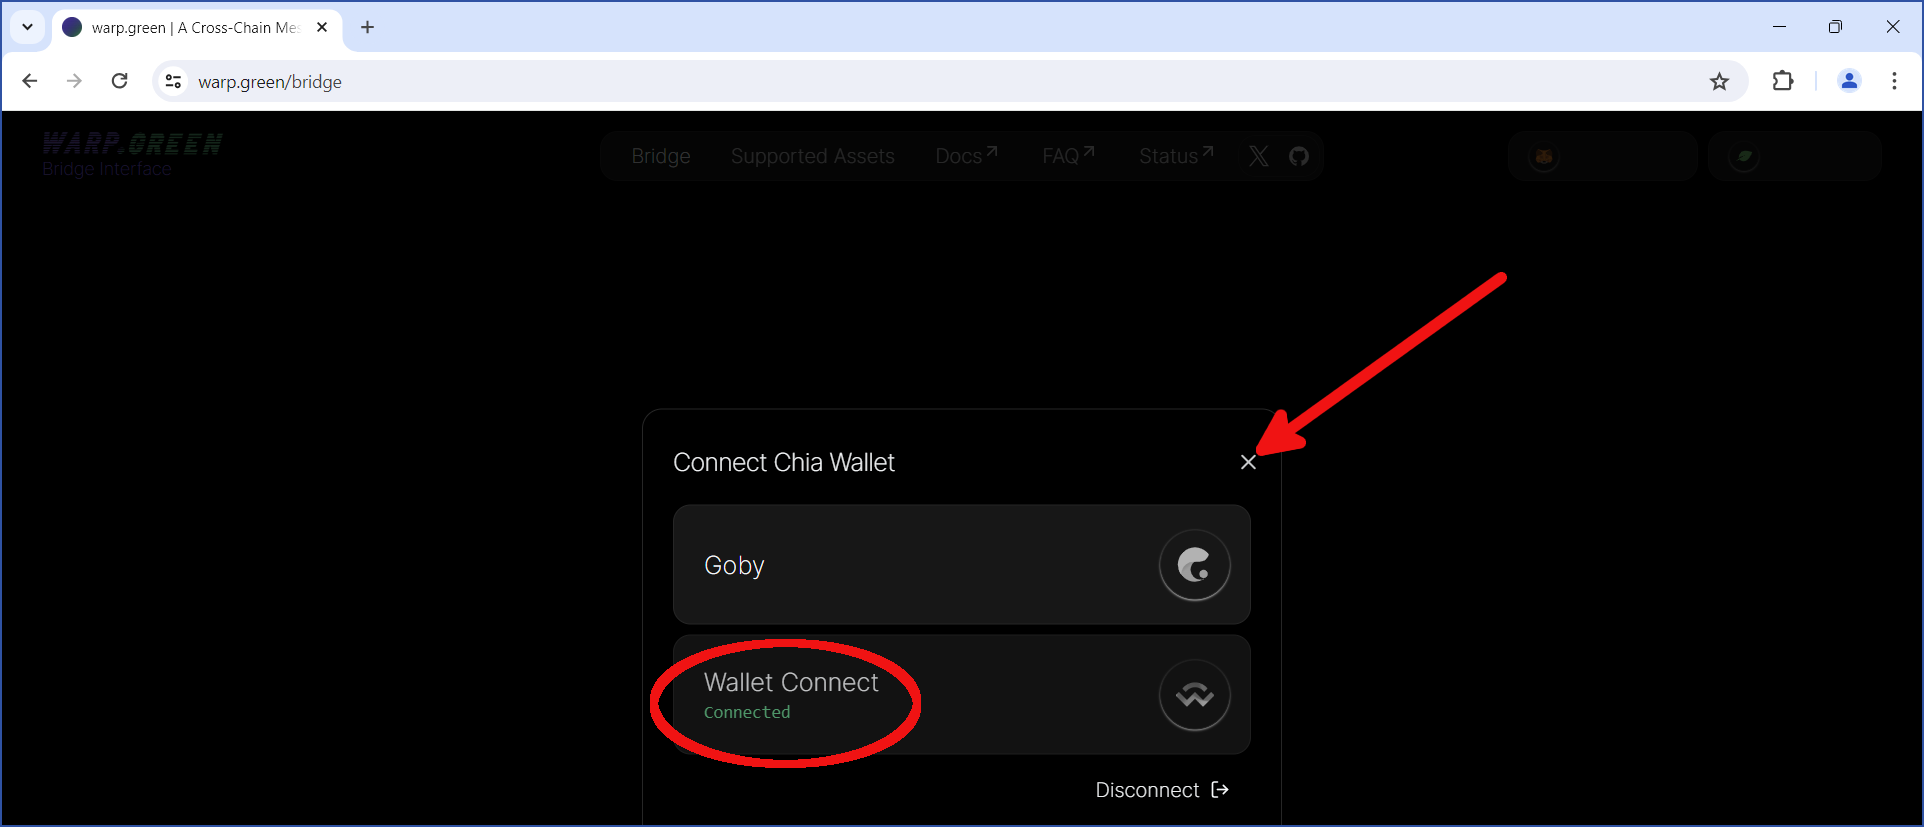
Return to your web browser. You should see Connected displayed under Wallet Connect. If so, you can close this dialog:
Initiate the transfer
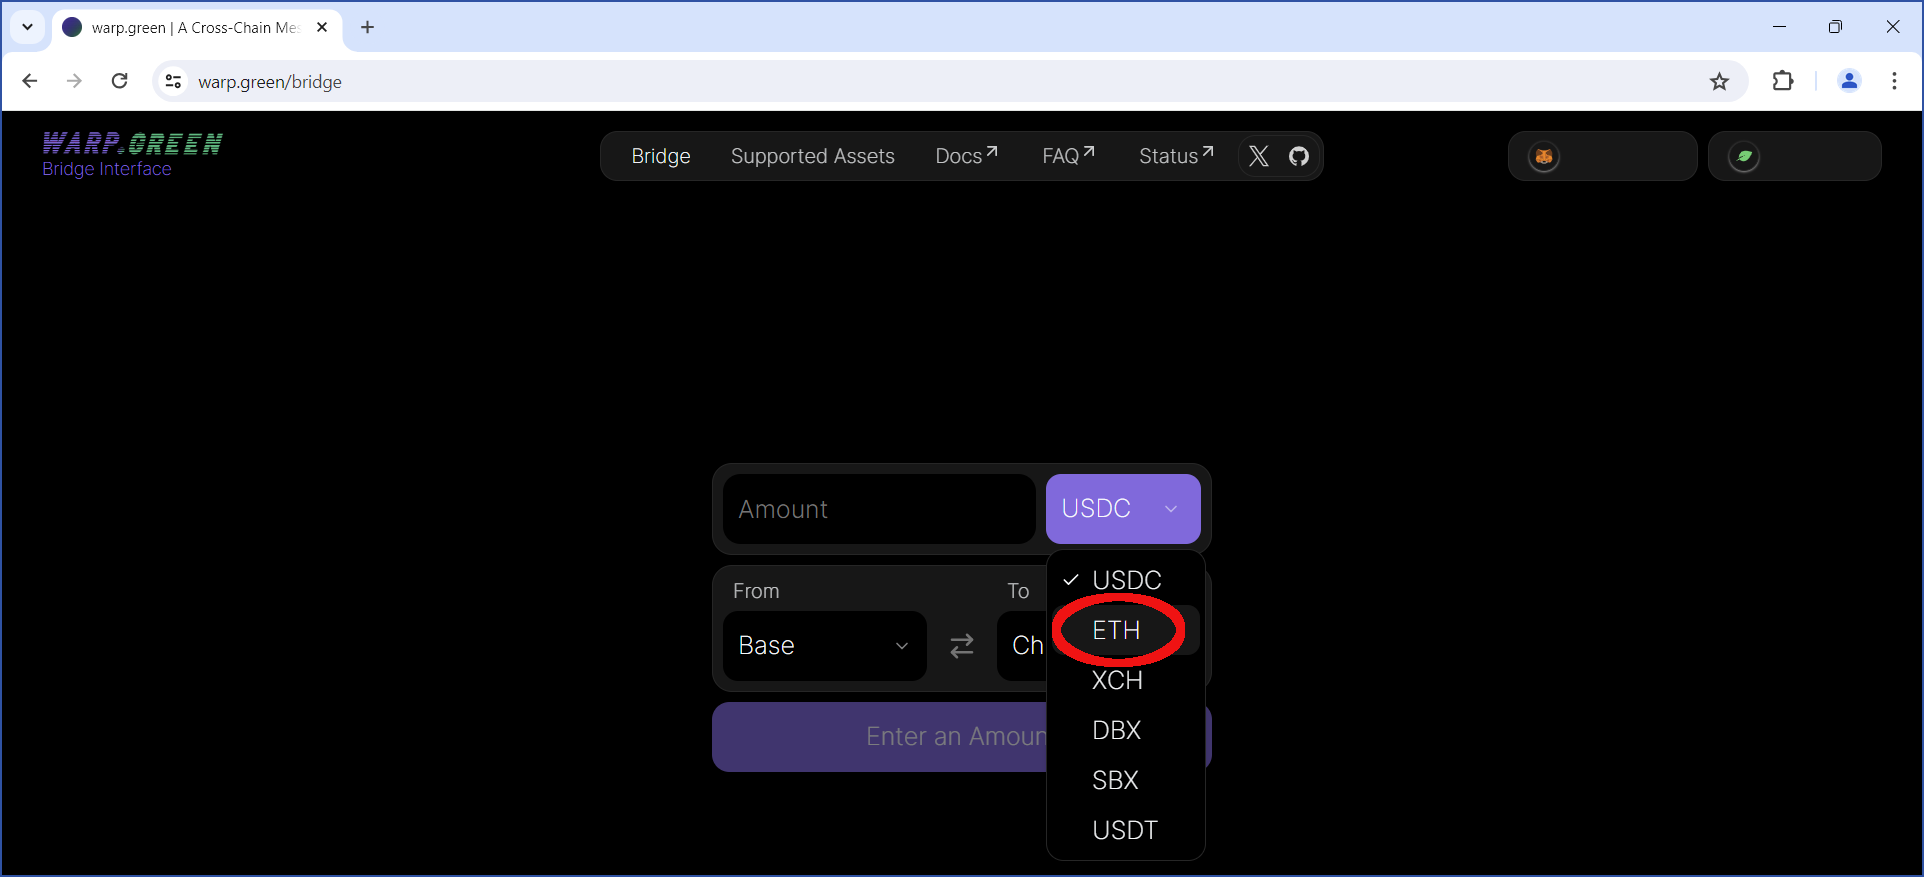
The bridge will ask you to enter an amount to transfer. By default, the asset to transfer will be USDC. However, in this example, we will transfer ETH:
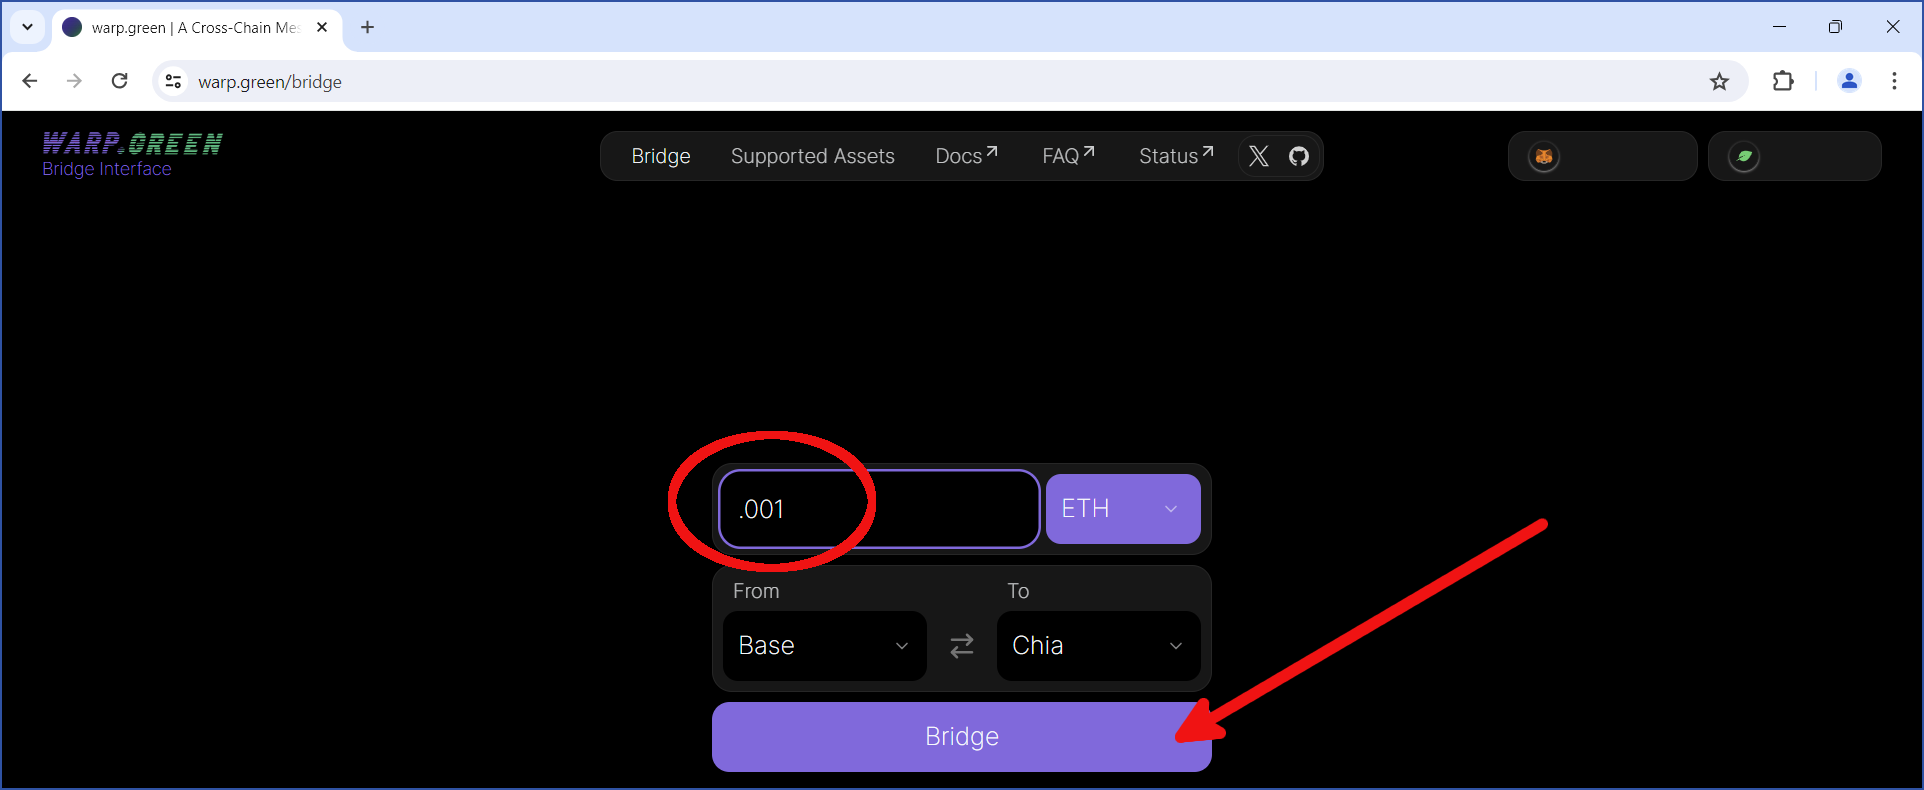
Enter the amount to transfer. Also, verify that the From and To chains are accurate. For this example, we will transfer 0.001 ETH from Base to Chia.
The Base blockchain will charge a fee, so you will not be able to send the full amount in your MetaMask wallet. In this example, 0.00000465 ETH was the required fee. This fee will vary, depending on which blockchain you are using, and how busy the network is.
After you have verified this info, click Bridge:
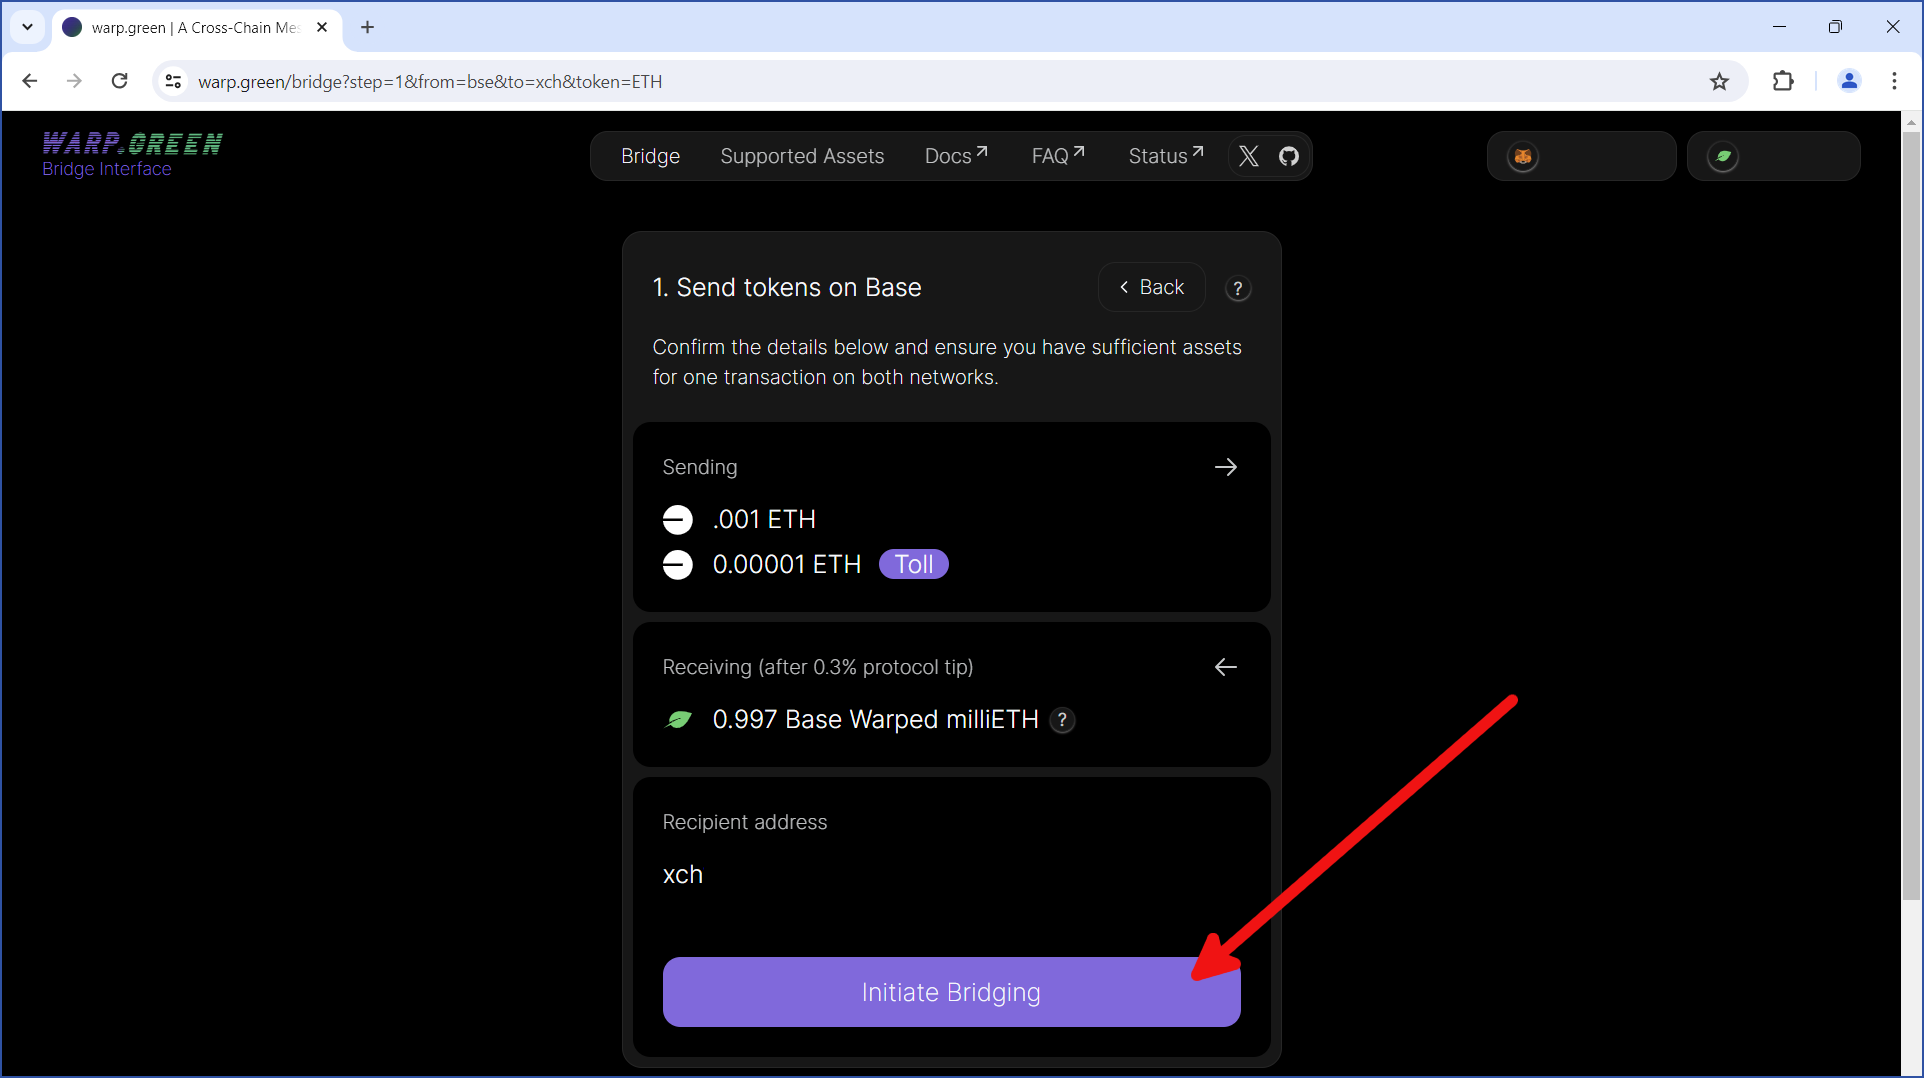
In Step 1 of the transfer, you will be given one more chance to verify the accuracy of everything you have entered.
Be sure to read this dialog carefully, and verify that all information contained within is accurate.
Several fees may apply when using the bridge:
Each blockchain charges a fee to use its network. The size of each fee depends on how busy the network is, as well as how long you are willing to wait for your transaction to be confirmed. Generally speaking, the fees on Base are significantly lower than those on Ethereum. On Chia, the network is often not busy enough to require any fees.
In addition, a "toll" is automatically deducted for using the bridge. The toll is a small charge (either 0.001 XCH or 0.00001 ETH, depending on the chain where the transaction originated), collected solely to prevent network spam. This money does not go to the bridge or to its operators. Instead, it is redirected to the farmer/miner of the block which includes your transaction.
Finally, the bridge itself charges a 0.3% tip for using the protocol. This tip is split among the bridge validators and helps to cover the costs associated with maintaining the bridge.
For more information, see warp.green's documentation.
If everything looks good, click Initiate Bridging:
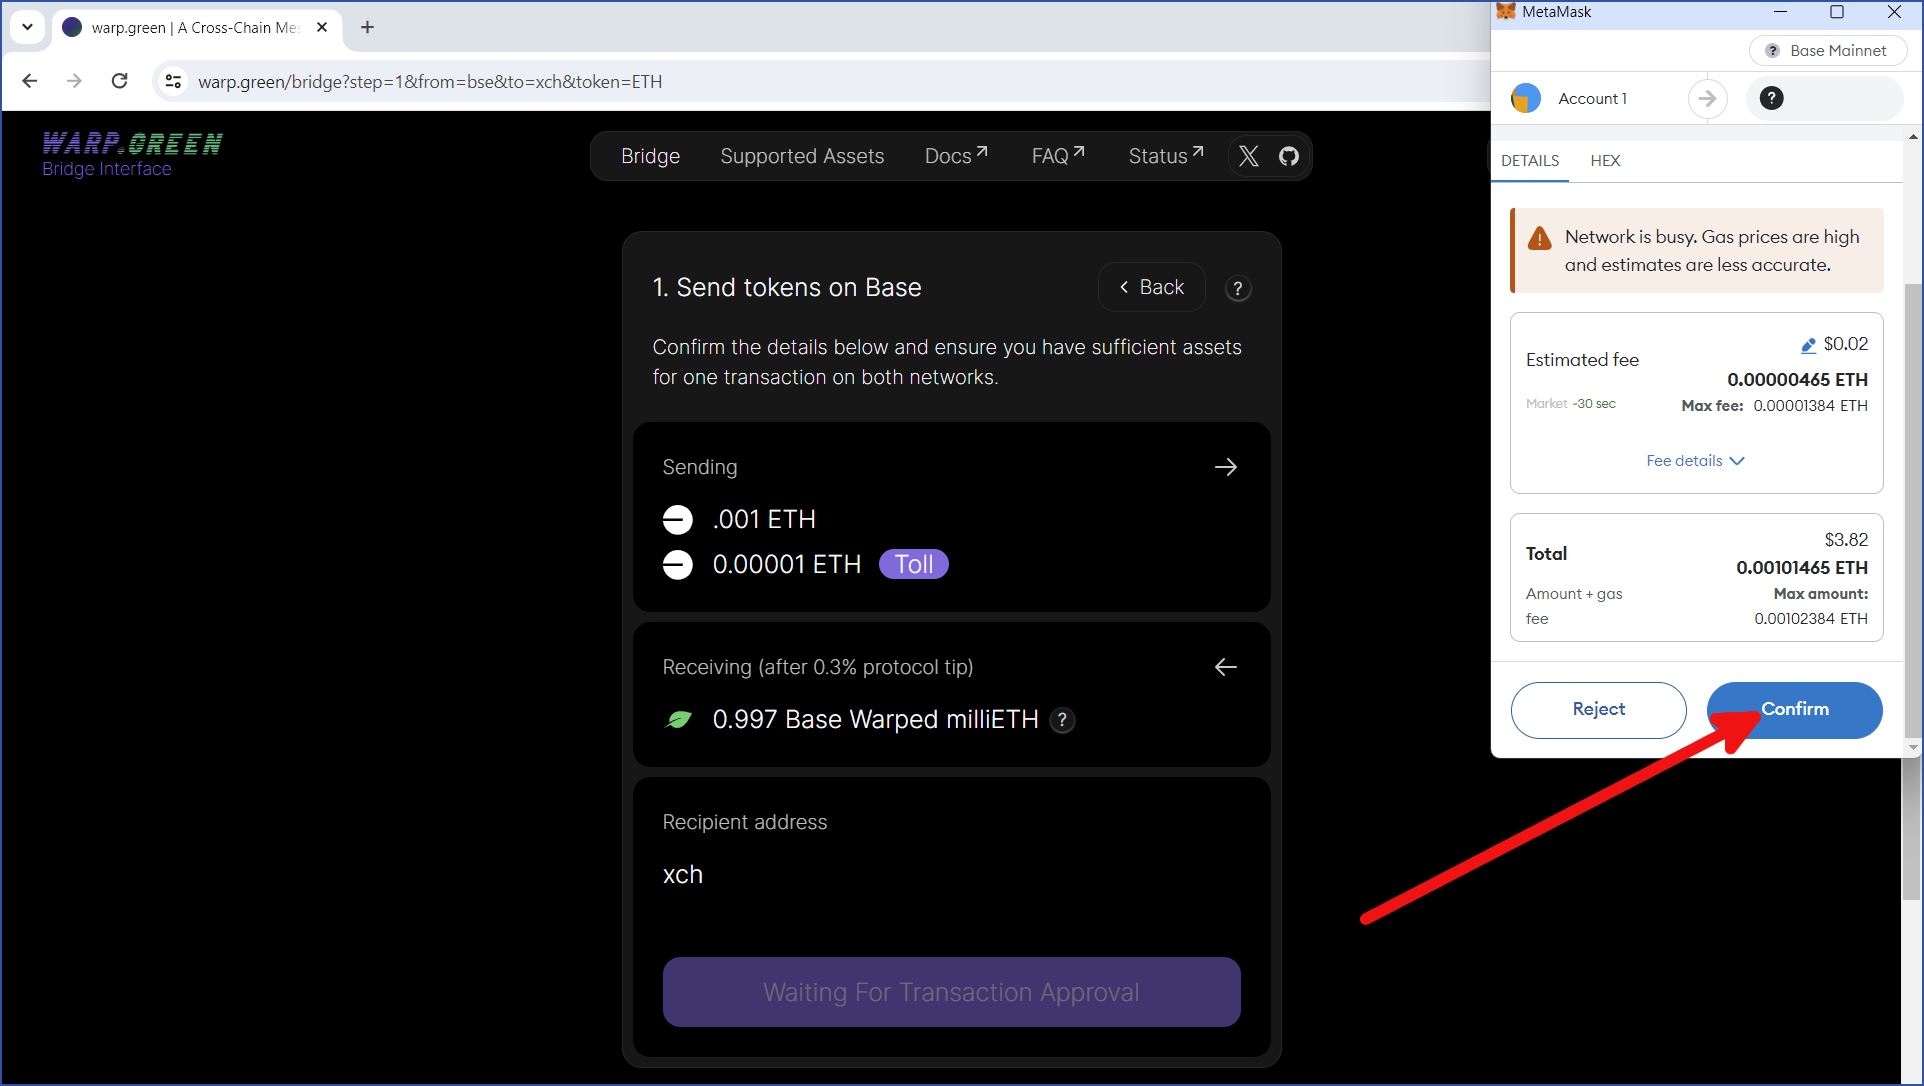
MetaMask will pop up, and you will be shown the details of your transfer. This includes the current blockchain fee amount. Click Confirm to accept the fee and initiate the transfer:
You will now be taken to Step 2 of the transfer. Before completing the transfer, you will need to wait around 10-15 minutes; the exact time can vary a bit. The reason for this delay is to avoid funds being lost in blockchain reorgs:
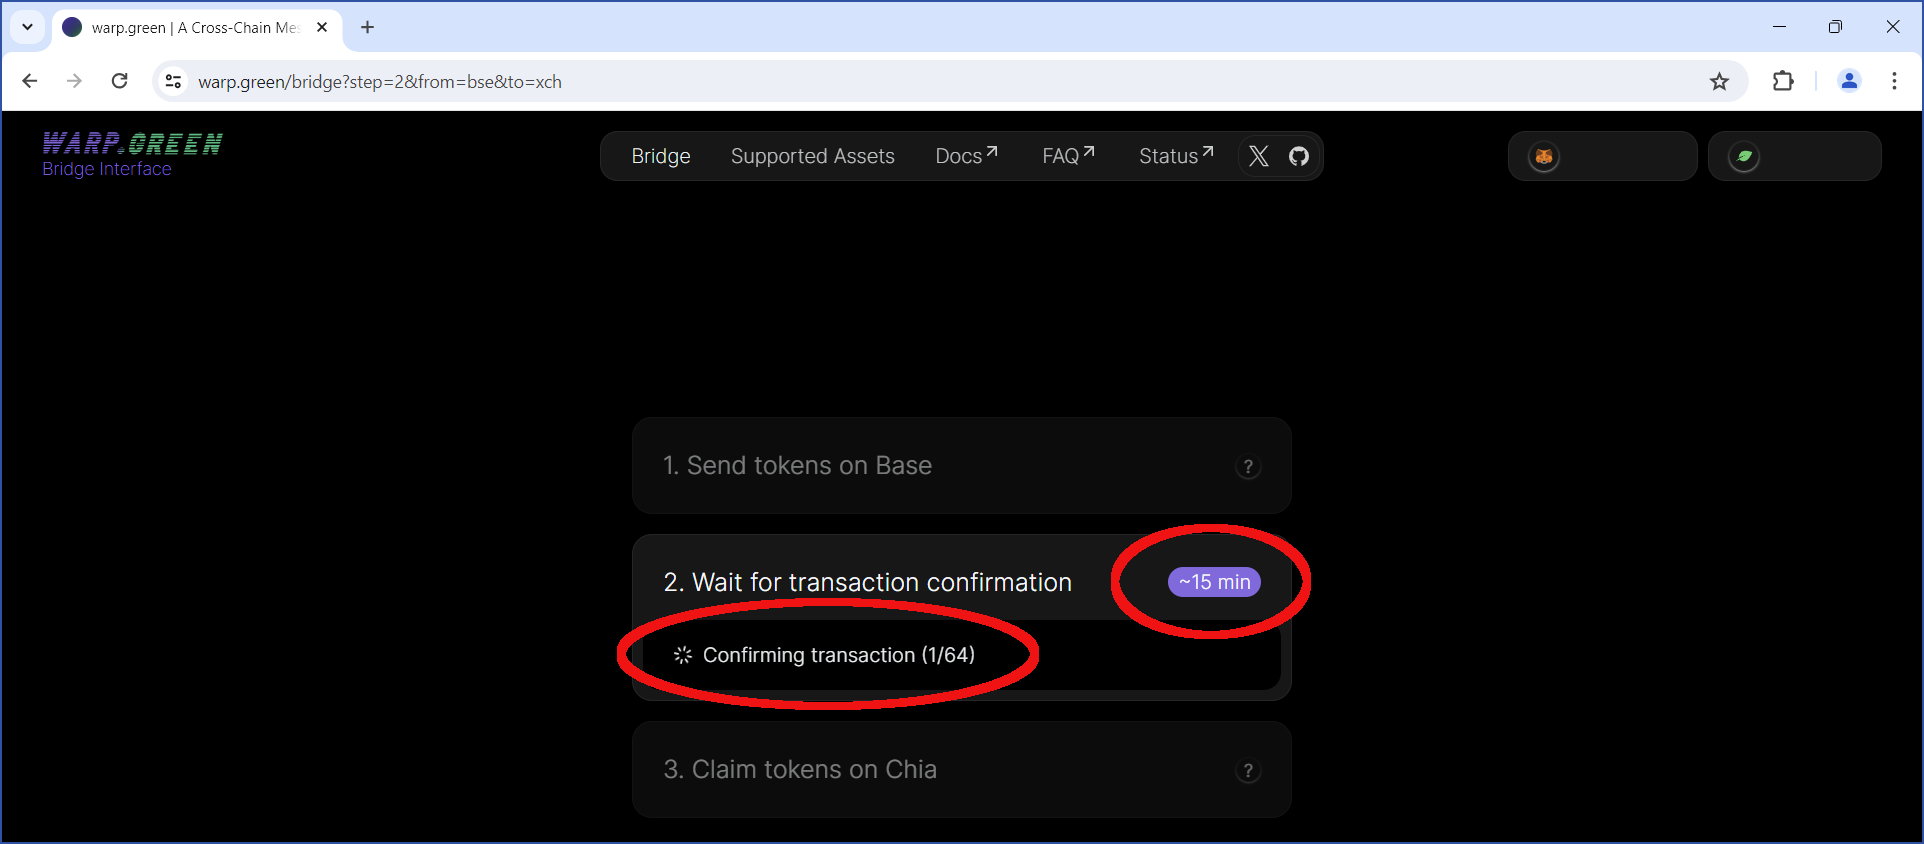
Leave this browser window open, and return to it after 15 minutes.
Complete the transfer
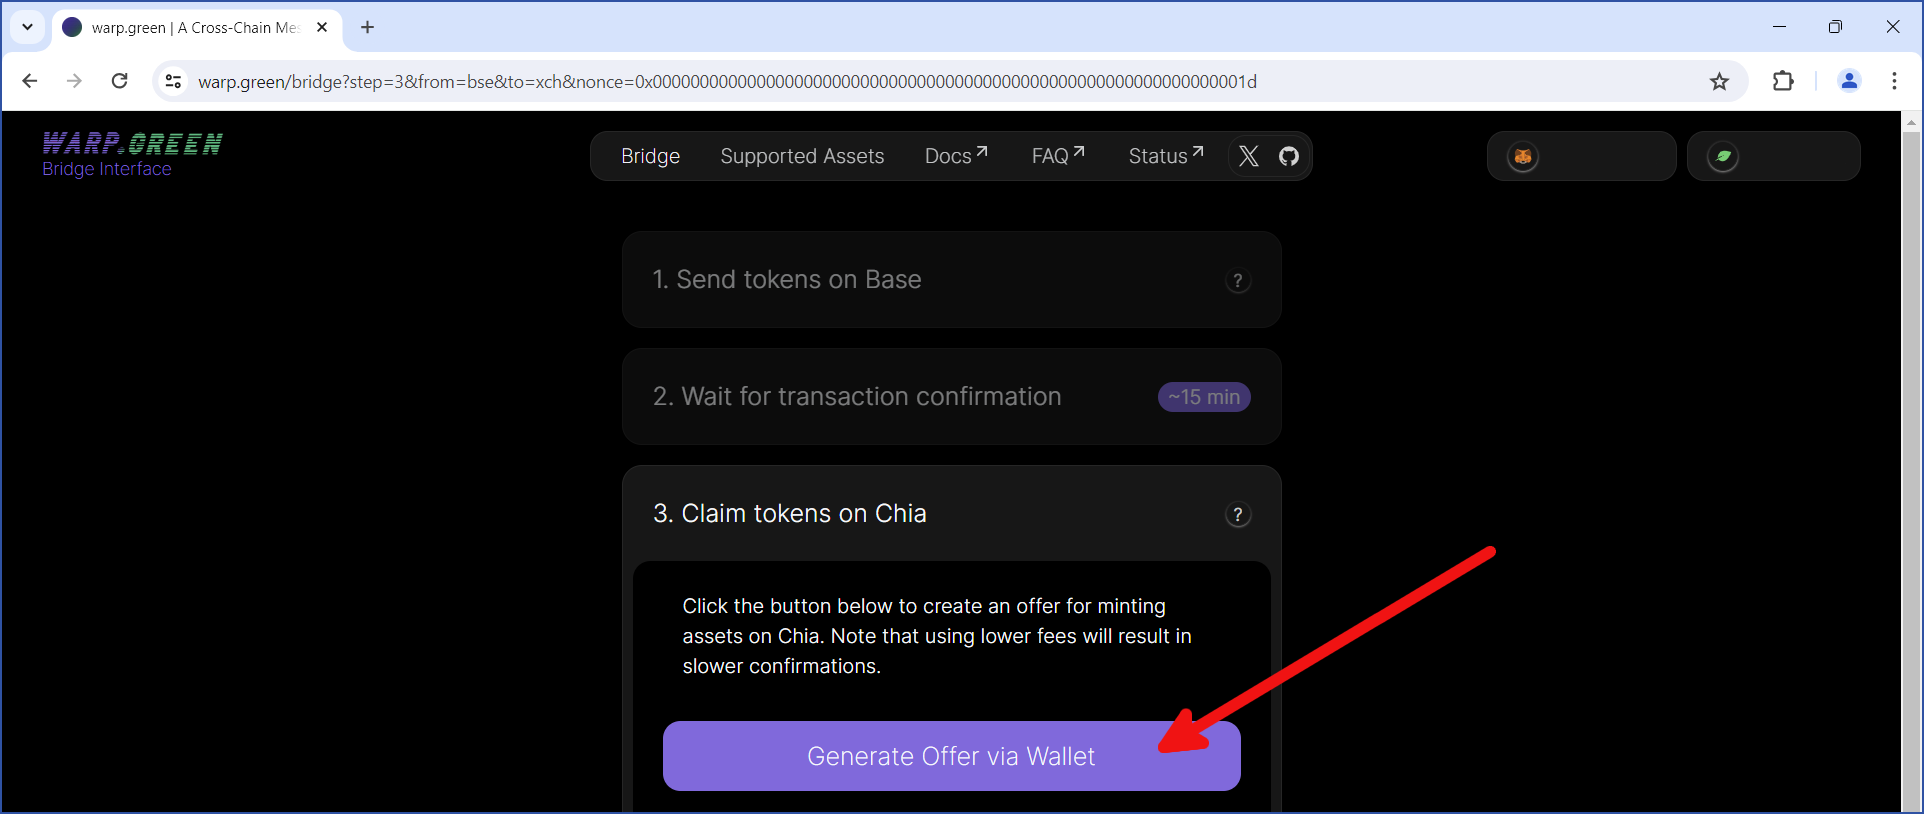
After waiting for around 15 minutes, the transfer will reach Step 3. Click Generate Offer via Wallet:
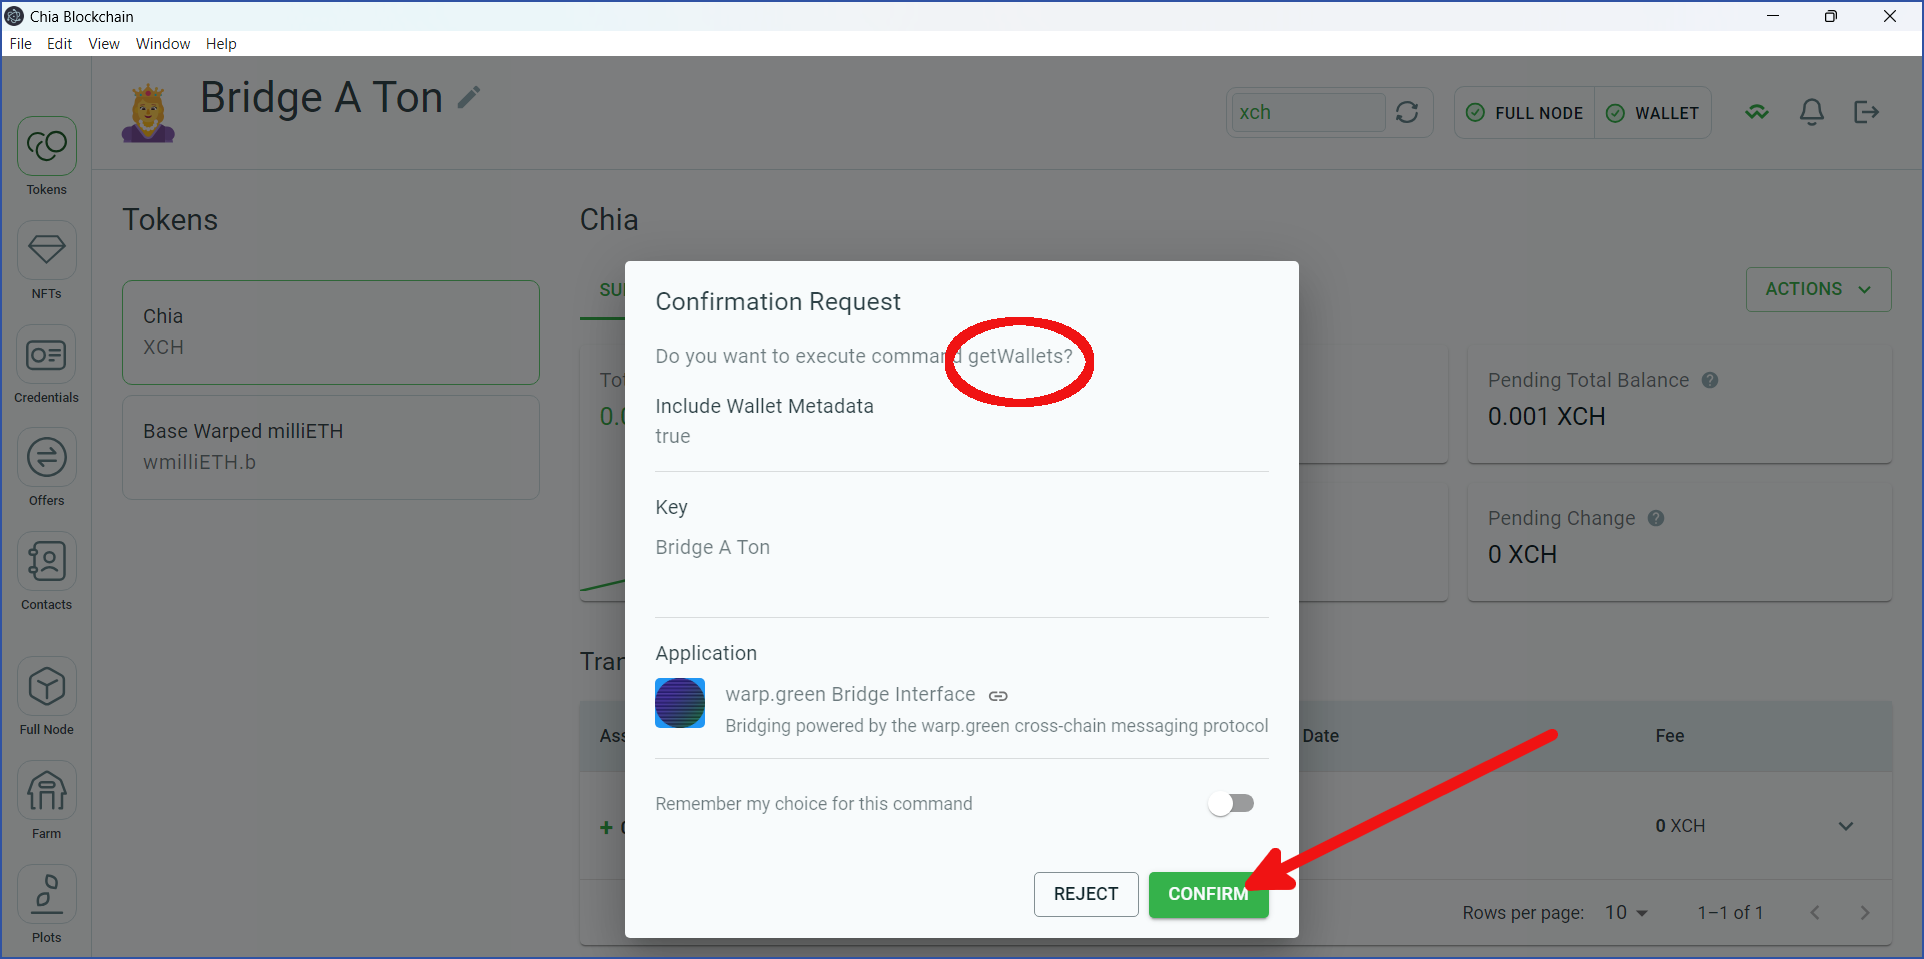
Change to your Chia reference wallet. You may see a dialog asking for permission to execute getWallets. If so, Click CONFIRM:
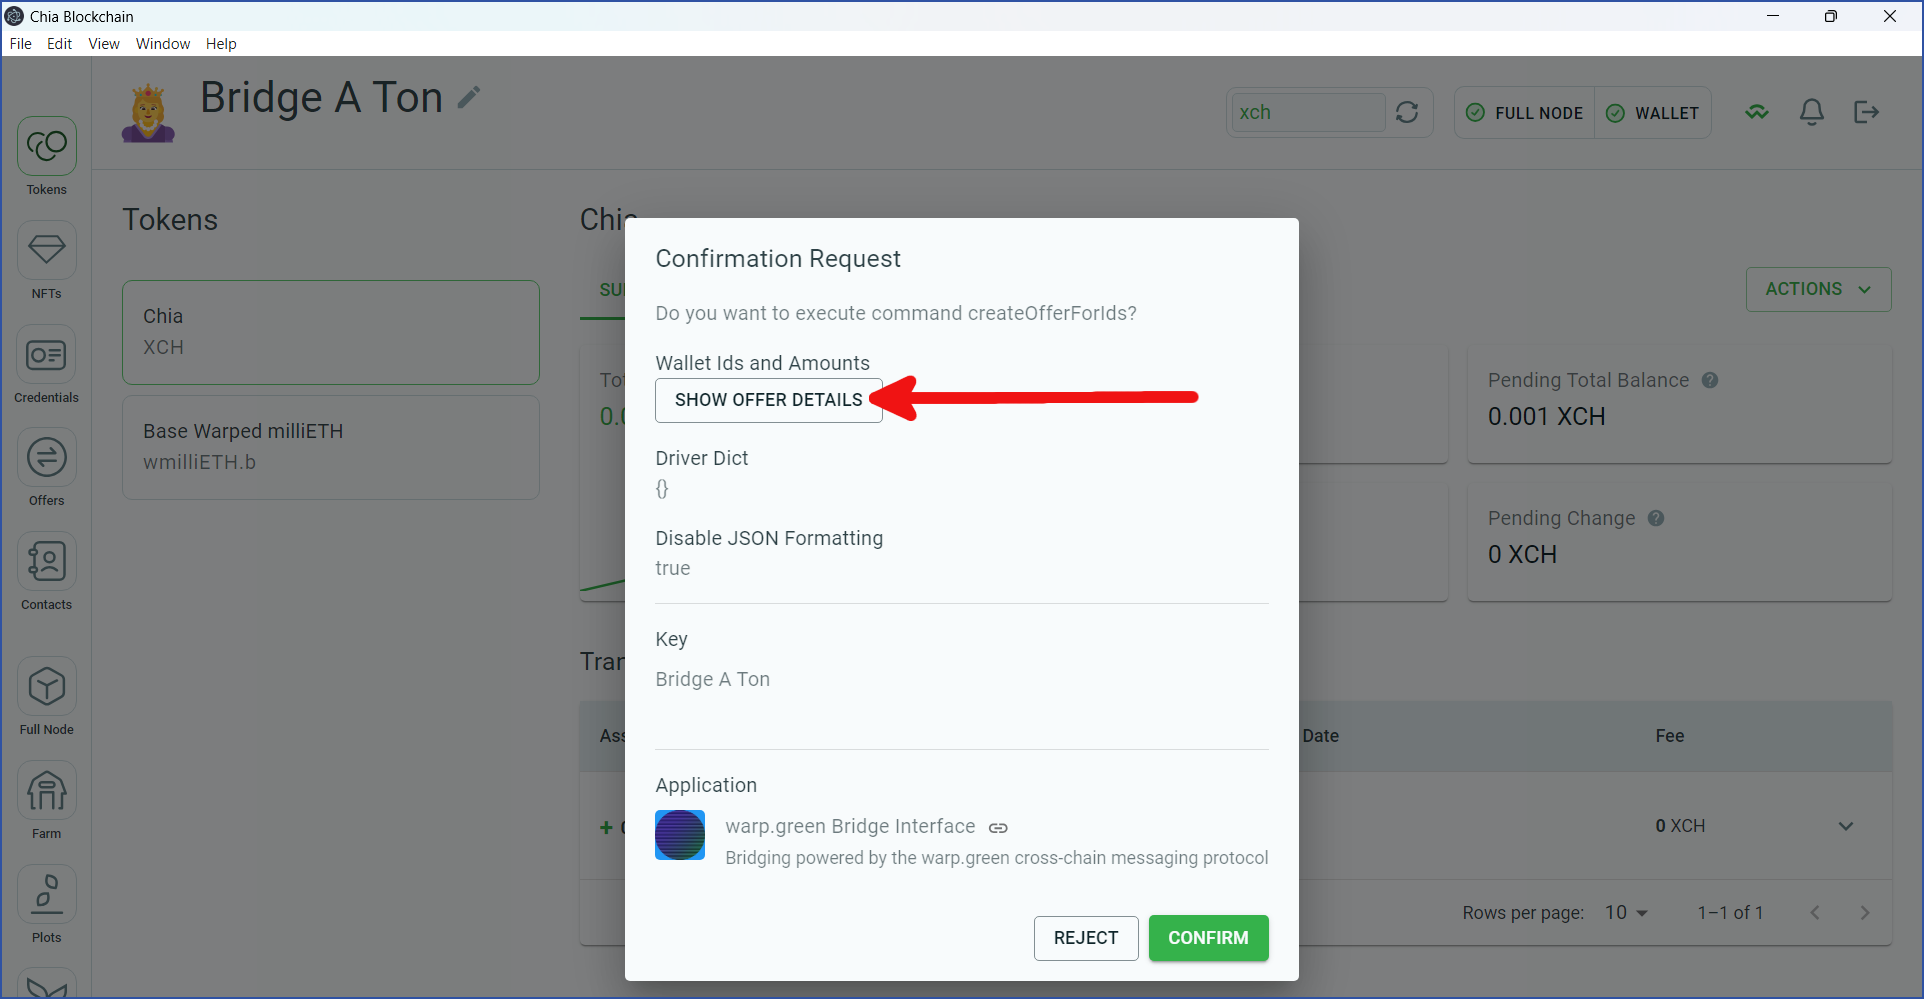
You may need to grant permission to execute one or more additional methods. Click CONFIRM on these dialogs. Eventually, you will see a dialog with a SHOW OFFER DETAILS button. Click this button:
You will be shown the details of the transfer from the bridge to your wallet. By default, no blockchain fee will be used. However, if you have available funds (the small circle in the image below), we recommend that you add a fee in order to expedite the transfer. Either way, leave the In exchange for side of the dialog blank. Click CLOSE when you are finished reviewing this dialog:
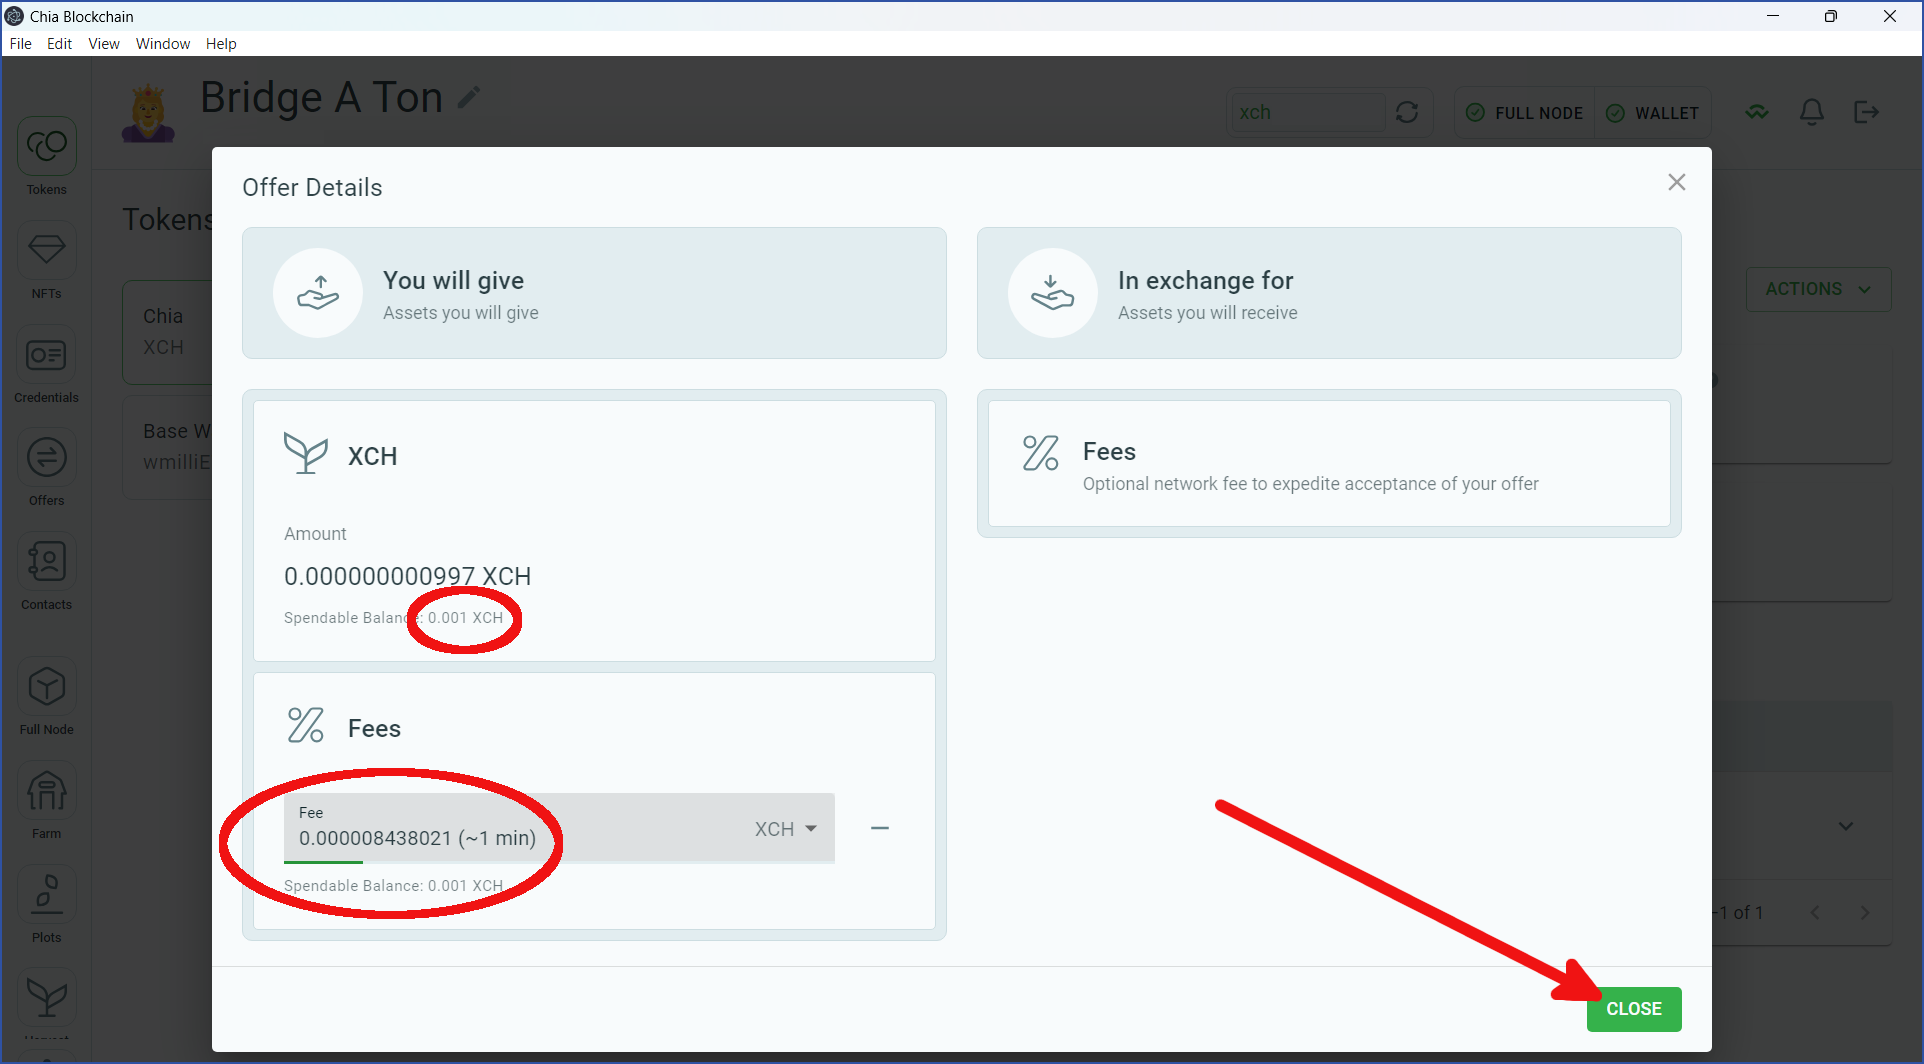
If you added a blockchain fee, it will now appear in the Confirmation Request dialog. Click CONFIRM:

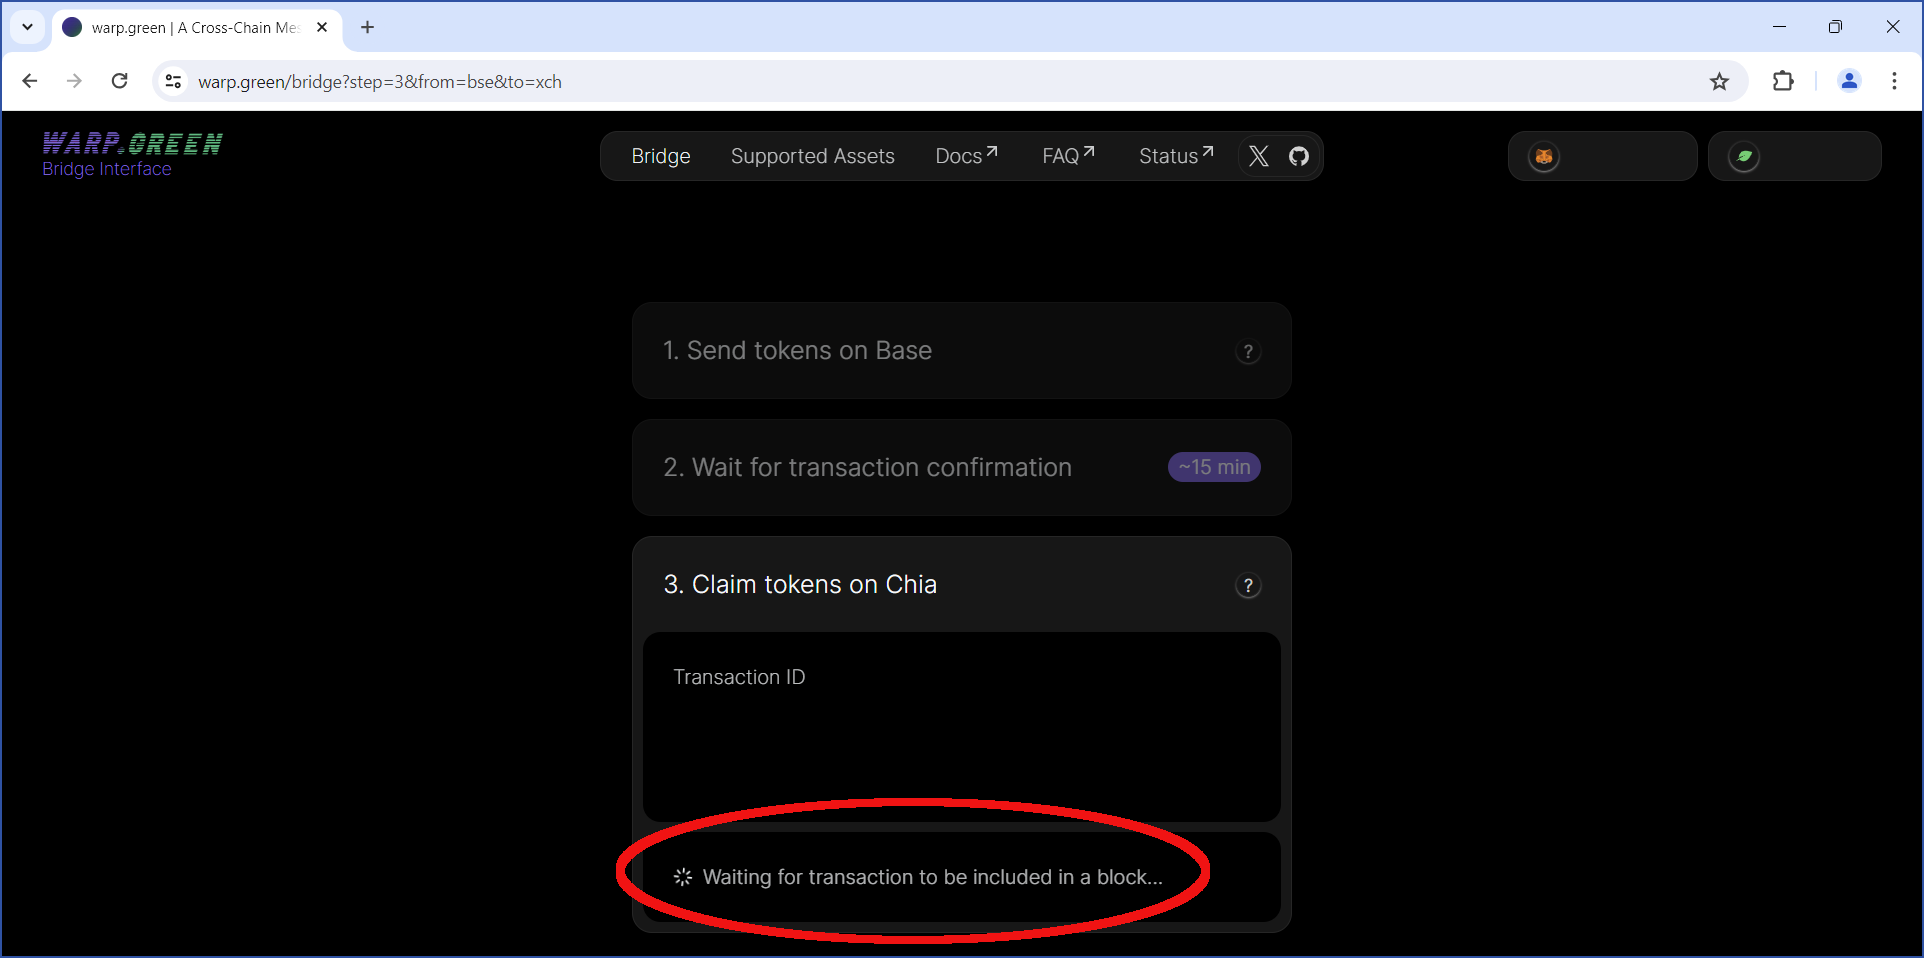
Return to your web browser. The transfer will now be in progress. This should be completed in 1-5 minutes, depending on how busy the Chia network is, along with the size of your fee:
After the transfer has completed, return to the reference wallet. It should now contain the Base Warped milliETH. In this example, the bridge charged a 0.3% fee, so 0.997 wmilliETH.b was transferred. Recall that this amount is worth 0.000997 ETH:
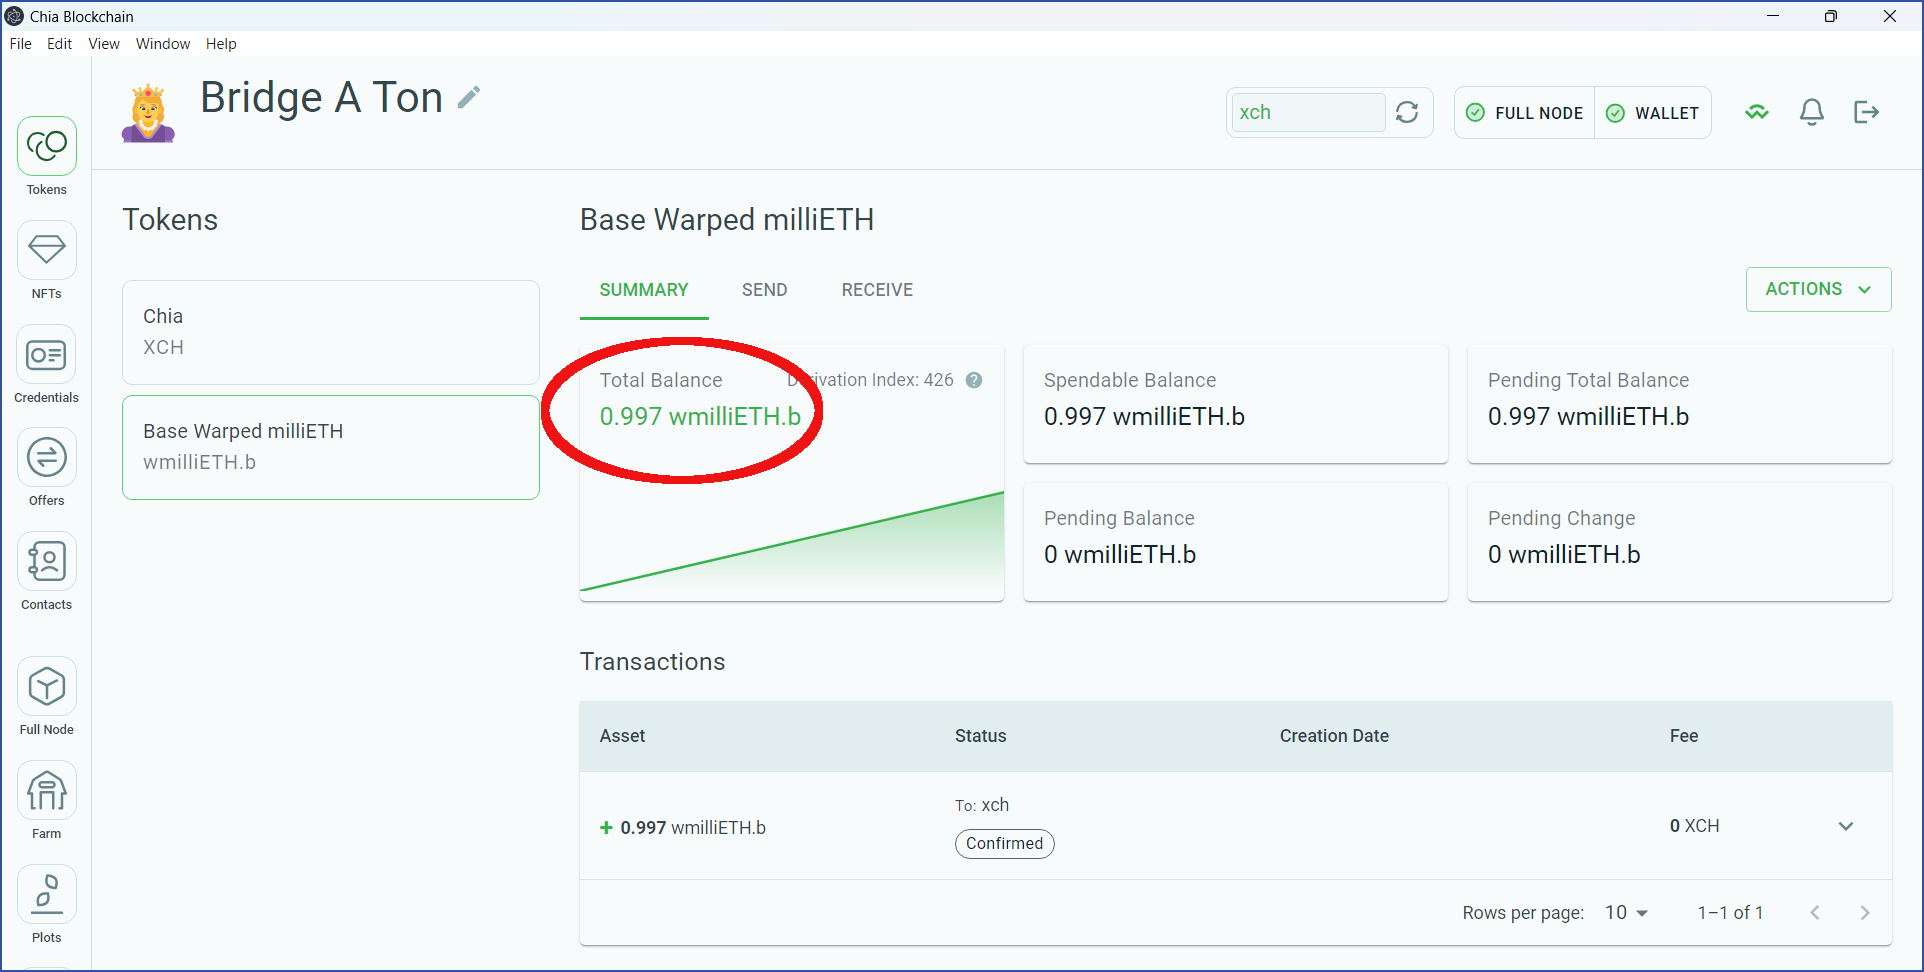
Congratulations! You have successfully transferred ETH from the Base chain to Chia. If you would like to exchange the wmilliETH.b for another asset, you could head to a decentralized exchange such as dexie.space, or an AMM such as tibetswap.io.