Beginner's Guide to Farming
So you want to be a Chia farmer? You've come to the right place!
Chia plotting and farming can seem daunting at first, but it's a relatively straightforward process:
This guide will take you through each of these steps. We will set up a Chia farm, which includes syncing a full node and creating your first plot. This will take anywhere from an hour to several days, depending on a number of factors. But don't worry -- most of this time will not require you to be active on your computer.
This guide is intentionally light on technical details. It is only intended to help new users set up a basic farm, ideally using equipment they already own. Subsequent pages on this website will go into the concepts introduced in this guide in much greater detail.
Ready? Let's get started!
Obtain hardware
You may already have everything you need, but let's make sure. (All you need for this tutorial is the minimum requirements. We'll cover more optimized setups later.)
Computer
Most computers made after 2010 can be used for farming, as long as they have a 64-bit CPU. Windows, Linux, and Mac OS are supported. This entire guide was created from a Windows laptop.
Farming does not require a fast computer. The minimum spec is a Raspberry Pi4 with 4 GB of RAM for a CLI farm, or 8 GB for a GUI farm. (This guide will show you how to set up a GUI farm.) Many farmers choose a Pi because it consumes very little electricity.
Plotting, on the other hand, is resource-intensive. Luckily, once a plot has been created, it can be farmed for many years. A Pi can be used for plotting, but it will be quite slow. As will a laptop. Long-term, these are not great options.
However, for creating your first plot, it's a good idea to use the equipment you already own. Once you get a feel for Chia farming, you will have a much better idea of what to acquire later.
Plot storage
For this guide, we will create a single plot. This will require:
- 4 GB of available RAM
- If you don't have this much, you can use Linux swap space, but it will be very slow
- 275 GB of temporary storage
- An HDD will work, but it will be slow
- An SSD will be much faster; it's a good option for this tutorial
- RAM is the fastest option (the minimum for RAM plotting is 256 GB; if you don't have that much, don't worry about it for now)
- 108.8 GB of free space where the plot will live
- An SSD will work, but is overkill
- The vast majority of plots are stored on HDDs
A laptop or desktop with 400 GB of free space will satisfy these requirements. A 512-GB external SSD (available for ~$35 on Amazon) is another option.
Database SSD
In order to store the blockchain database, an SSD with at least 520 MB/s read/write speeds is required (it doesn't need to be a high-speed NVMe SSD, but unfortunately HDDs aren't fast enough). As of mid-2023 the database is ~130 GB; a 256 GB SSD will likely be usable until 2025. External and internal SSDs are both fine.
Let's say you have a computer without much free space. If you add a 1024-GB external SSD, it will be sufficient to create and store a plot, as well as to store the blockchain database. This will not be an ideal setup for creating a larger farm. But if you already have this equipment, you can set up a small farm without spending any money.
Once you have the required hardware, it's time to install Chia.
Install Chia
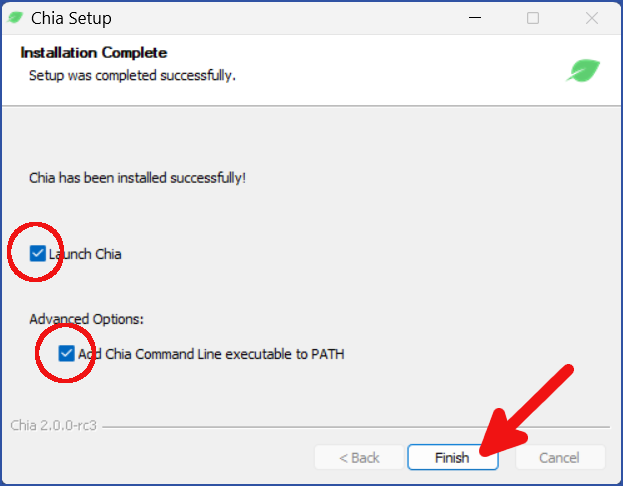
Head to the official download page; download and run the installer for your Operating System. The default settings are fine for most setups.
Two check boxes will be shown on the last screen after the install has completed. It's a good idea to check both of them. Doing so will allow you to type chia in a terminal window without requiring the full path, and it will automatically start the application.
Run and configure Chia
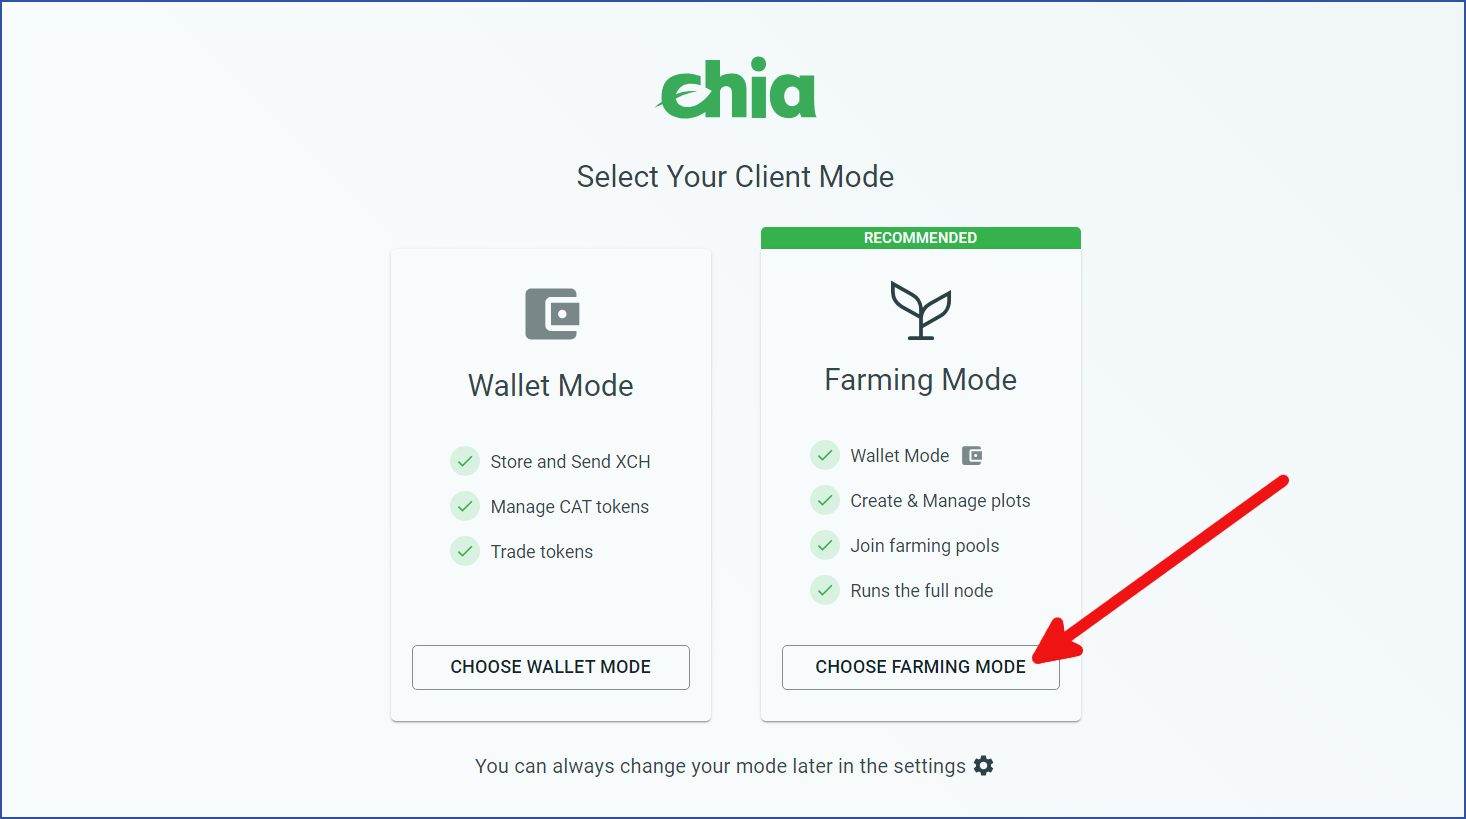
The first time Chia starts, you will be given the option to run in either Wallet Mode or Farming Mode. You will be setting up a Chia farm, so click CHOOSE FARMING MODE:
Create a wallet
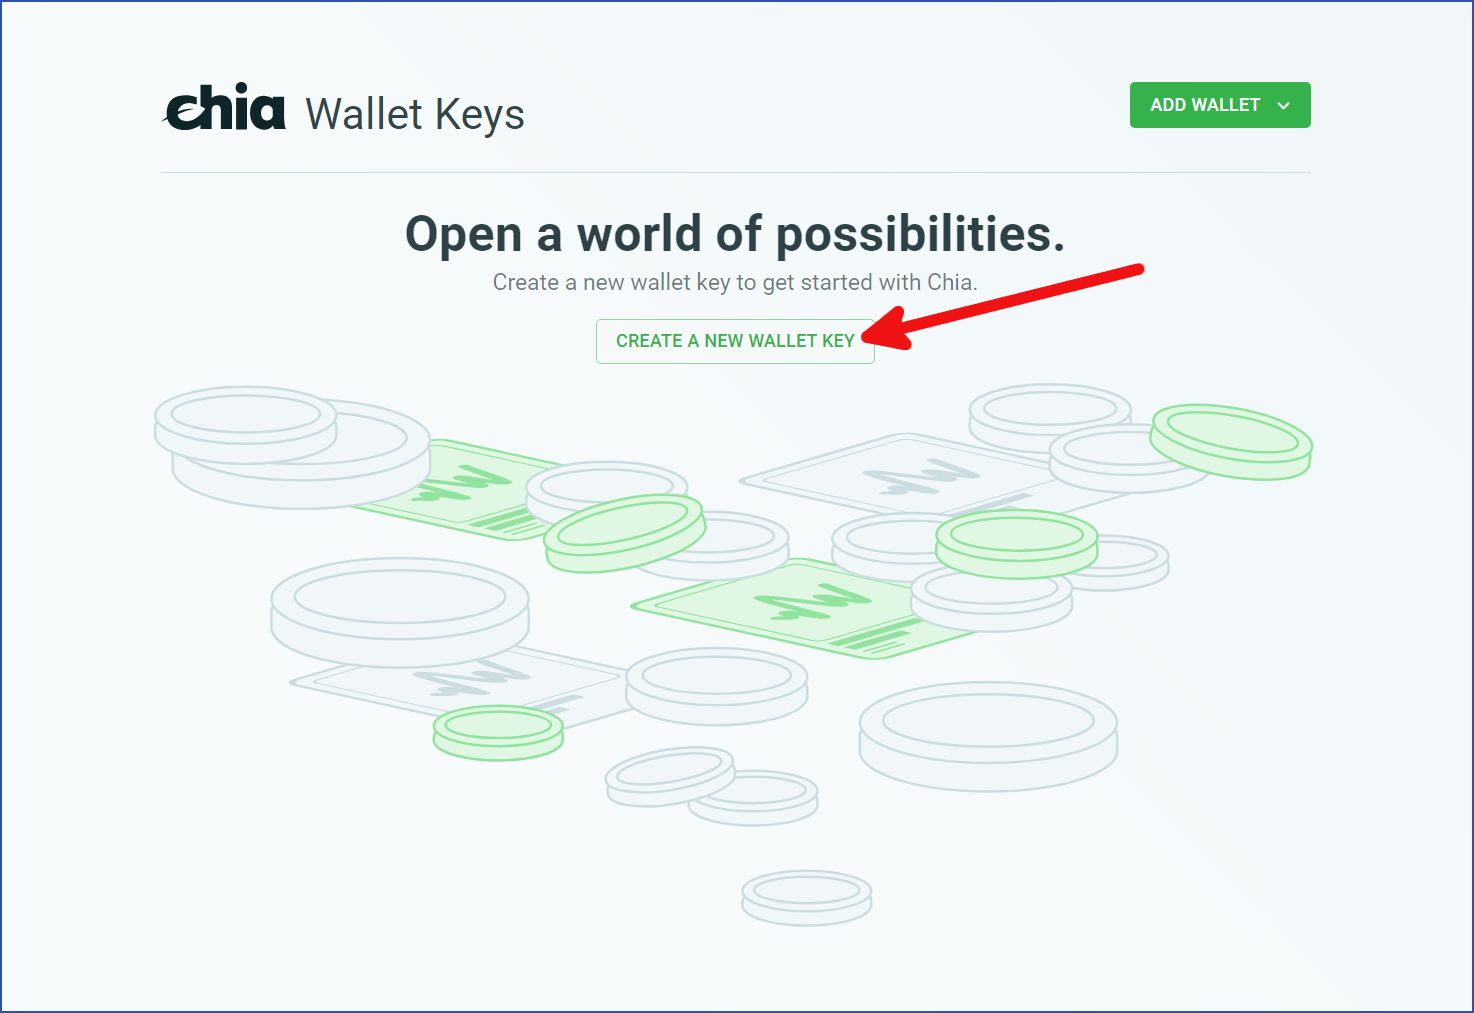
Assuming you don't have a wallet yet, click CREATE A NEW WALLET KEY (If you already have a wallet, you can import it by clicking the green ADD WALLET button):
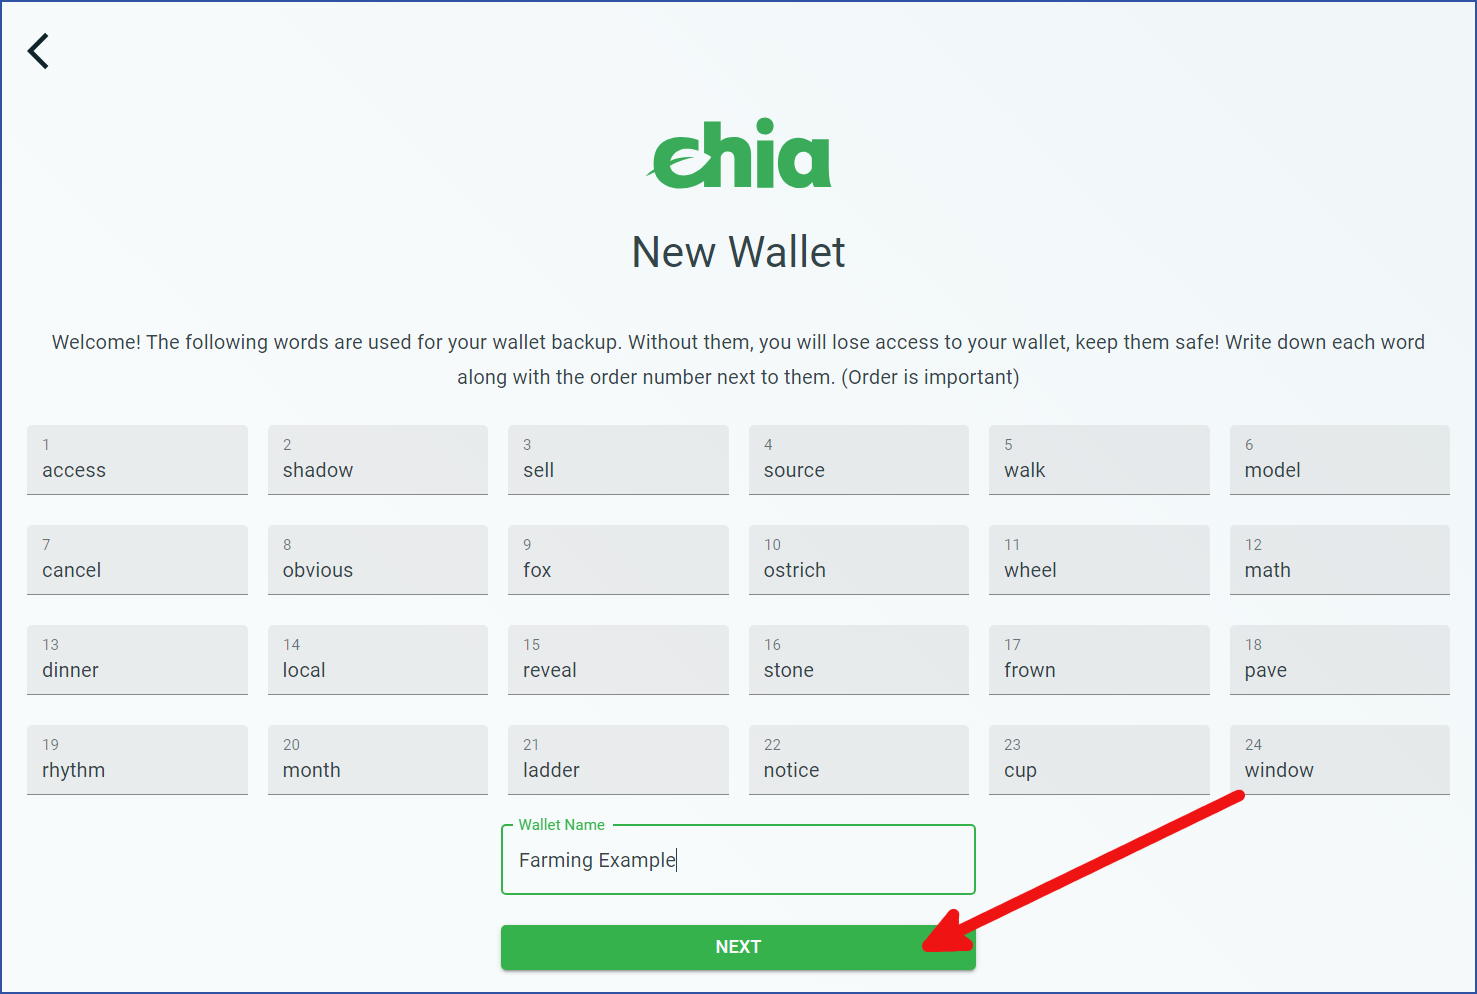
You will be presented with a list of twenty-four words. This is your wallet's recovery phrase. These words are all that are needed to recover your wallet on a new computer. Write them down and store them in a safe place. The order of the words is also important.
You can also choose a custom name for your wallet. Click NEXT when you are finished.
If someone obtains a copy of these words, they can steal your entire wallet, including all of its funds. Be sure to store your recovery phrase in a safe place.
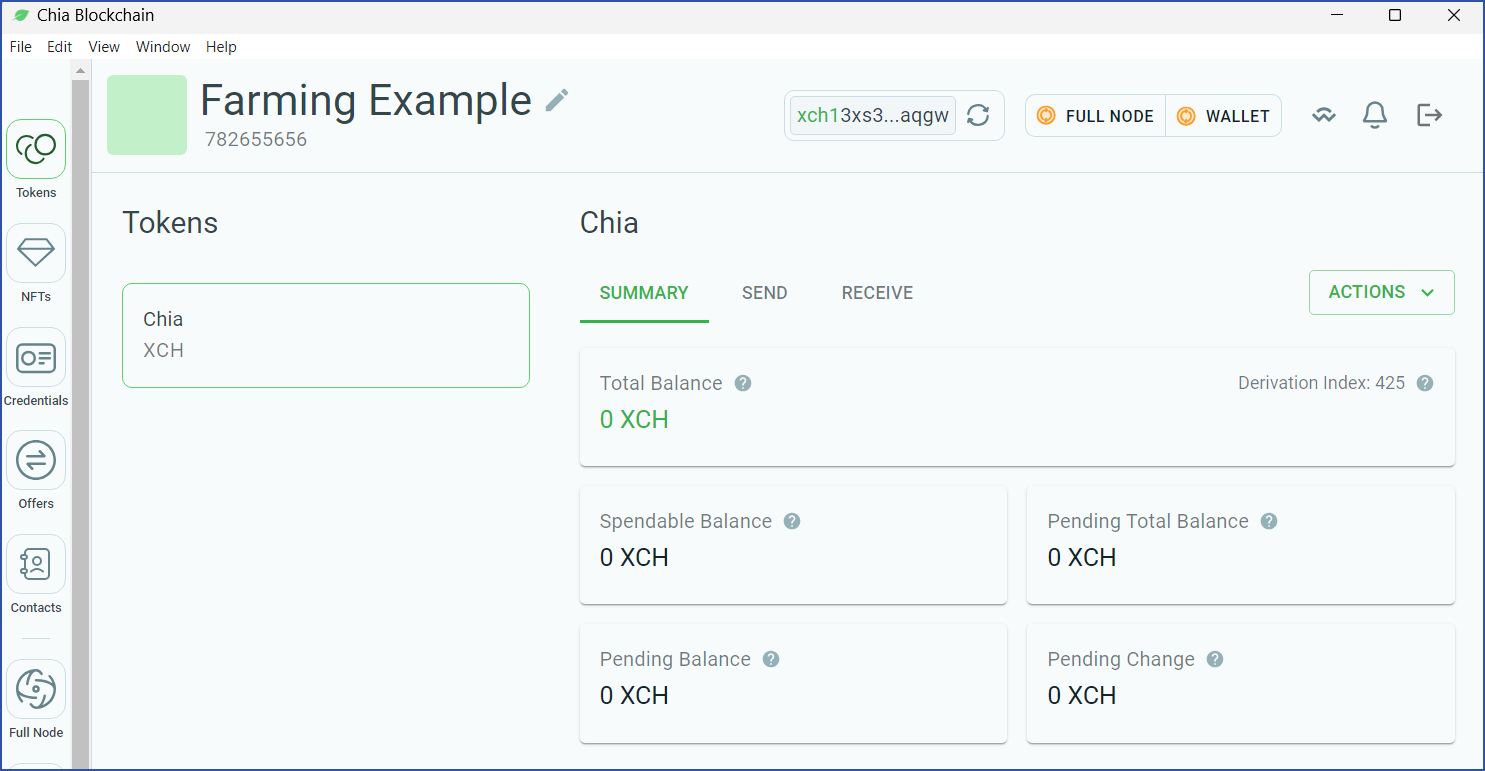
You will be taken to your wallet, which will show a zero-XCH balance. There will be two round icons in the upper-right corner, one for the full node and one for the wallet:
- Full node -- this icon will appear red until you connect to at least one peer. At this point it will turn yellow, which indicates that your full node is syncing.
- Wallet -- this icon will appear yellow at first. Your wallet will attempt to connect to three peers for syncing. It should be synced within a few seconds, at which point the icon will turn green.
Fund your wallet
If you think you will ever want to join a pool (recommended for small and medium farms), you will need at least one mojo (one trillionth of an XCH). To help with this, we have set up an online faucet at faucet.chia.net.
To use the faucet you will need to identify your Master Public Key (also referred to as the Public Key). You can use either the GUI or CLI to identify the Master Public Key by following these steps:
GUI
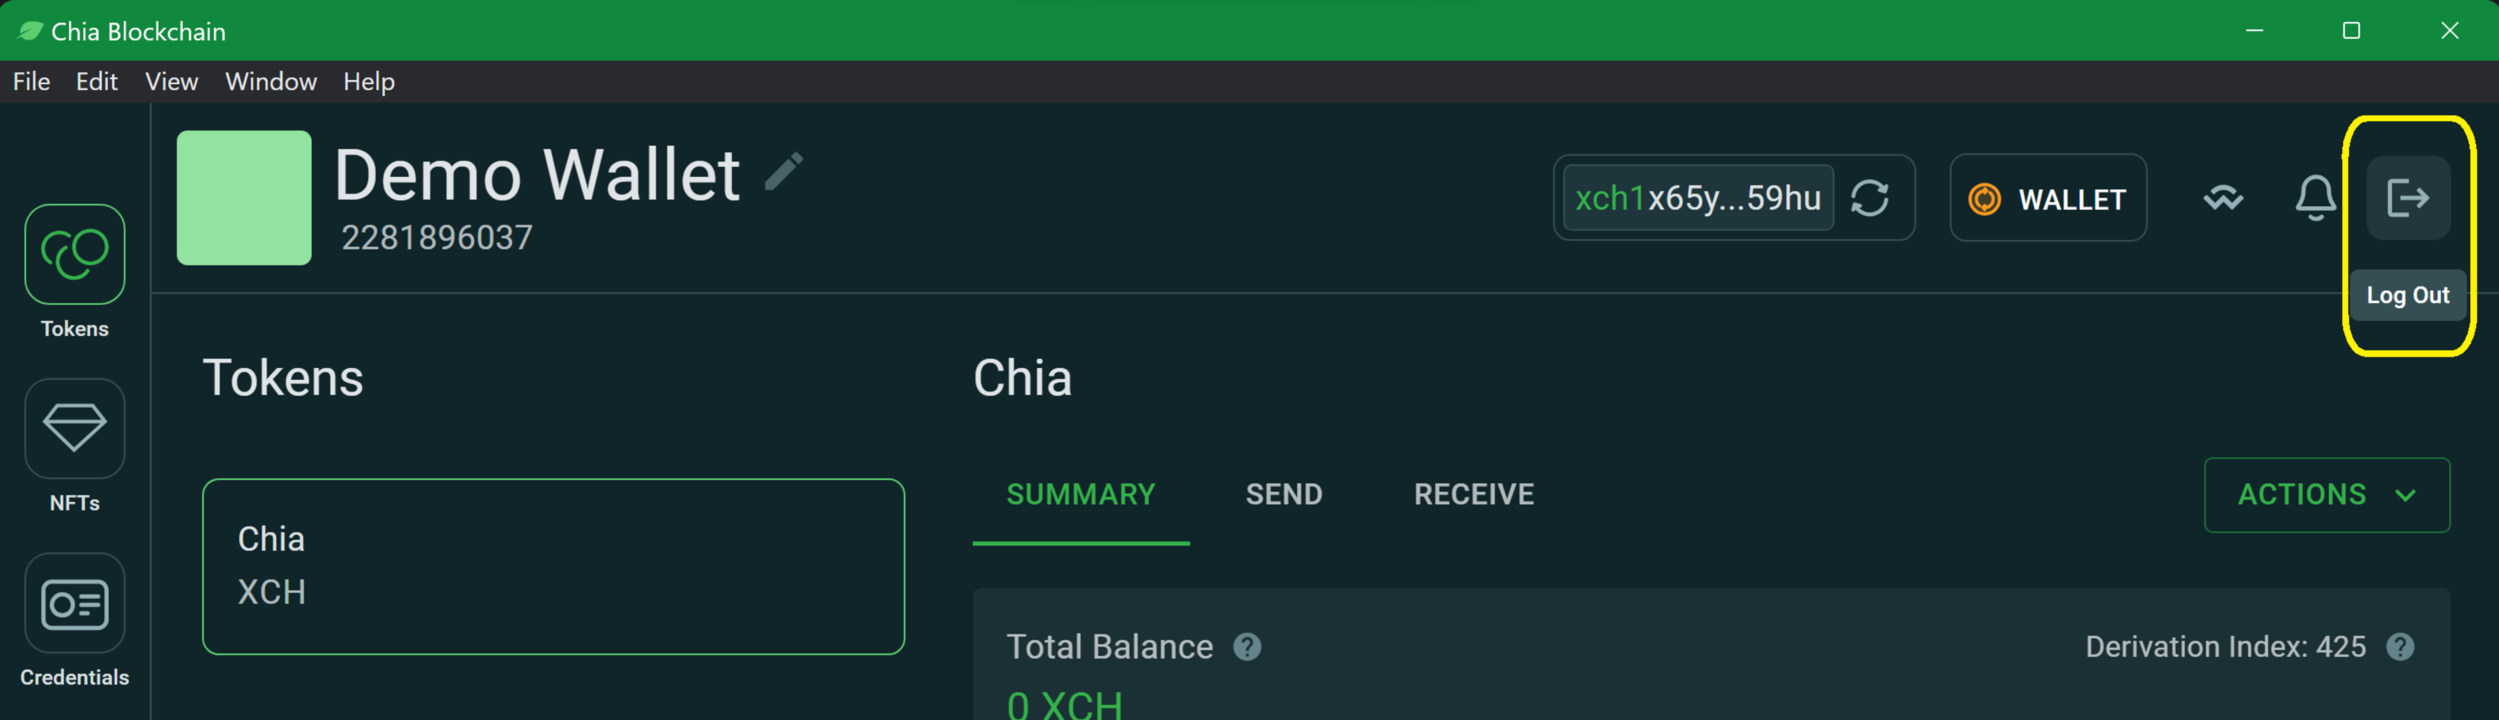
Never share your private / secret keys or mnemonics with anyone. These give access to spend funds from your wallet.
- In the top right corner select logout:
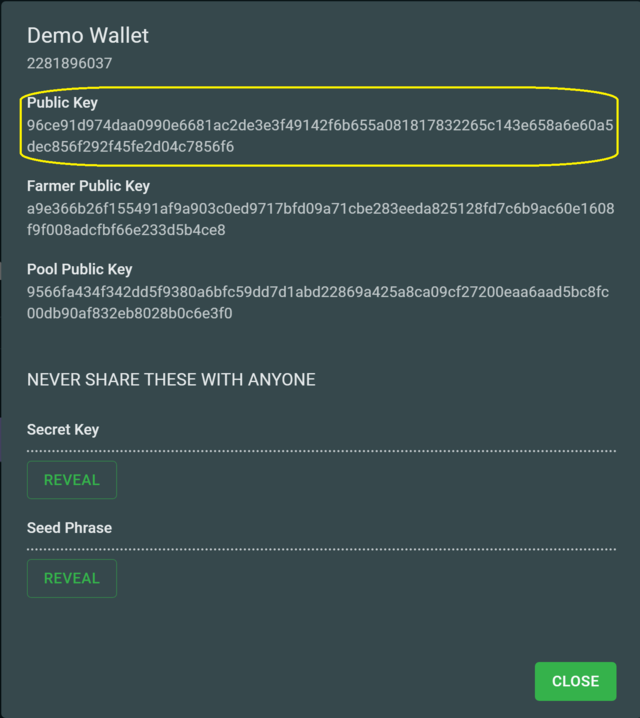
- Using the desired keys menu, select details:

- View and copy the Public Key to the field on the Faucet page:
CLI
NEVER share your private / secret keys or mnemonics with anyone. These give access to spend funds from your wallet.
In order to view your keys from the cli, run chia keys show, optionally including the -f <fingerprint> flag to show only the info for the key you just generated:
- From terminal (mac/linux) or powershell (windows) run
chia keys show:
chia keys show
- View and copy the Master Public Key to the field on the faucet page:
Showing all public keys derived from your master seed and private key:

Label: Demo Wallet
Fingerprint: 2281896037
Master public key (m): 96ce91d974daa0990e6681ac2de3e3f49142f6b655a081817832265c143e658a6e60a5dec856f292f45fe2d04c7856f6**
Farmer public key (m/12381/8444/0/0): a9e366b26f155491af9a903c0ed9717bfd09a71cbe283eeda825128fd7c6b9ac60e1608f9f008adcfbf66e233d5b4ce8
Pool public key (m/12381/8444/1/0): 9566fa434f342dd5f9380a6bfc59dd7d1abd22869a425a8ca09cf27200eaa6aad5bc8fc00db90af832eb8028b0c6e3f0
First wallet address: xch1kr3zf7dqw5q953ex6zt33lndj90q0zlh68404tsntnljthnwqs2qvjmwrg
For more security best practices please review the Securing Your Chia – How to Be a Hard Target blog article.
You can continue with this guide while waiting for your faucet payment to arrive.
Sync your node
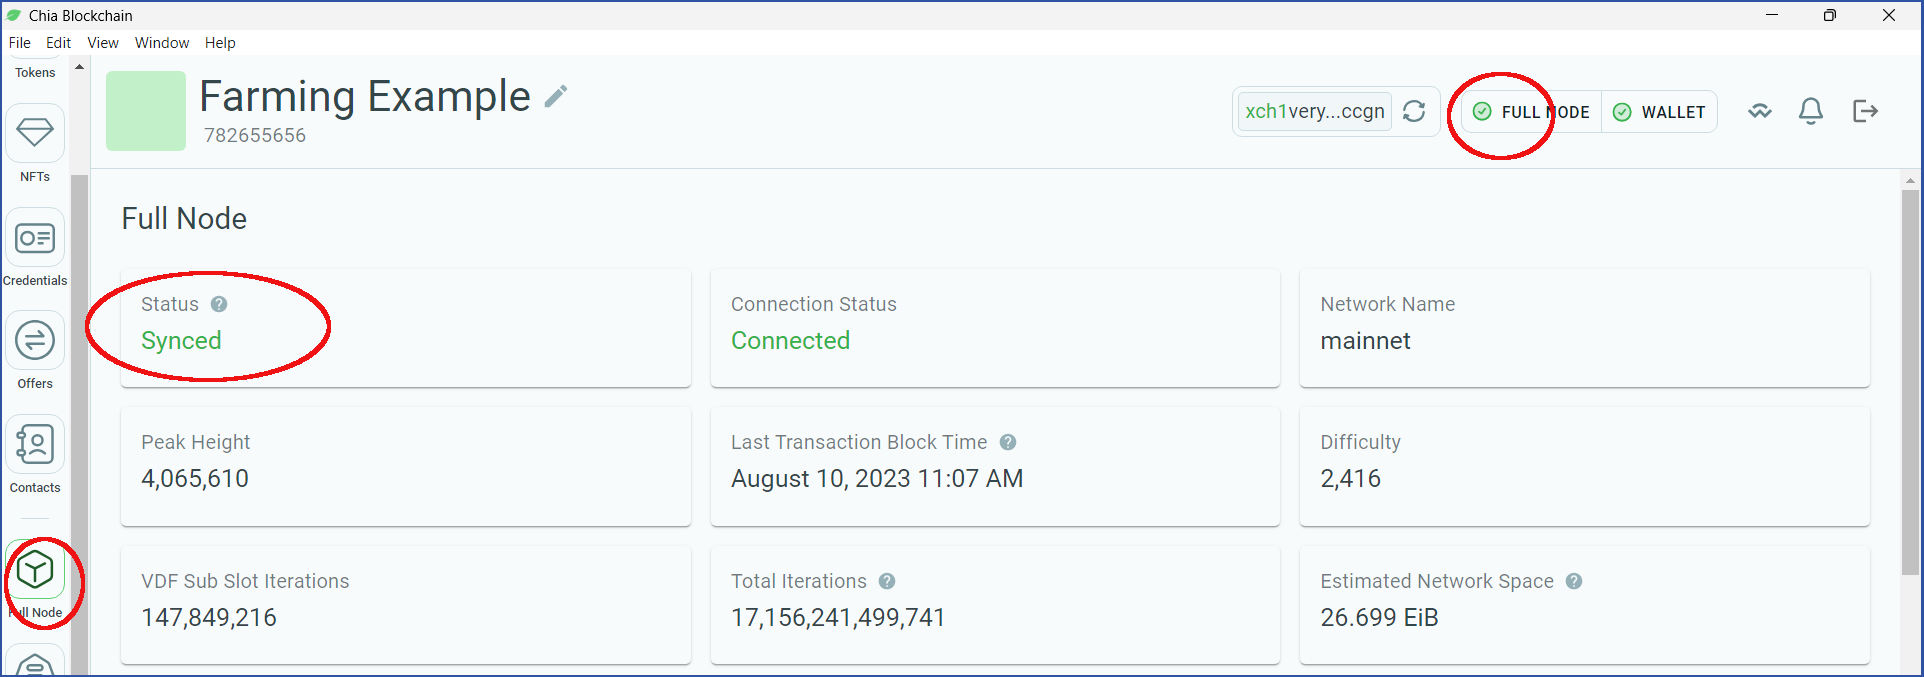
Click the Full Node icon on the left side of your wallet:
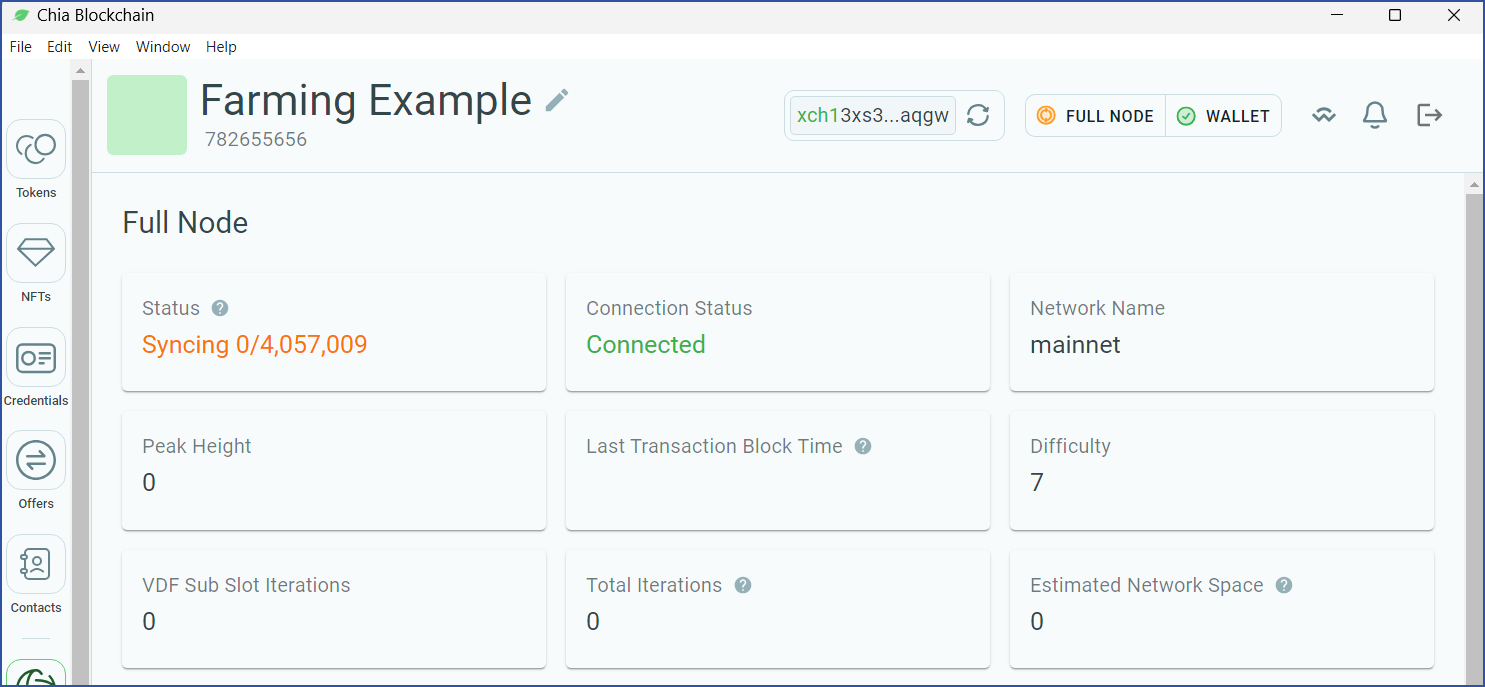
This screen shows your node's syncing status. In order to farm Chia, your node needs to be fully synced. You have two options to achieve this:
- Sync from genesis -- the above image shows this happening. Your node will connect with up to 80 peers and download information for each block. This is the most secure way to sync a node, and the only way to be sure that the information is accurate. However, it will take at least a few days, and possibly a week or more to sync from genesis, depending on your node's speed, your internet connection, and the quality of the peers to which you connect.
- Download a checkpoint database -- this option will allow you to sync much faster, but you have to trust that the information is accurate. For most users, this will be a worthwhile tradeoff.
- Head to our official checkpoint download page and click the
Torrentlink for the mainnet Database. - When your download has completed, use BitTorrent to open it; be sure to verify it with the checksum listed on the download page.
- Move the database to the appropriate destination (see below).
- Head to our official checkpoint download page and click the
Never download a database from a third party. A database or torrent file with a checksum that does not match the checksum from the official download page is likely malware. Installing malware will result in all of your XCH being stolen, or worse.
By default, the database will be stored in ~/.chia/mainnet/db. If you don't want to store it there (for example, if your computer lacks sufficient free space), you will need to change your configuration:
- Edit
~/.chia/mainnet/config/config.yaml-- this is this primary configuration file for all Chia settings. - Search for
database_pathin thefull_node:section.- The default value is
db/blockchain_v2_CHALLENGE.sqlite. - Change the path to the location of your database. For example, to store the database on an external SSD, you might change this to
/media/externalSSD/db/blockchain_v2_CHALLENGE.sqlite. You do not need to change the name of the .sqlite file.
- The default value is
If you change this setting, you will need to restart Chia for the change to be applied.
Even if you choose to download the checkpoint database, it will take some time for your node to sync. This is because the checkpoint database is only updated once every three months. You will therefore need to sync from the time the checkpoint was taken until the head of the chain.
Regardless of which method you choose for syncing, you can continue with this guide while waiting.
Join a pool
Over the long term, your reward for farming will be directly proportional to the total space on the network (AKA netspace). For example, if your farm controls 1% of the netspace, it will win 1% of the rewards, on average.
Over the short-to-medium term, luck can play a large factor in your winnings. Small farms could get lucky and win an outsized number of rewards very quickly, but they are equally likely to be unlucky.
For this tutorial, we are creating a single plot, the smallest farm possible. As of this writing, a single-plot farm will only collect a reward once every 161 years!
So why even bother trying?
That's where pooling becomes valuable. Pools, well, pool their farming resources. When one member of a pool wins a reward, it is split among all participants according to the amount of space they contributed. The effect is a smoothing out of one's rewards over time, resulting in a consistent payout. Most users with small farms (and even some with large farms) join a pool.
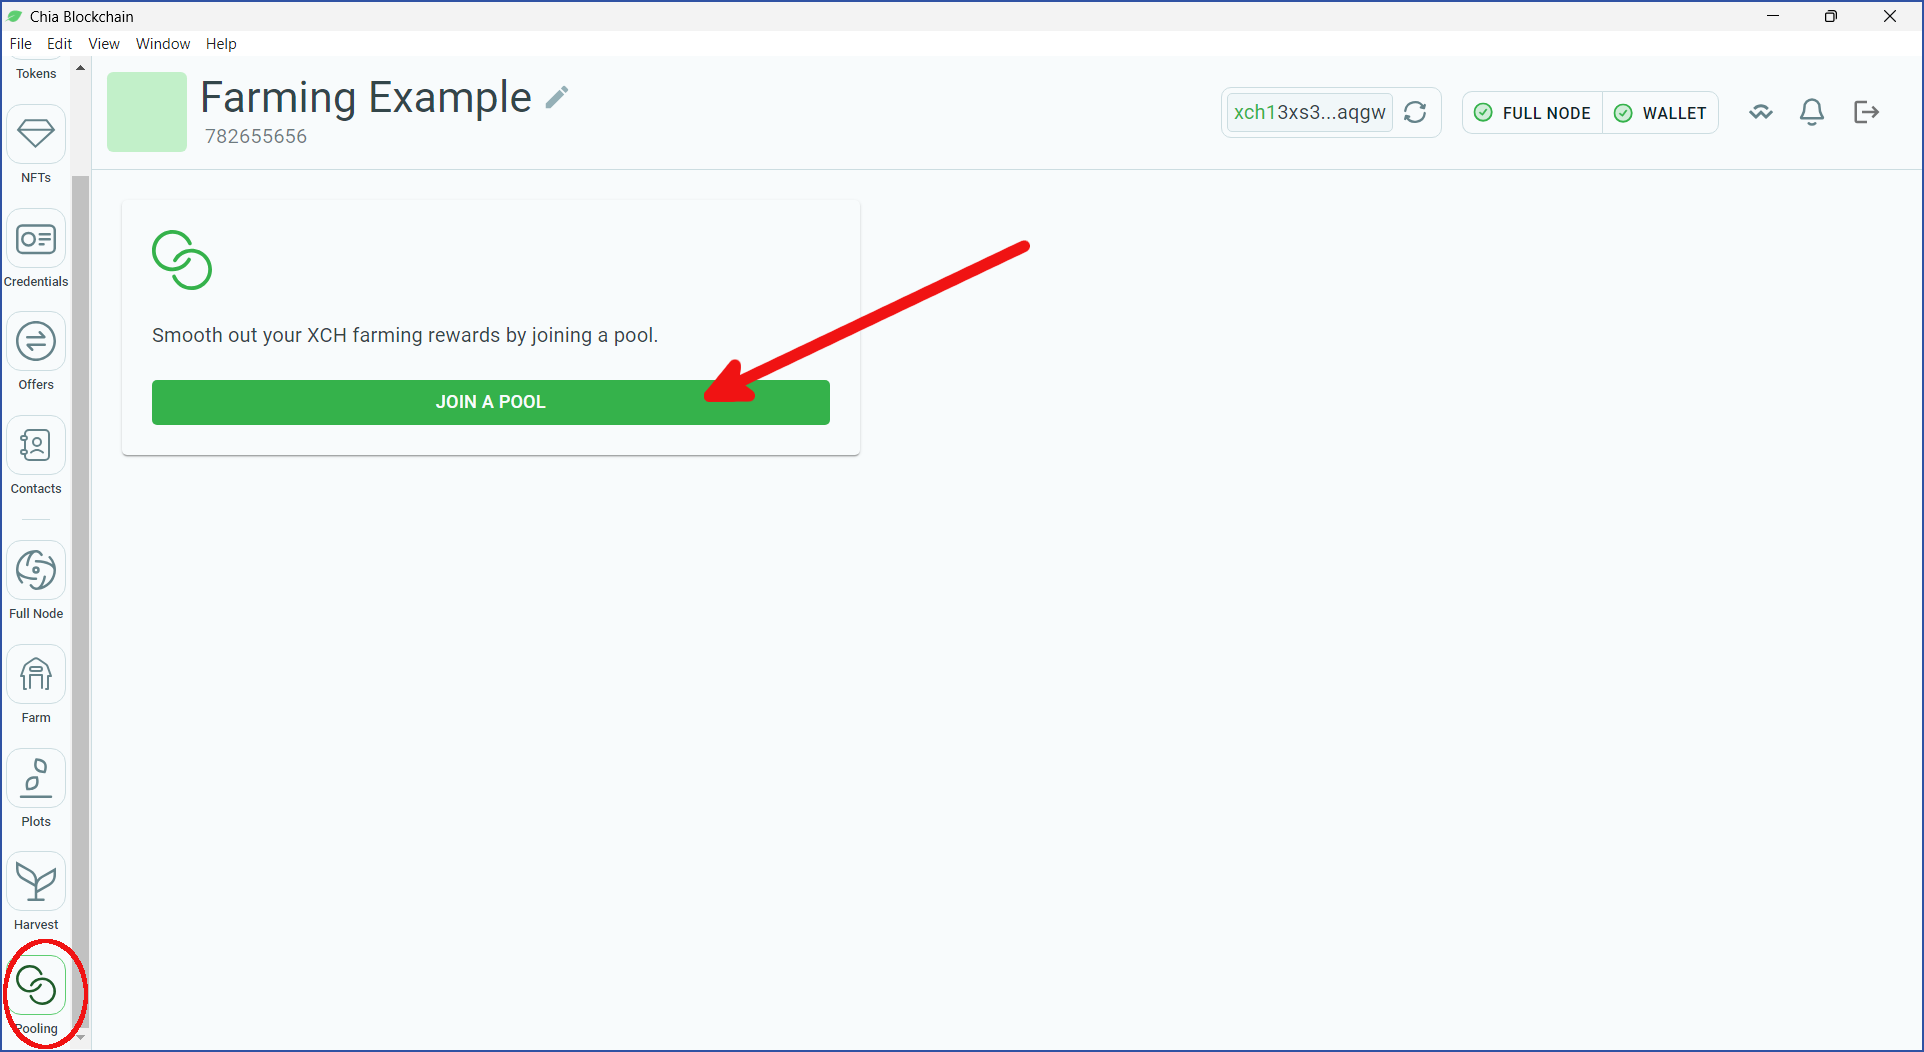
Click the Pooling icon on the left side of your wallet, and click JOIN A POOL:
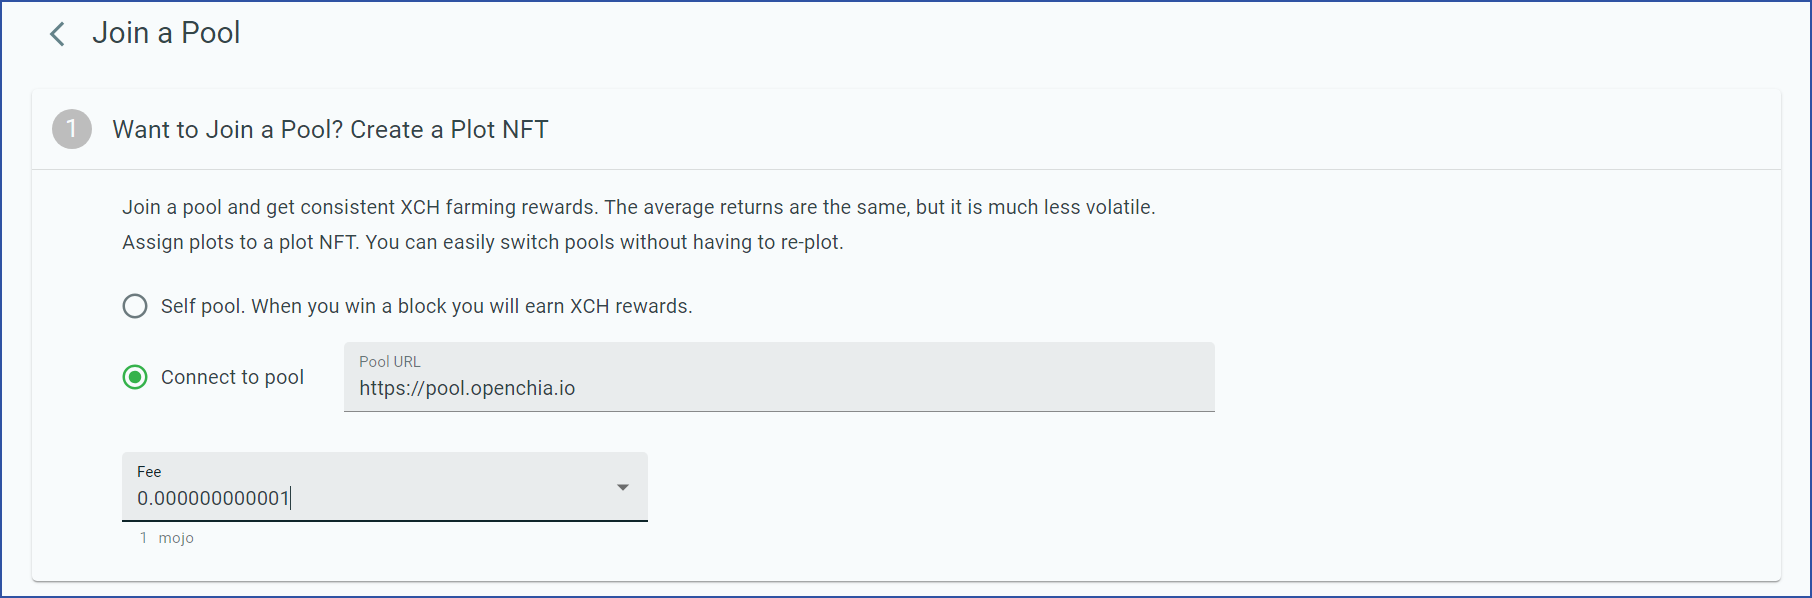
Before you can join a pool, you will need to create a plot NFT. This will allow you to easily change pools later.
Select Connect to pool. You will need to enter a valid pool URL. We will use OpenChia for this example, but there are many great pools to choose from. For a list of reputable pools, see Chialinks.com. (Chia Network Inc. does not run a pool, and is not affiliated with OpenChia or Chialinks).
If you don't want to join a pool, select Self pool. This will assign you to a pool with only one participant: you. Later, you can join a pool with the same plot NFT if desired.
Creating a plot NFT requires an on-chain transaction that will cost one mojo. You are also recommended to enter a blockchain fee. If you used the faucet, you will now have 100 mojos. Depending on how busy the network is, a one-mojo fee is typically enough to complete your transaction within a few minutes.
If you have not received your faucet payment, unfortunately you will not be able to create a plot NFT. This is a really important step. If you skip it, you will only ever be able to solo farm with the plots you create. You are therefore not recommended to skip this step.
If your faucet payout has not arrived after more than 10 minutes, someone on Discord might be willing to send you some mojos if you ask nicely.
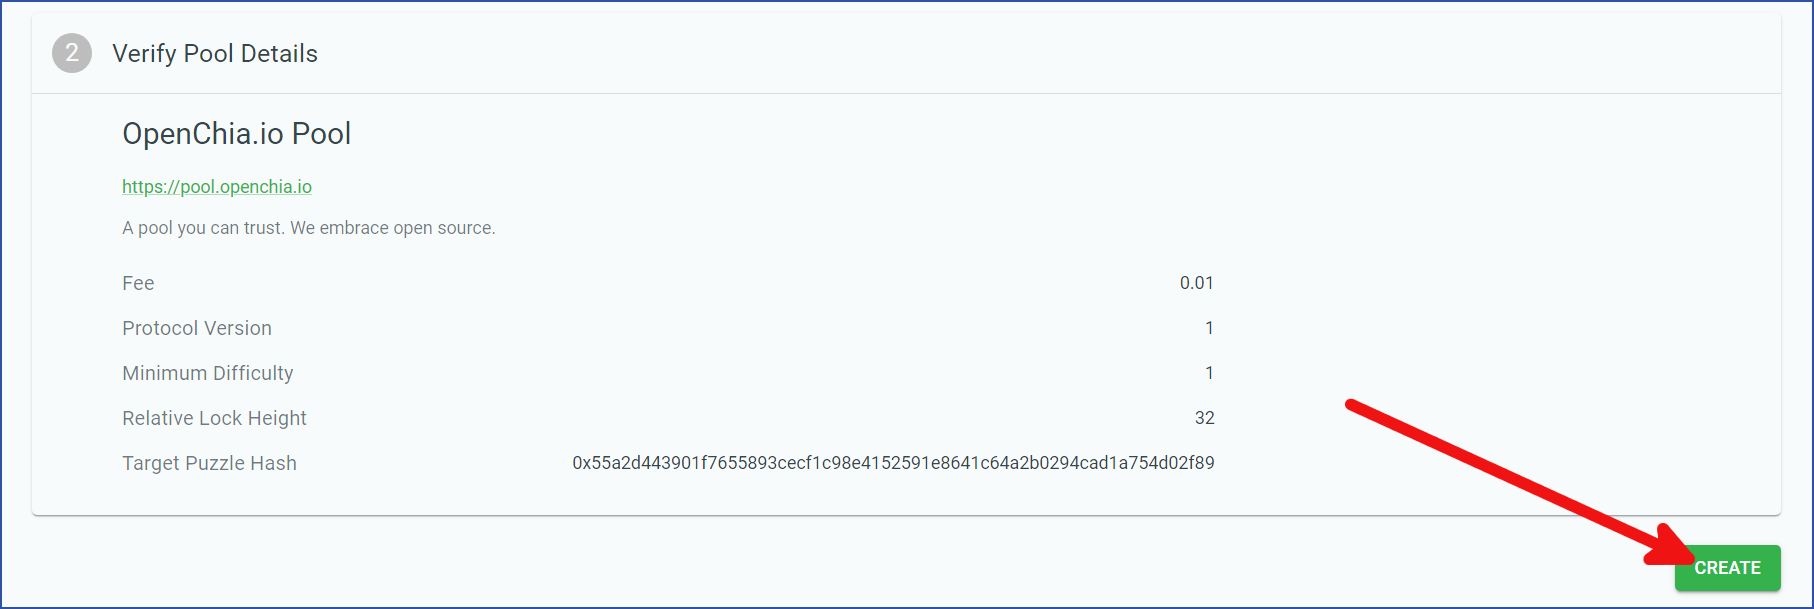
If you entered a valid pool URL, the details will pop up. For example, this pool has a fee of 1%. If everything looks acceptable, click CREATE:
Your transaction will be pushed to the blockchain. While it is pending, a new screen will appear:
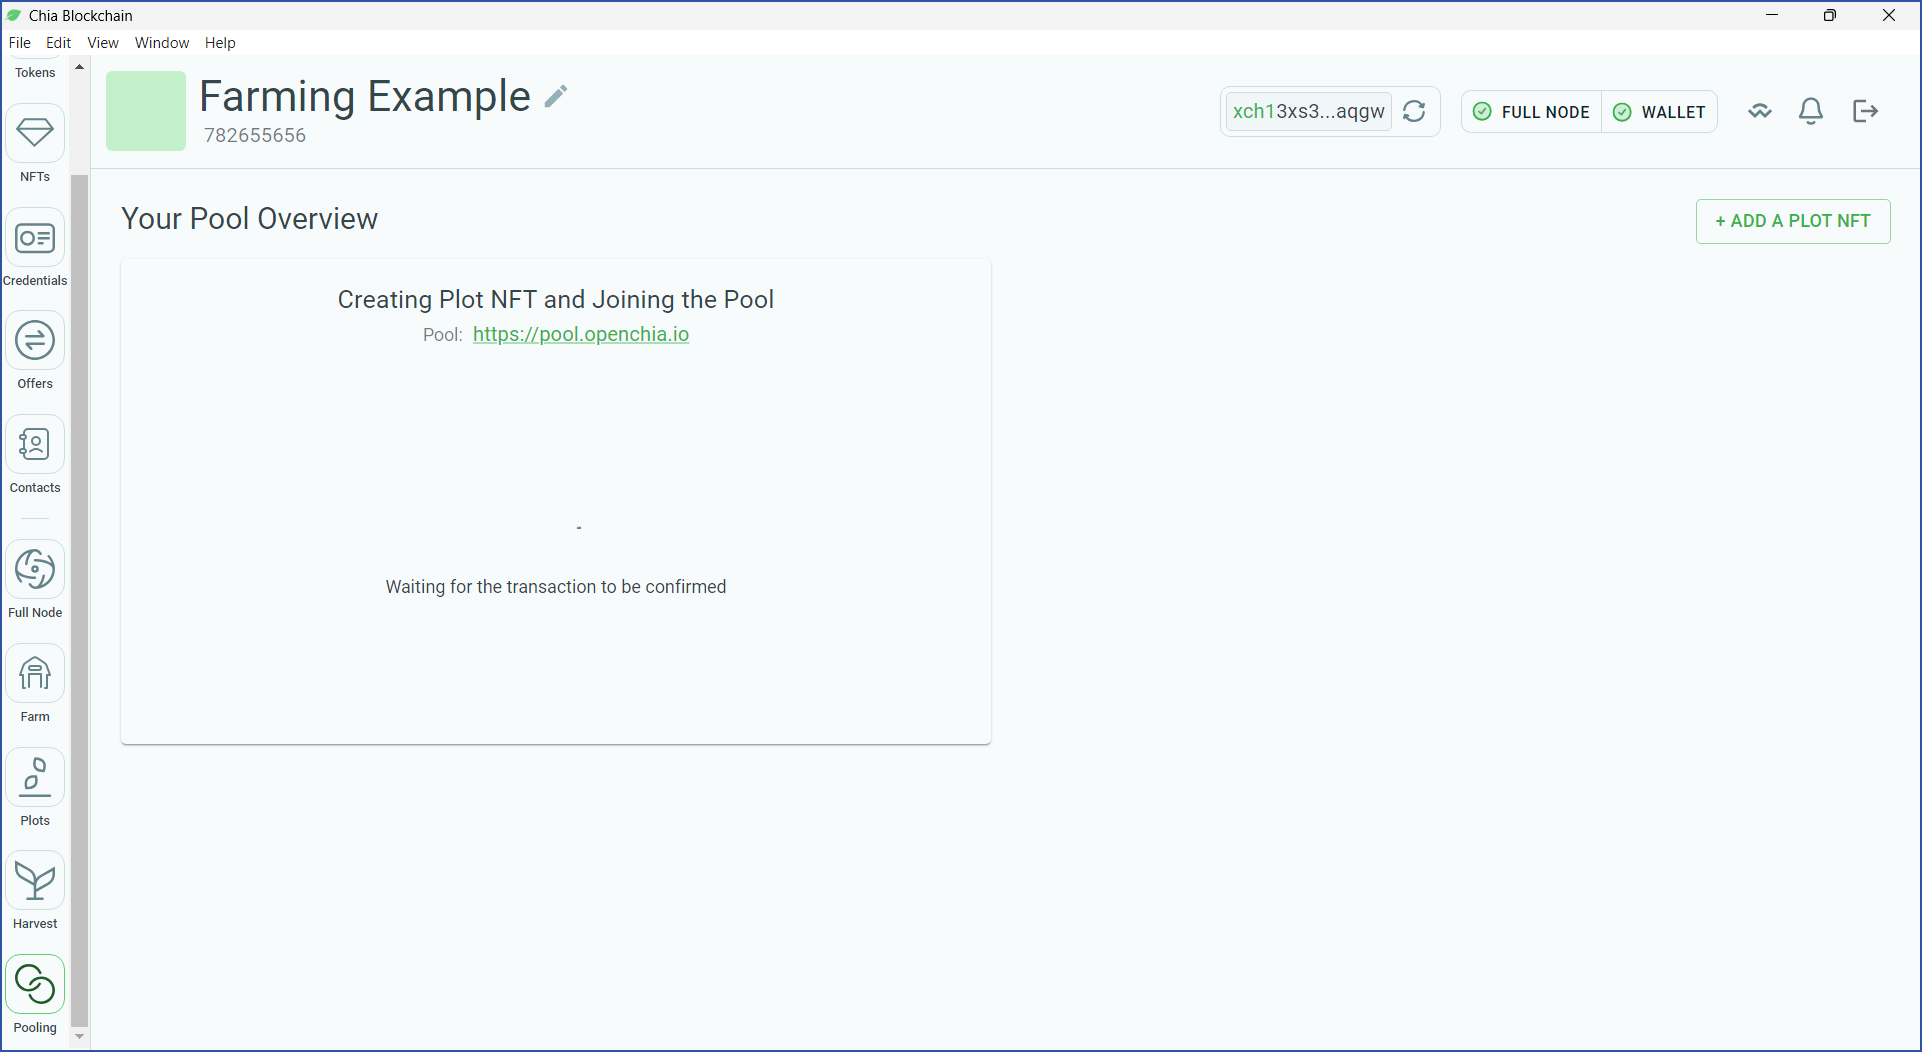
After the transaction has been finalized (typically 1-3 minutes), the details of your plot NFT will appear:
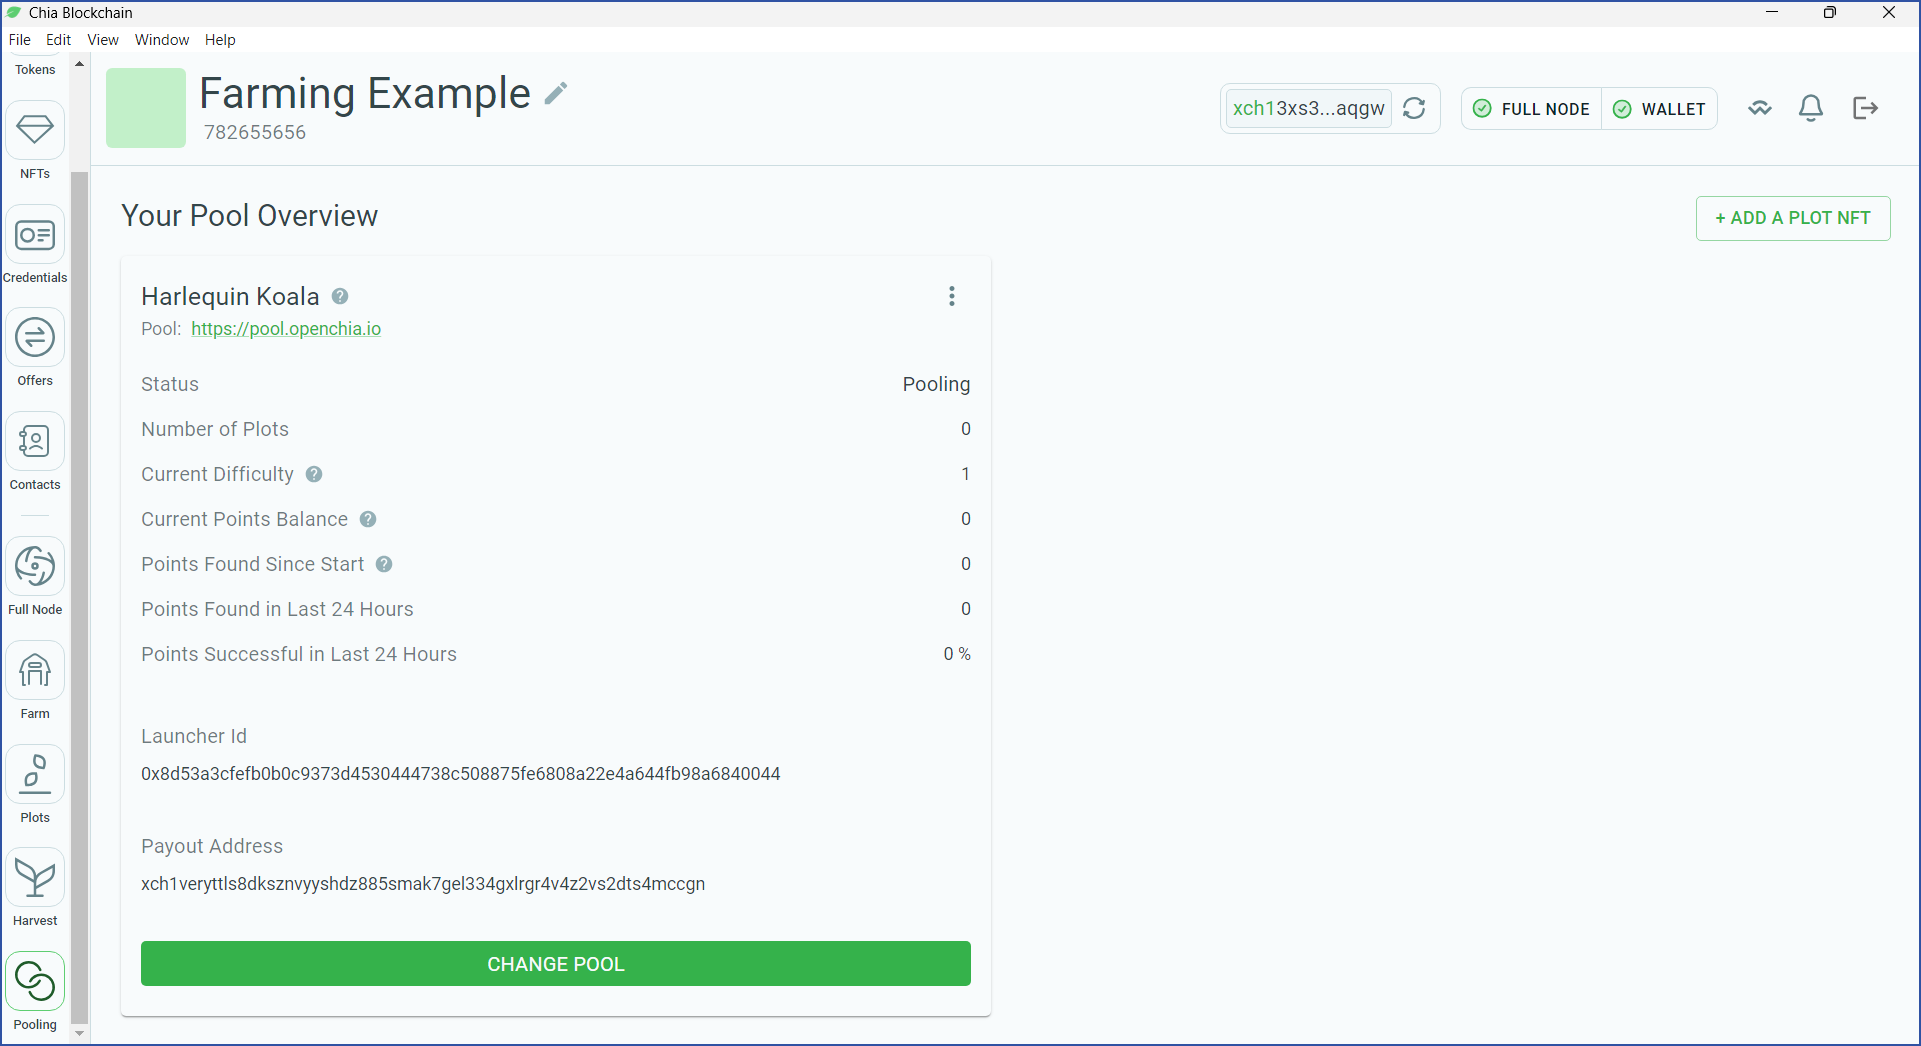
A two-word name will automatically be assigned to your plot NFT, in this case "Harlequin Koala". In order to determine how much space you are contributing, your pool will periodically send you challenges. If you want to change pools later, simply return to this screen and click CHANGE POOL.
Pools typically require you to wait for 30 minutes before leaving. This is to prevent you from leaving the pool when you are about to farm a block, thus keeping the reward for yourself.
Chia's pooling protocol has several significant advantages over pools on other blockchains. Read more about these advantages, as well as the technical details of how the protocol works, in our pooling section.
Create a plot
Plots are large files that consist almost entirely of cryptographic data to be used in Chia farming. The plot creation process does not require a full node or wallet to be synced. In fact, it doesn't even require an internet connection.
For this tutorial, we will create a plot from inside the same application that runs the node and wallet. For the creation of subsequent plots, you may want to offload this work to a computer that has been optimized for plotting.
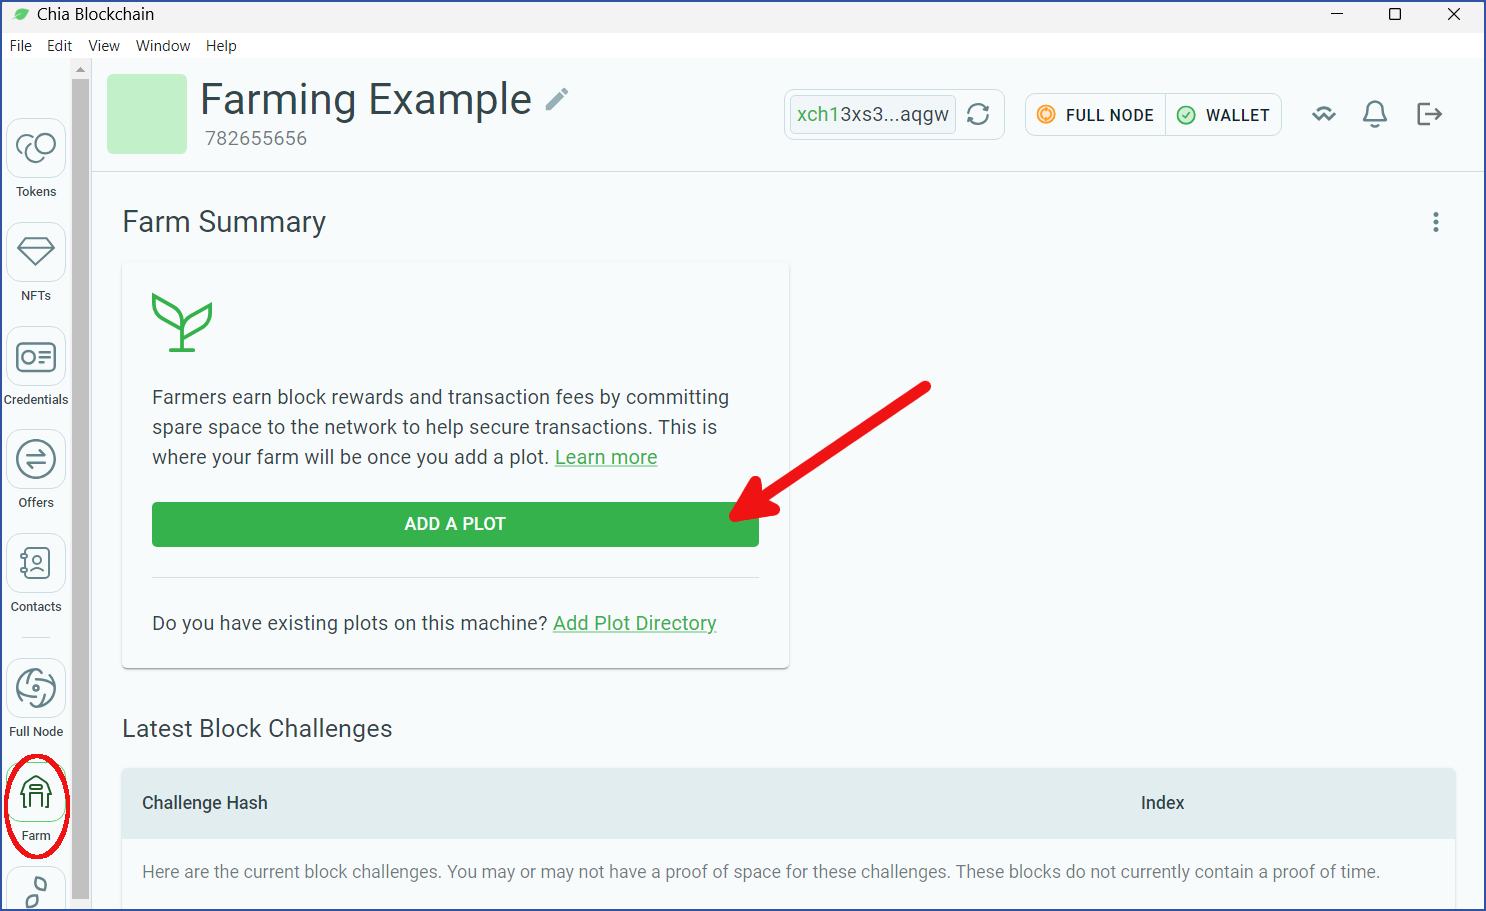
From the Chia application, click the Farm icon and click ADD A PLOT:
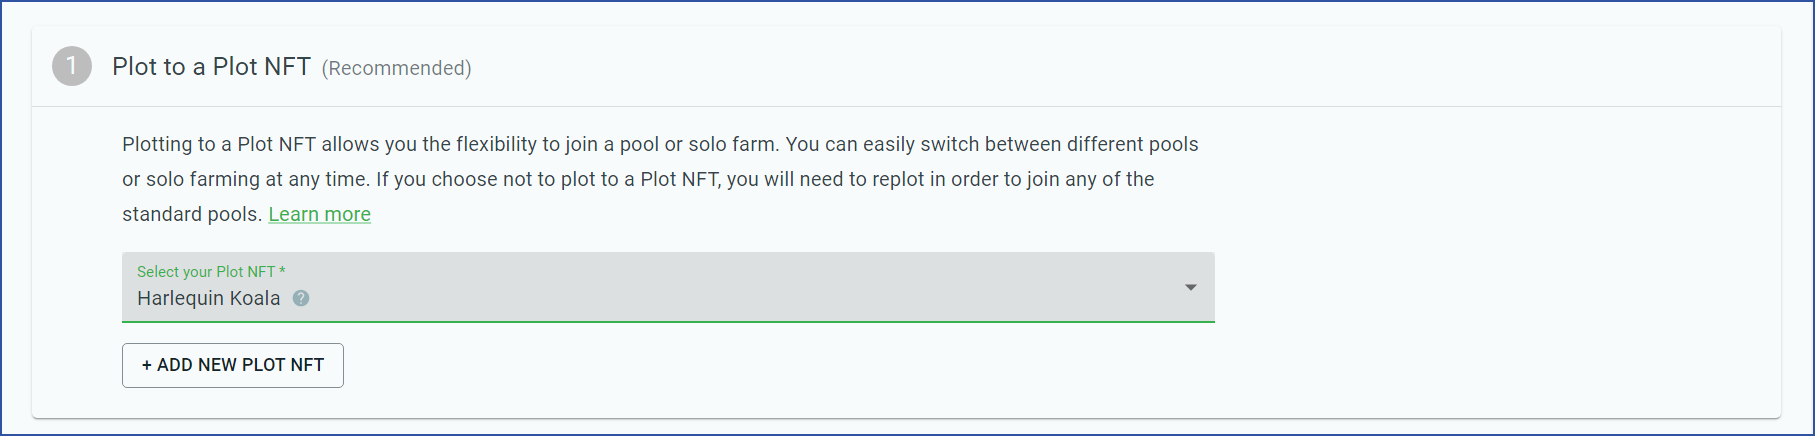
If you previously created a plot NFT, it will show up now. The plots you create will be associated with this NFT. It is important that you associate all of your plots to the same NFT in order to farm to a pool, as well as to be able to change pools easily if desired. As long as your plot NFT shows up here, there is no need to change it:
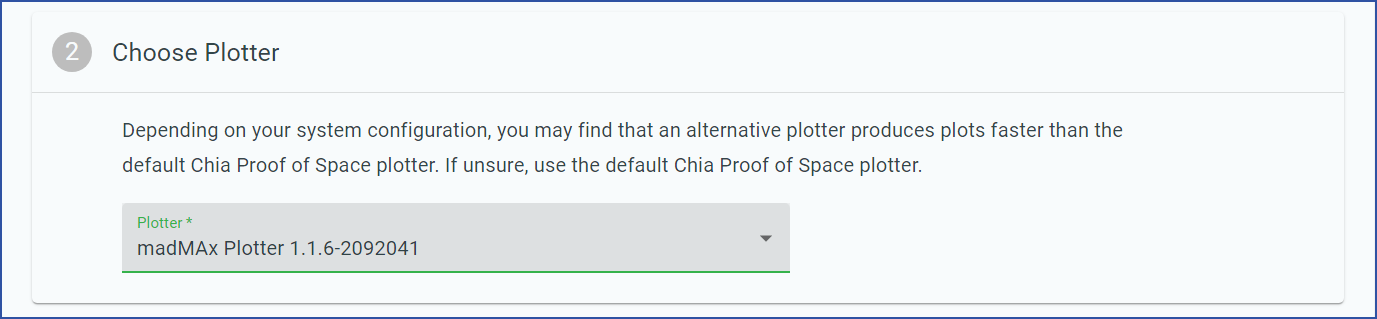
Next, you will need to choose a plotter. When creating a single plot, Chia Proof of Space and madMAx both will work on almost all hardware. The plot from this example was created with madMAx because it requires the smallest amount of temporary disk space.
When building a larger farm, the plotter you choose will depend greatly on your available hardware. It may help to experiment with multiple plotters to get a feel for which ones work best for your setup. For details on each of the available plotters, see our Plotting Software section.
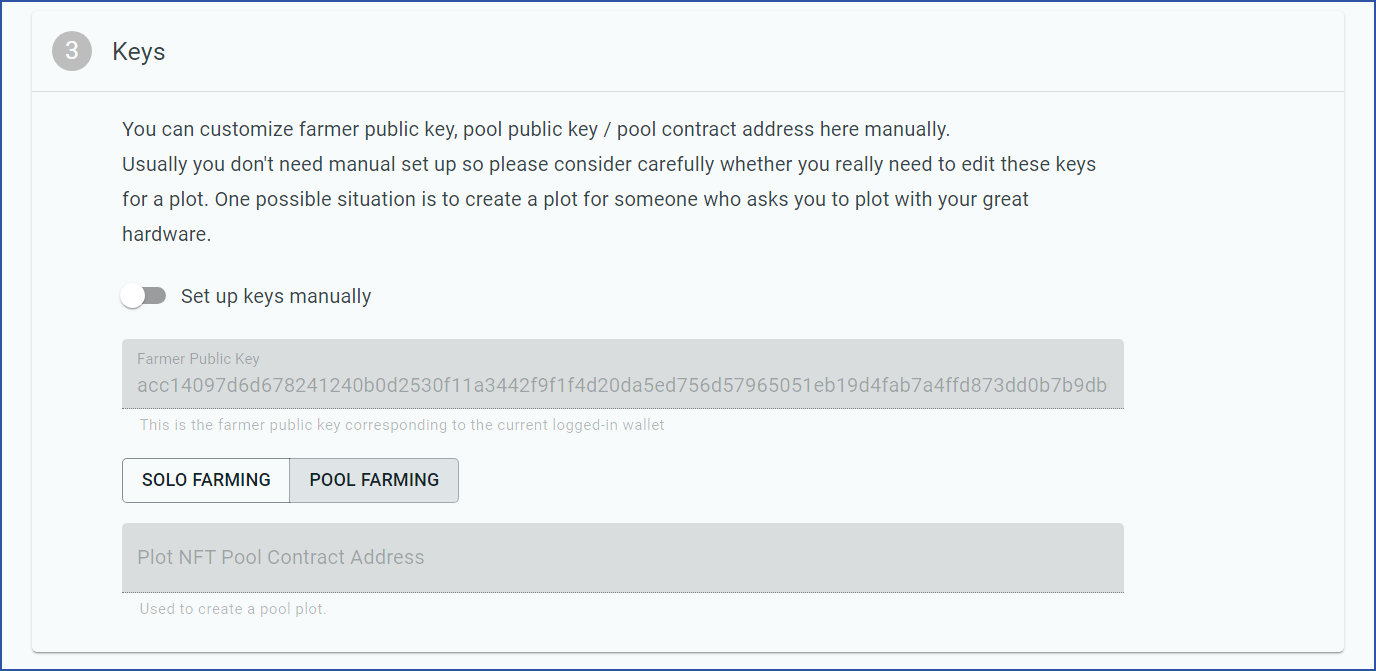
For the Keys section, you typically won't need to change anything.
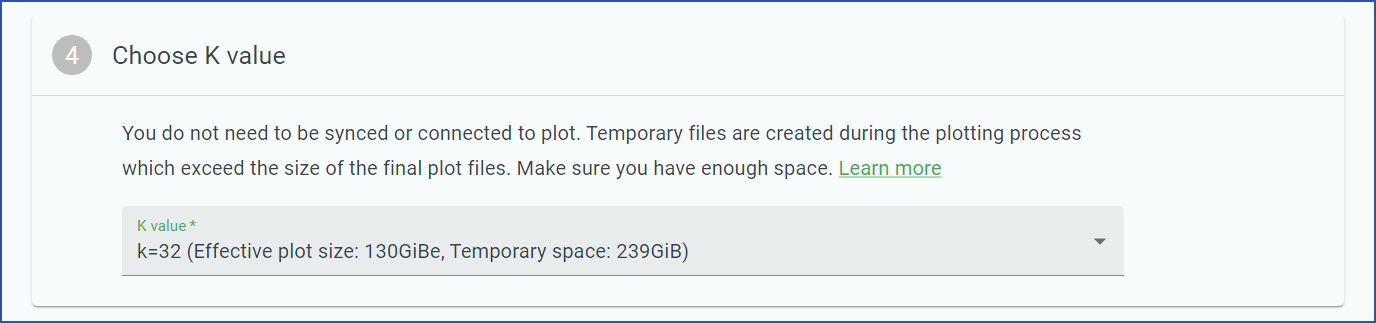
Next, you will need to choose a k value, and possibly a compression level.
k is a constant that dictates the size of the plot. The minimum k for Chia's mainnet is 32. This is also the most common size used, by far. With each increment in this value, all of a plot's associated parameters are doubled. For example, a k33 plot is twice as large as a k32 plot, and it requires twice the memory, temporary storage, and time to be created.
For this tutorial, we'll choose k32. Note that some plotters are only capable of creating k32 plots, so you might not see any other options.
Due to advancements in technology, the minimum k value will likely need to be increased at some point. This would require you to replot all k32 plots. However, there are currently no plans to increase the minimum k, and we will do our best to give you at least a one-year notice if any such plans are made.
Certain plotters are also capable of creating compressed plots, which are discussed in great detail in the Plotting Basics section. If the Compression Level dropdown appears, fee free to select 3. This is a modest level of compression that even low-power systems can harvest. Most farmers will want to create compressed plots, but for now we just want to get a feel for creating a single plot. A C0 (uncompressed) plot is fine for accomplishing this goal.
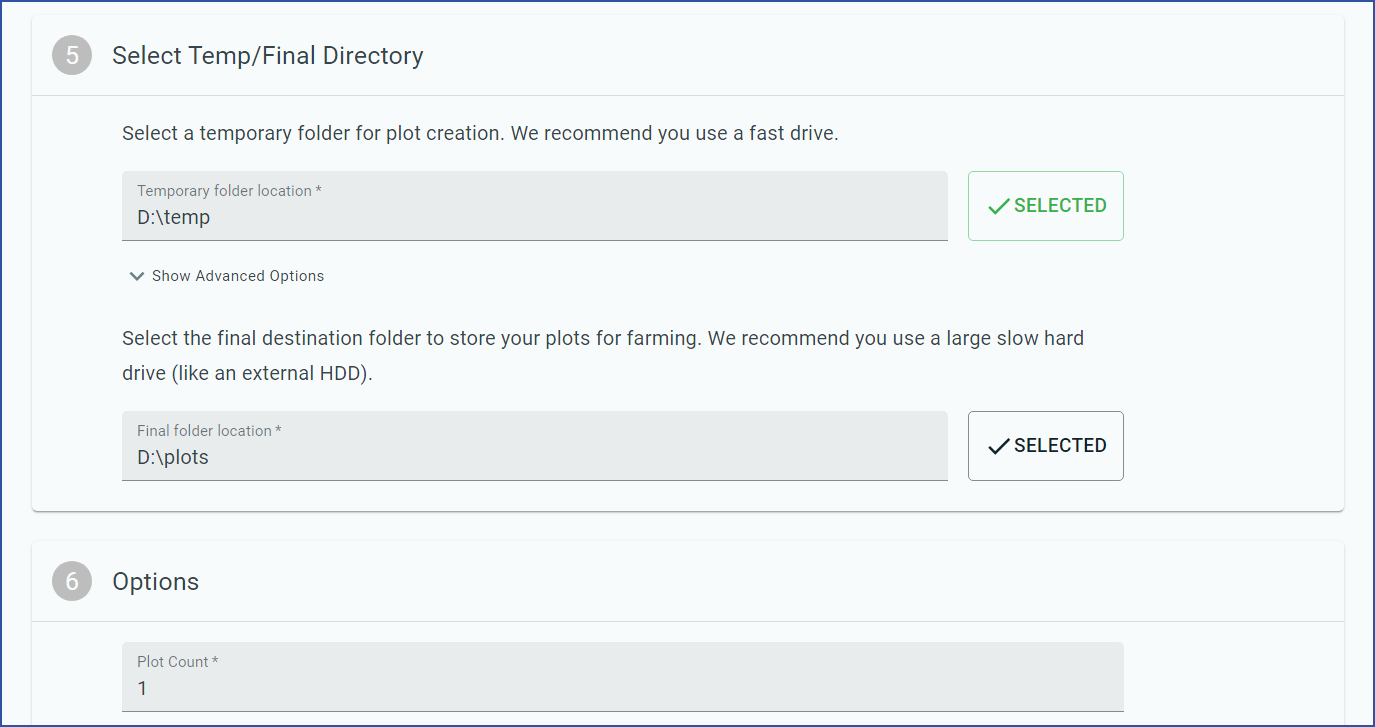
Next, you need to select the temporary and final directories for your plot. The medium for temporary storage will greatly affect the speed at which your plot is created:
- RAM -- For plots created entirely in RAM, there is no temporary storage. RAM plotters can typically create k32 plots in a few minutes, but they also require a significant amount of memory (256 GB - 416 GB, depending on the plotter).
- SSD -- Most farmers choose to use an enterprise NVMe SSD for the temporary storage. These SSDs can handle large amounts of reads and writes in their lifetimes.
- HDD -- If you don't mind plotting slowly, you can choose a directory located on an HDD.
The final directory is where the plot will be copied after it has been created. Most farmers will choose to use an HDD as the final directory. However, for this tutorial an NVMe SSD was used for both the temporary and final directories.
SSDs are rated for a certain number of writes. Creating a plot is write-intensive. If you plan to create thousands of plots, avoid doing so on a consumer SSD or you will risk wearing it out.
You will also need to choose how many plots to create. Certain plotters can be optimized by creating multiple plots in parallel. However, we will only create a single plot for this tutorial:
After you have gone through all of these settings, click CREATE. You will be taken to a progress panel:
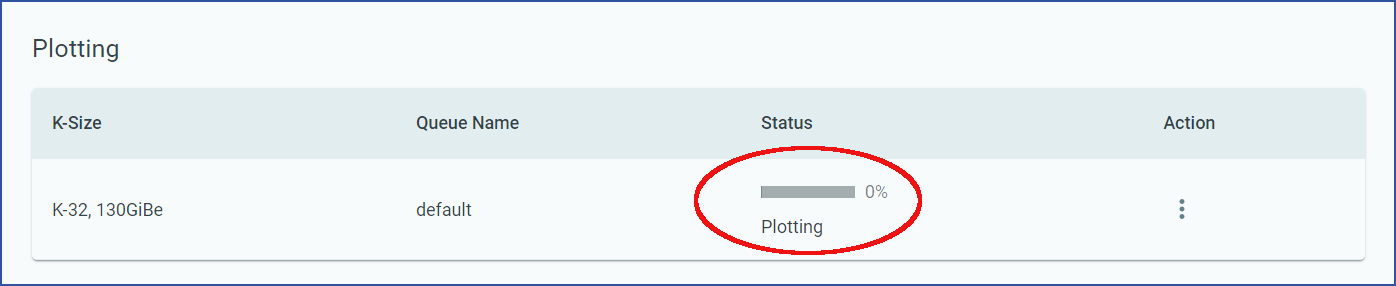
The amount of time required to create this plot is highly dependent on your hardware. The world record time to create a k32 plot is around 30 seconds. The plot for this tutorial was created on a laptop in around 3 hours.
Some of the available plotters can create k25 plots. These plots are significantly smaller than k32, so they can be created quickly. However, they are for testing purposes only. Any proof of space taken from a plot smaller than k32 on mainnet will be rejected.
While waiting for your plot to be created, feel free to browse through the Chia application. However, if you shut down the application, the plotting process will be stopped and all progress will be lost. There is no "pause" button for plotting.
Start farming
Before you can begin farming, you need to be running a synced full node. Earlier in this tutorial, you either chose to sync from genesis, or to sync from a checkpoint database. In both cases, the Full Node screen will eventually show a status of Synced:
Your node is now synced. If your plot has finished being created, you are also farming. To verify this, click the Farm icon:
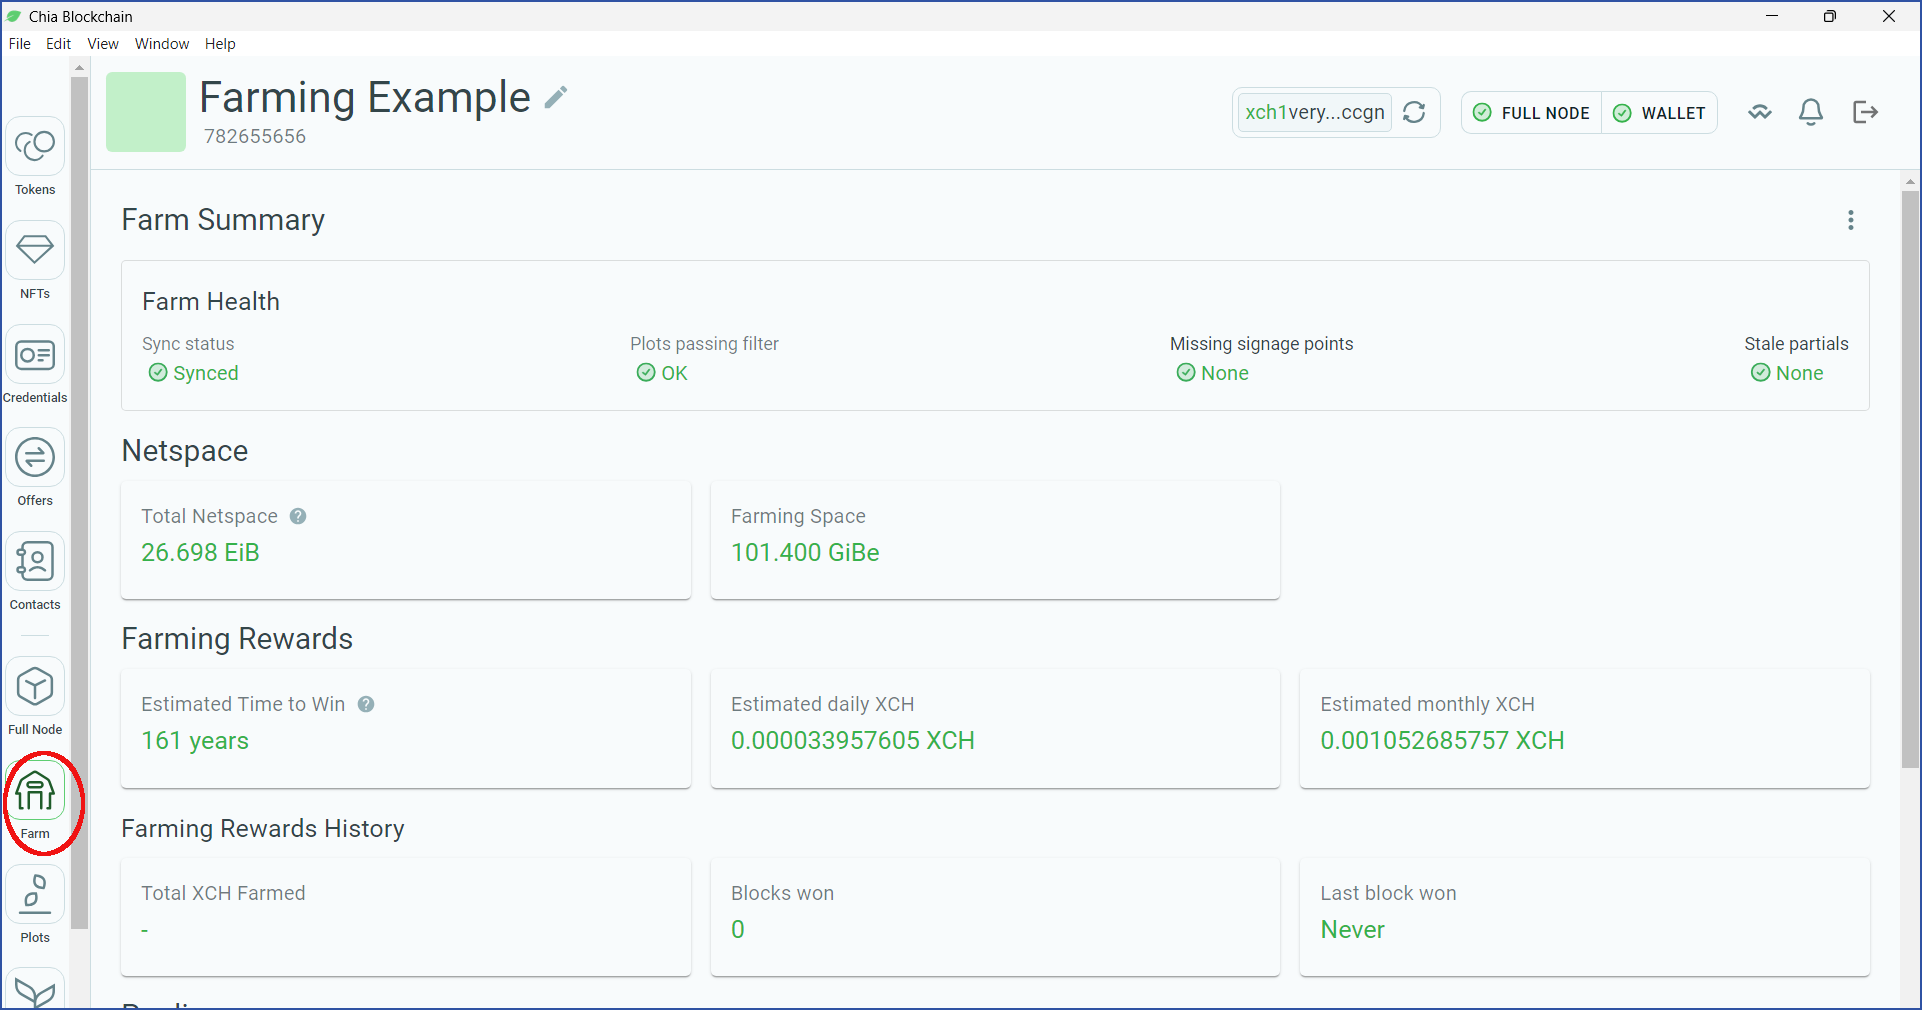
You will be shown a number of details about your farm. As long as the Farm Health section has all green icons, everything is working as expected.
Congratulations! You have become a Chia farmer.
There is still a lot to learn, but you already have the basic knowledge needed to grow your farm.
Next steps
Once you have a small farm up and running, you can decide whether to expand, and how to do so. The following pages will show you:
- Basic details of Chia plots, including "compressed" versus "uncompressed" plots
- How to select the optimal computer for plotting
- List of Chia plotting software
- How to choose a plot compression level
- How to create Chia plots
- Notes about SSD encurance
- How to move plots to their final destinations
How to Get Help
- Get help on CNI's official Discord, in the
#farming-and-plottingand#supportchannels. - Get more questions answered in the plotting FAQ.