WalletConnect User Guide
Intro
This guide will show you how to use WalletConnect to connect a sample dApp to your Chia reference wallet.
- Generally speaking, you only need to have a synced light wallet to use WalletConnect. A full node is not required. However, depending on your dApp, a full node may be required to run certain commands.
- WalletConnect is supported on every operating system supported by the Chia reference wallet, including Windows, Linux, and MacOS.
- WalletConnect is supported on Chia's testnet, as well as its mainnet.
- This guide will use Chia's reference wallet, but WalletConnect integration for other wallets will eventually be supported as well.
Install the sample dApp
In order to help you get started with WalletConnect, we have created a sample dApp to run Chia wallet RPCs. In this section, we'll install and run the dApp locally. We'll also obtain a link to connect the dApp to a Chia reference wallet.
If you would like to connect your Chia reference wallet to a different dApp, then feel free to skip ahead to the next section.
- Run this command to clone the sample dApp's GitHub repo:
git clone https://github.com/Chia-Network/walletconnect-rpcs-dapp -b main
- Change to the sample dApp's directory:
cd walletconnect-rpcs-dapp
- Install the sample dApp using NPM:
npm install
- Start the sample dApp:
npm run dev
Example result:
➜  Local:   http://127.0.0.1:5173/
  ➜  Network: use --host to expose
  ➜  press h to show help
In this example, the dApp was started locally on port 5173. This is the default port; your dApp may need to use a different port if 5173 is already being used for something else.
- Access the sample dApp:
Open a browser and navigate to http://127.0.0.1:5173/ (unless a different port was used)
If you see an error message such as An error as occurred, the most likely cause is that you are running an ad blocker that is interfering with the dApp.
Either disable the ad blocker or try a different browser.
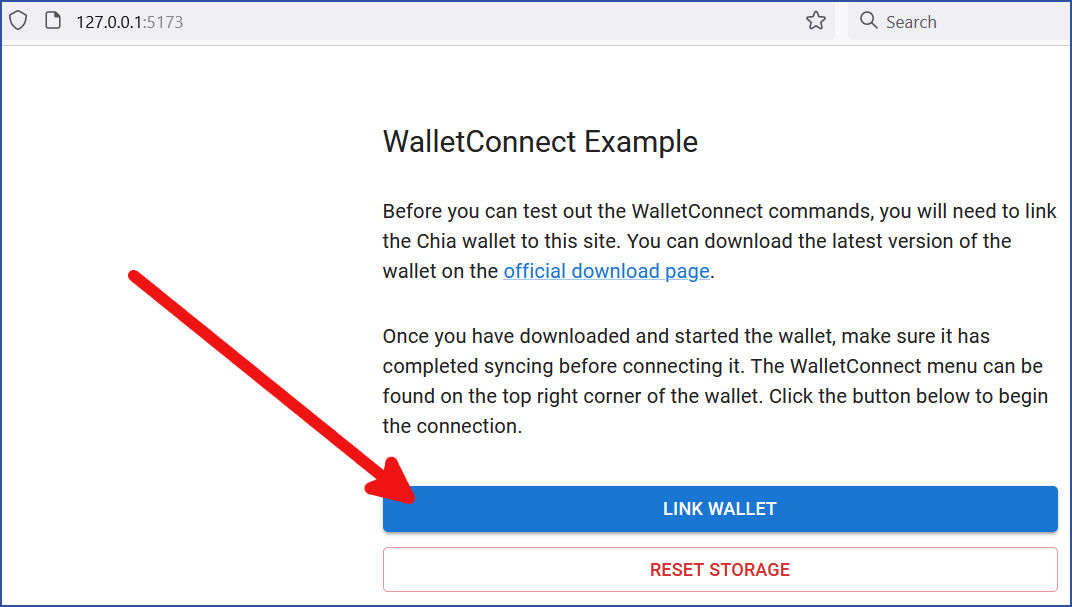
- The
WalletConnect Examplescreen should be displayed. ClickLink Wallet:
- A QR code will be displayed. Click the "Copy" button:
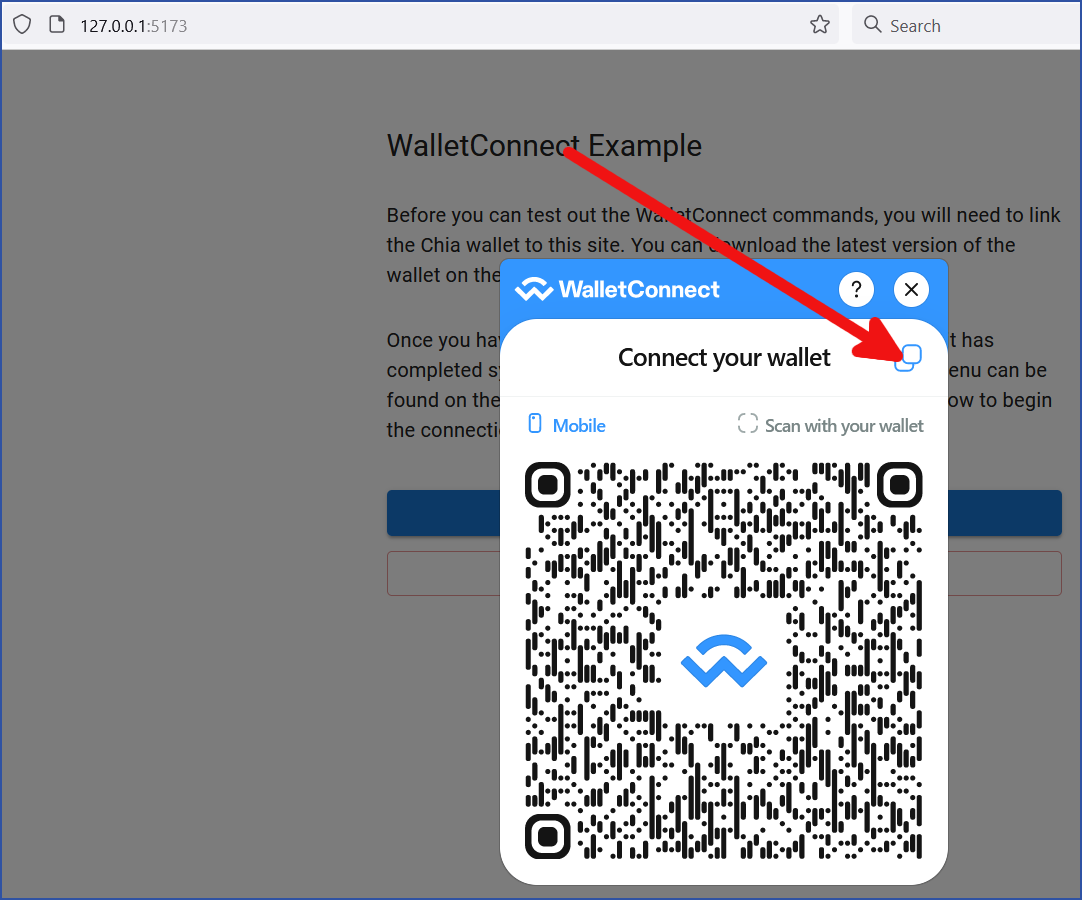
The link has been copied, so you are ready to set up WalletConnect in Chia's reference wallet. Keep this browser window open in case you need to copy the link again.
Configure WalletConnect
-
Download and install the latest version of Chia's reference wallet
-
Set up Chia's testnet
While it's possible to use WalletConnect on Chia's mainnet, this example will use the testnet.
The primary command to convert your system to use the testnet is chia configure -t true.
See our testnet setup guide for more info.
After your system has been configured to use the testnet, you can start your Chia reference wallet.
- Click the WalletConnect icon
The icon is located on the upper-right side of the reference wallet GUI, as shown here:

- Click
ENABLE WALLETCONNECT

- Click
ADD CONNECTION

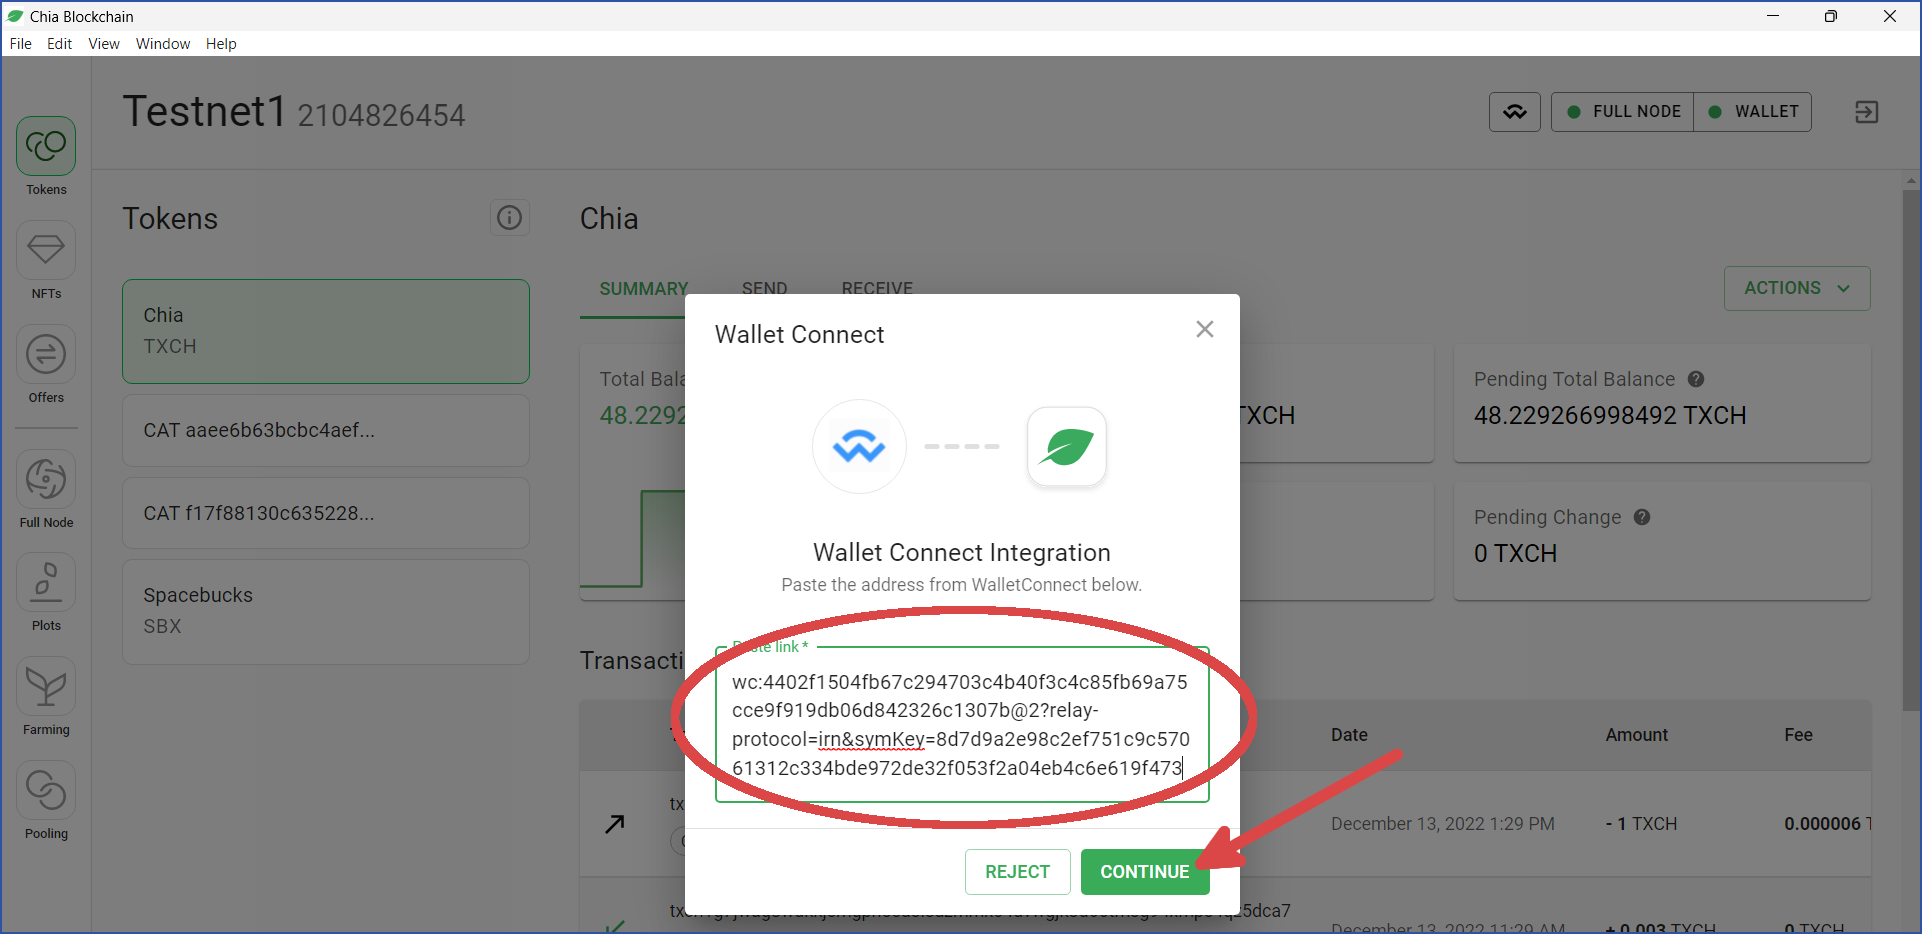
- Paste the link to your sample dApp and click
CONTINUE
If you used this guide to set up the sample dApp, this was the link you obtained with the last step of the previous section:
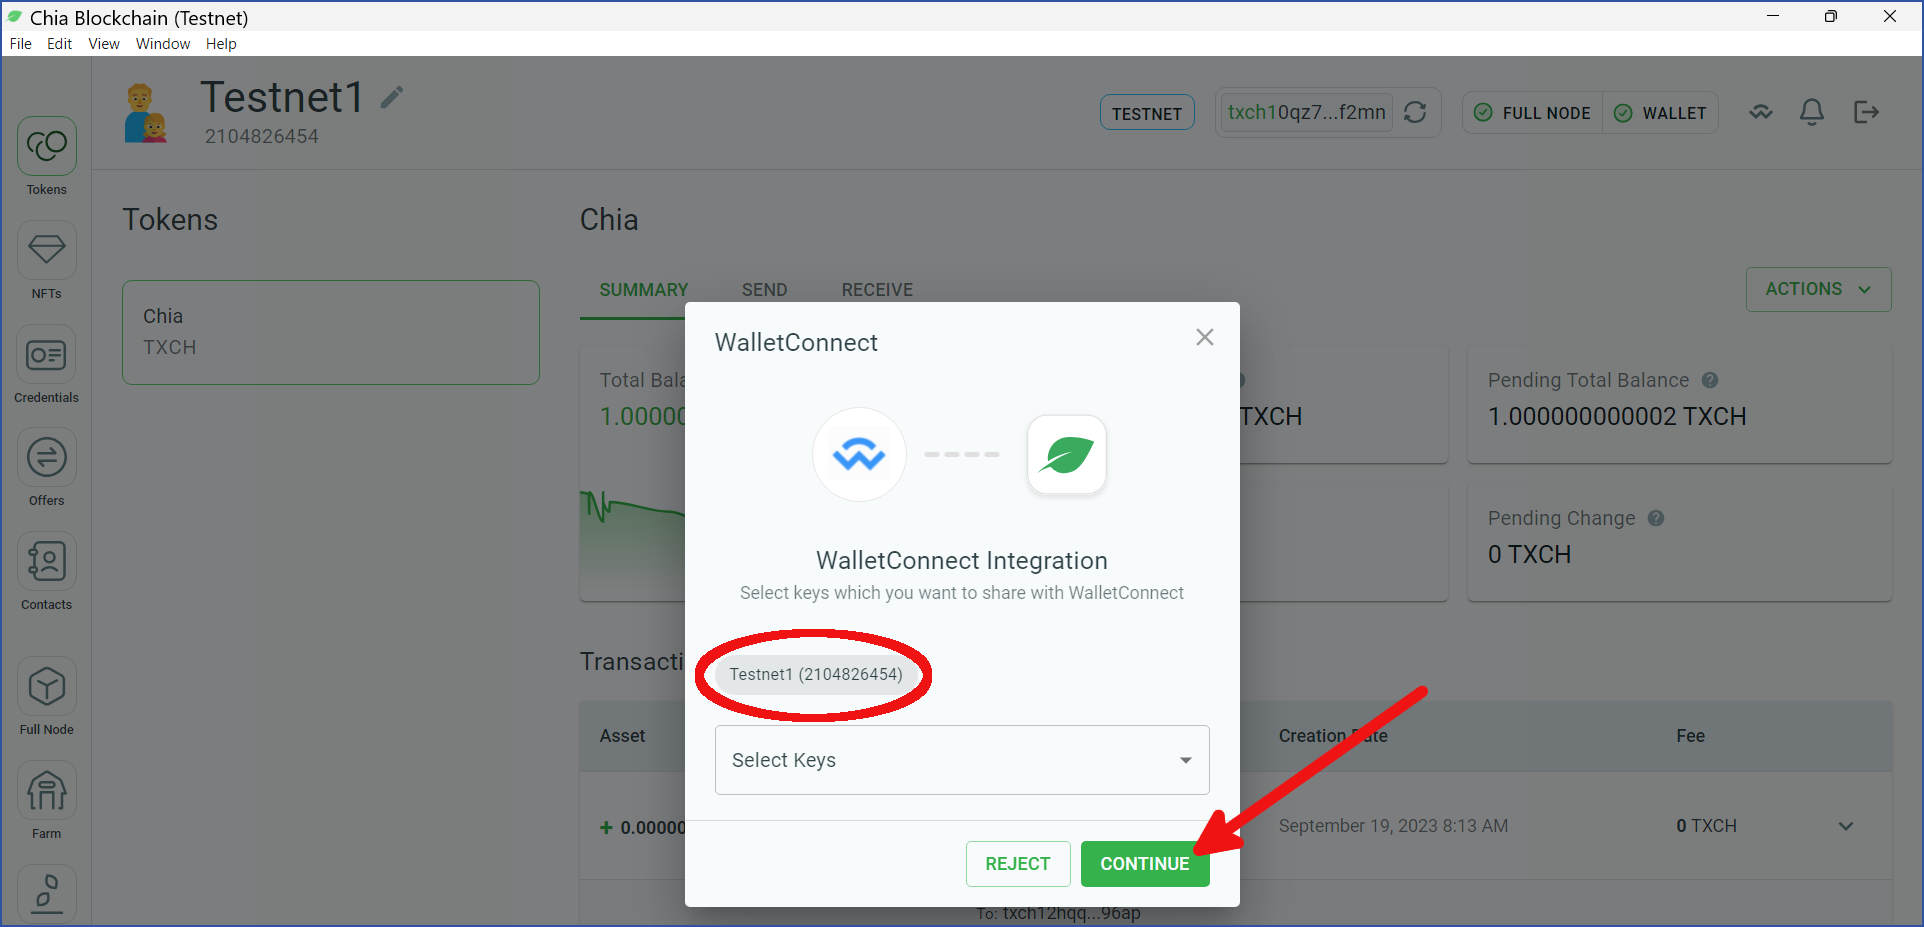
- By default, the wallet that is currently synced will be selected (in the red circle below). Click the
Select Keysdropdown if you want to connect other wallets, then clickCONTINUE:
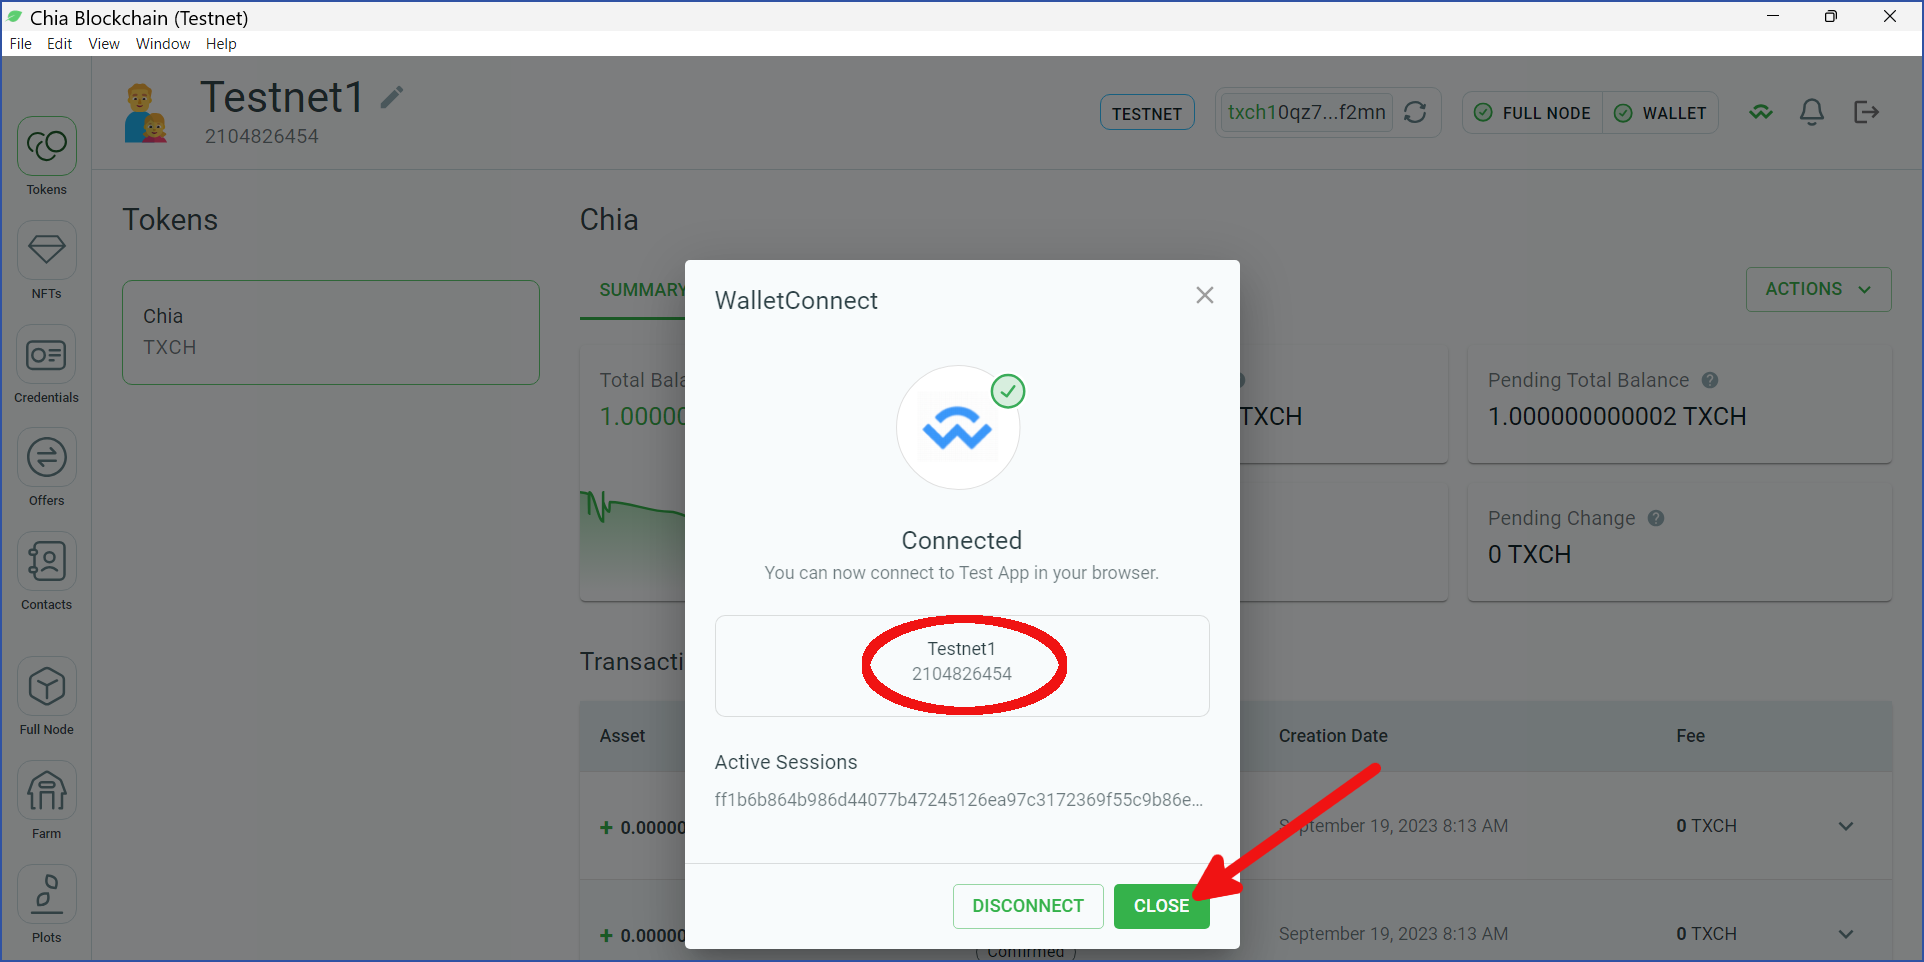
- Confirm your connection
You will be shown the key(s) to connect to the dApp. If this looks OK, click CLOSE. To start over, click DISCONNECT:
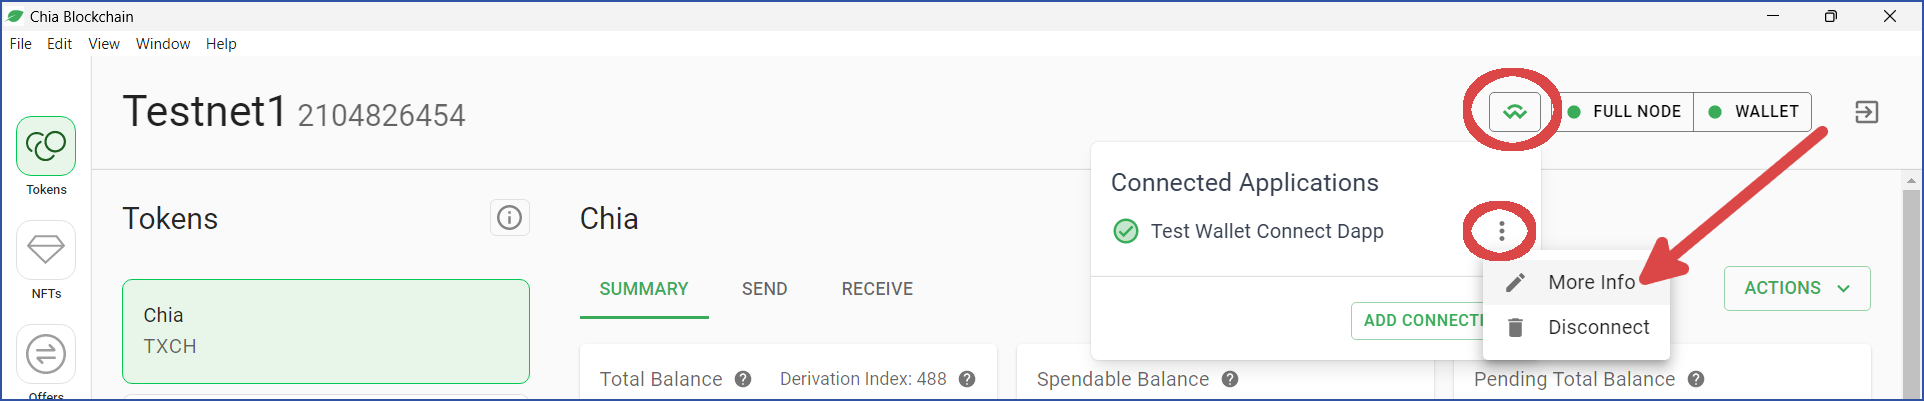
- Show more info
To show info on which dApp(s) are paired to which keys(s), click the WalletConnect icon, click the three dots, and click More Info:
You will be shown the Pair Information for your dApp:
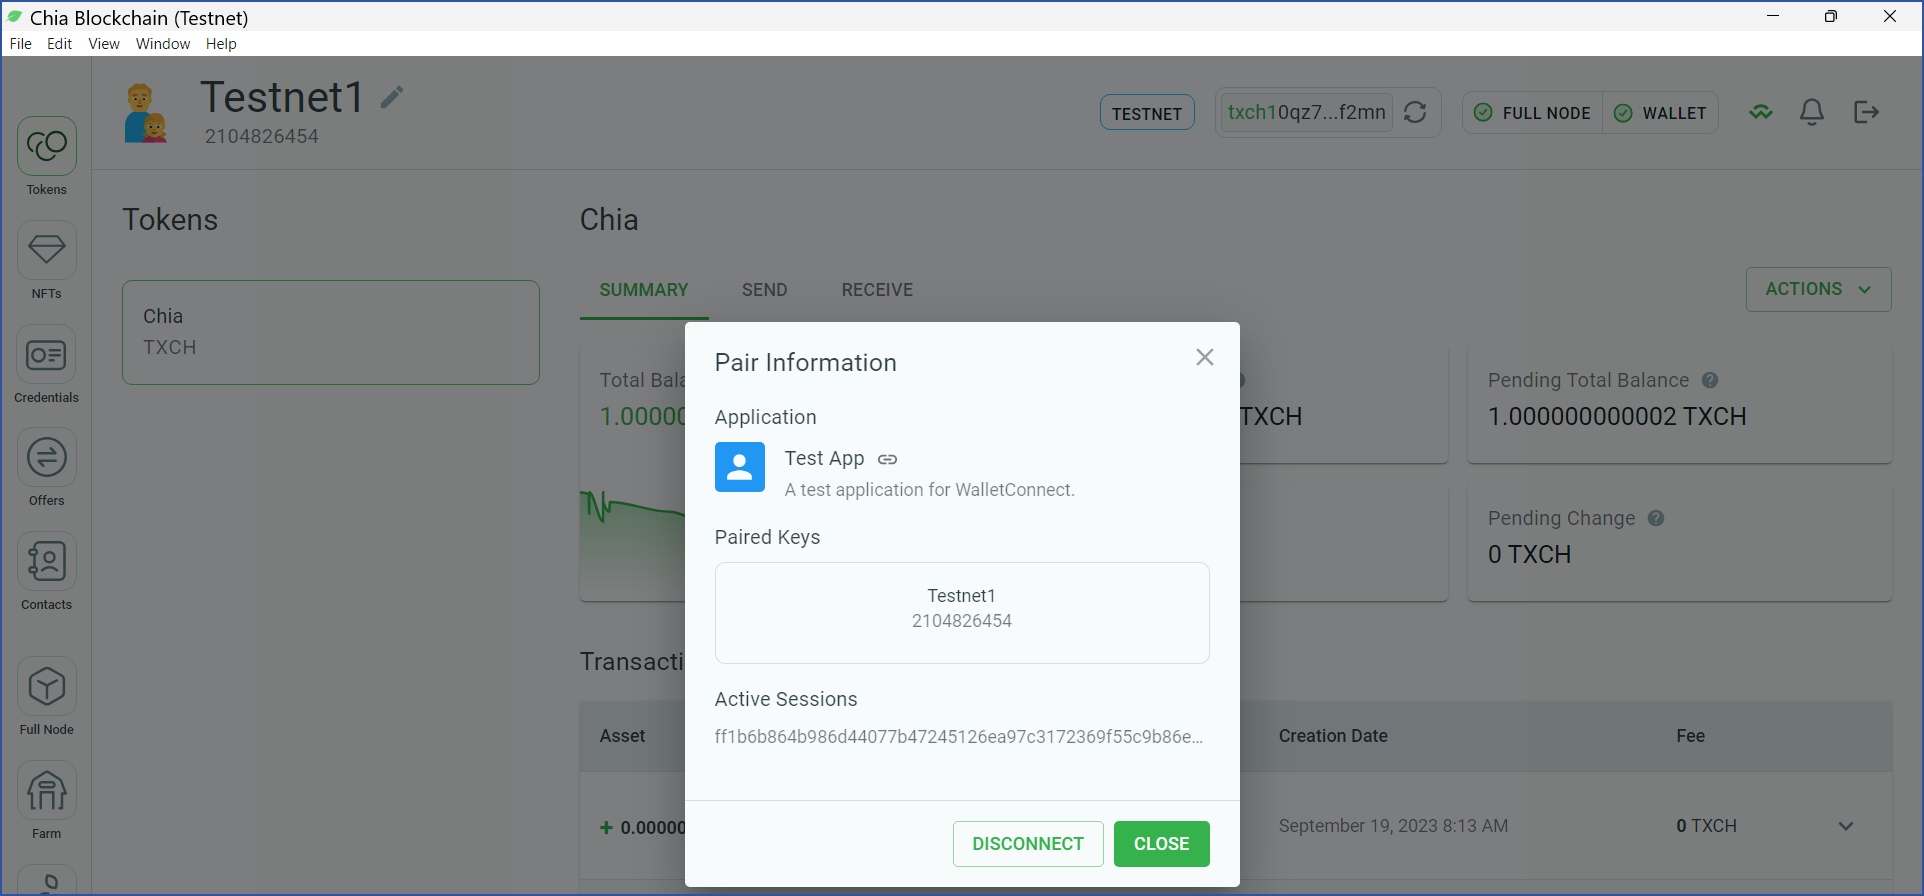
Your wallet has been successfully paired with the sample dApp. In the next section, we'll show you how to interact with your wallet from the dApp.
Call dApp functions
- View the sample dApp in a web browser
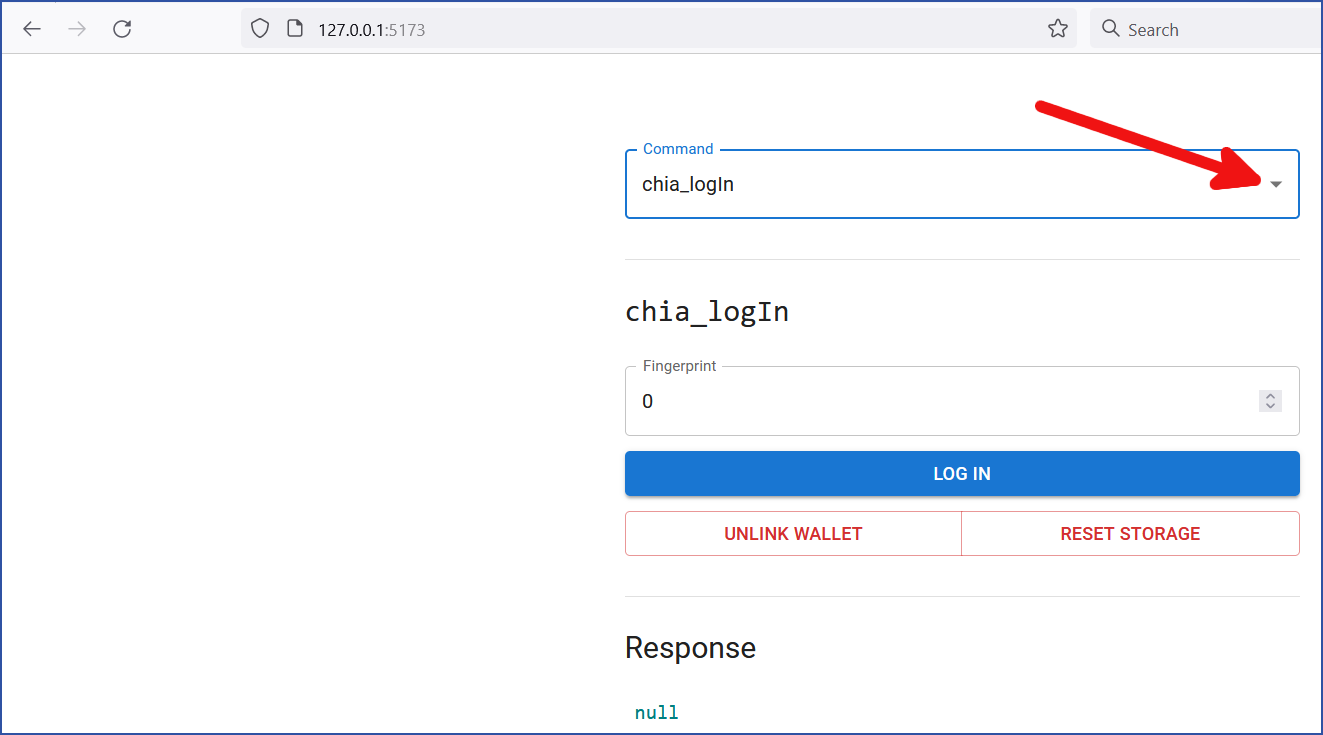
Recall that by default, the dApp will run on http://127.0.0.1:5173.
You will be shown a dropdown list of available methods. The default method is chia_logIn, but we'll call a different method for this example.
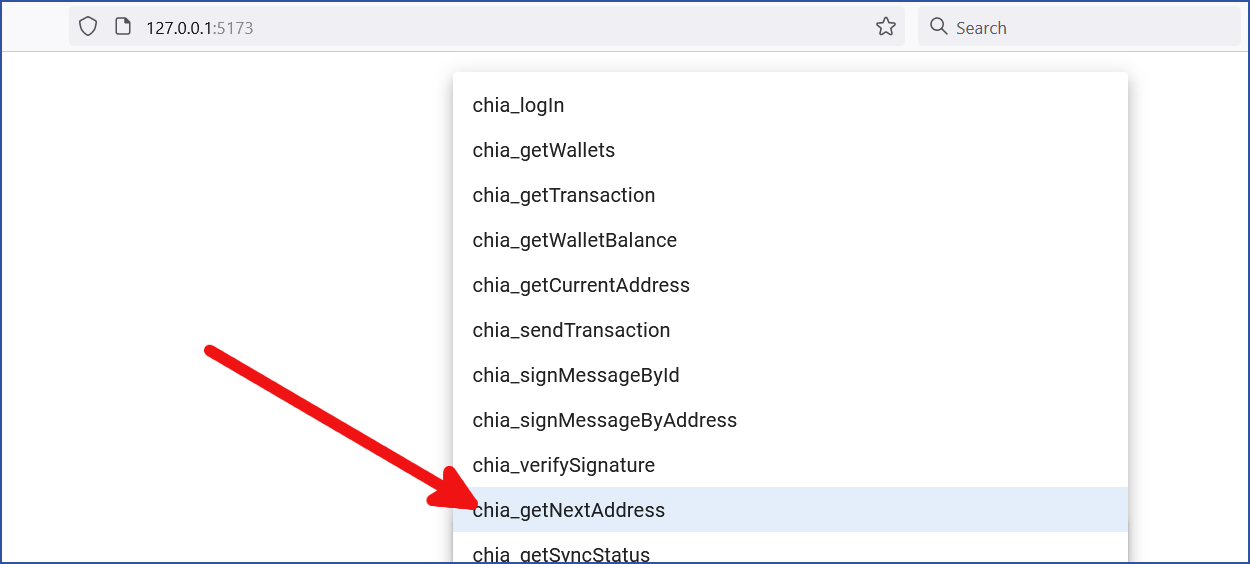
- Select
chia_getNextAddress:
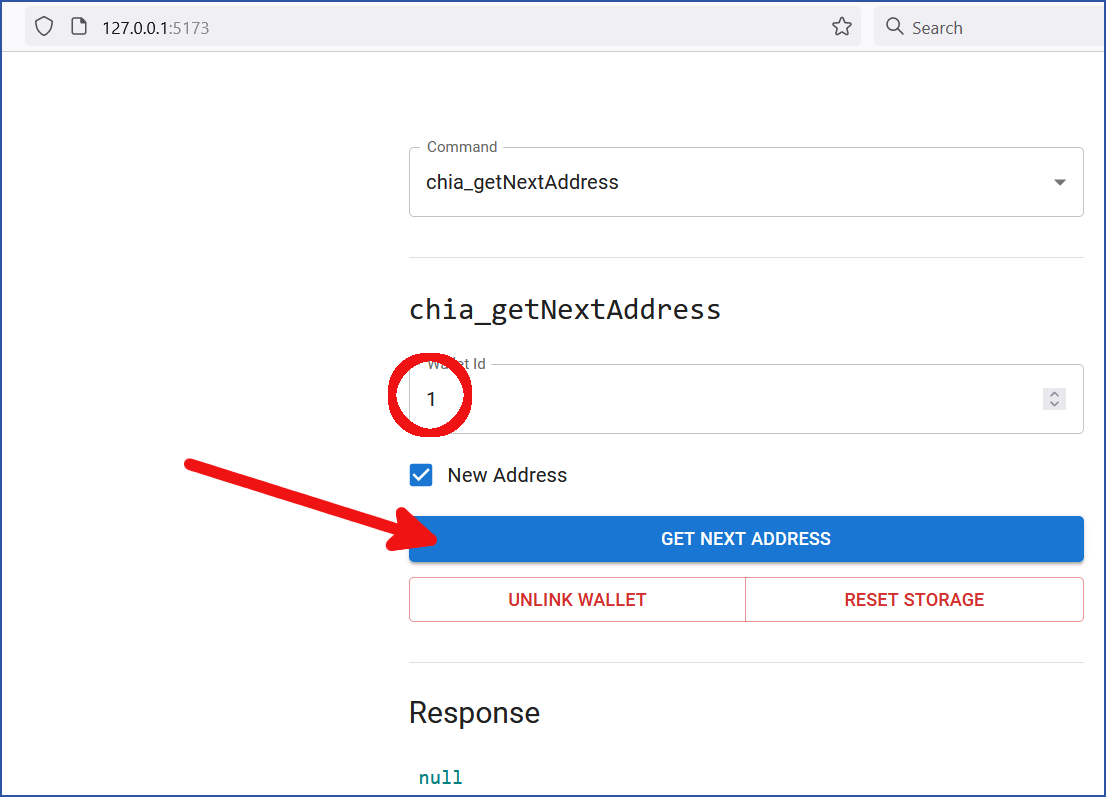
- For this example, we will choose wallet ID
1(the XCH wallet), and selectNew Address:
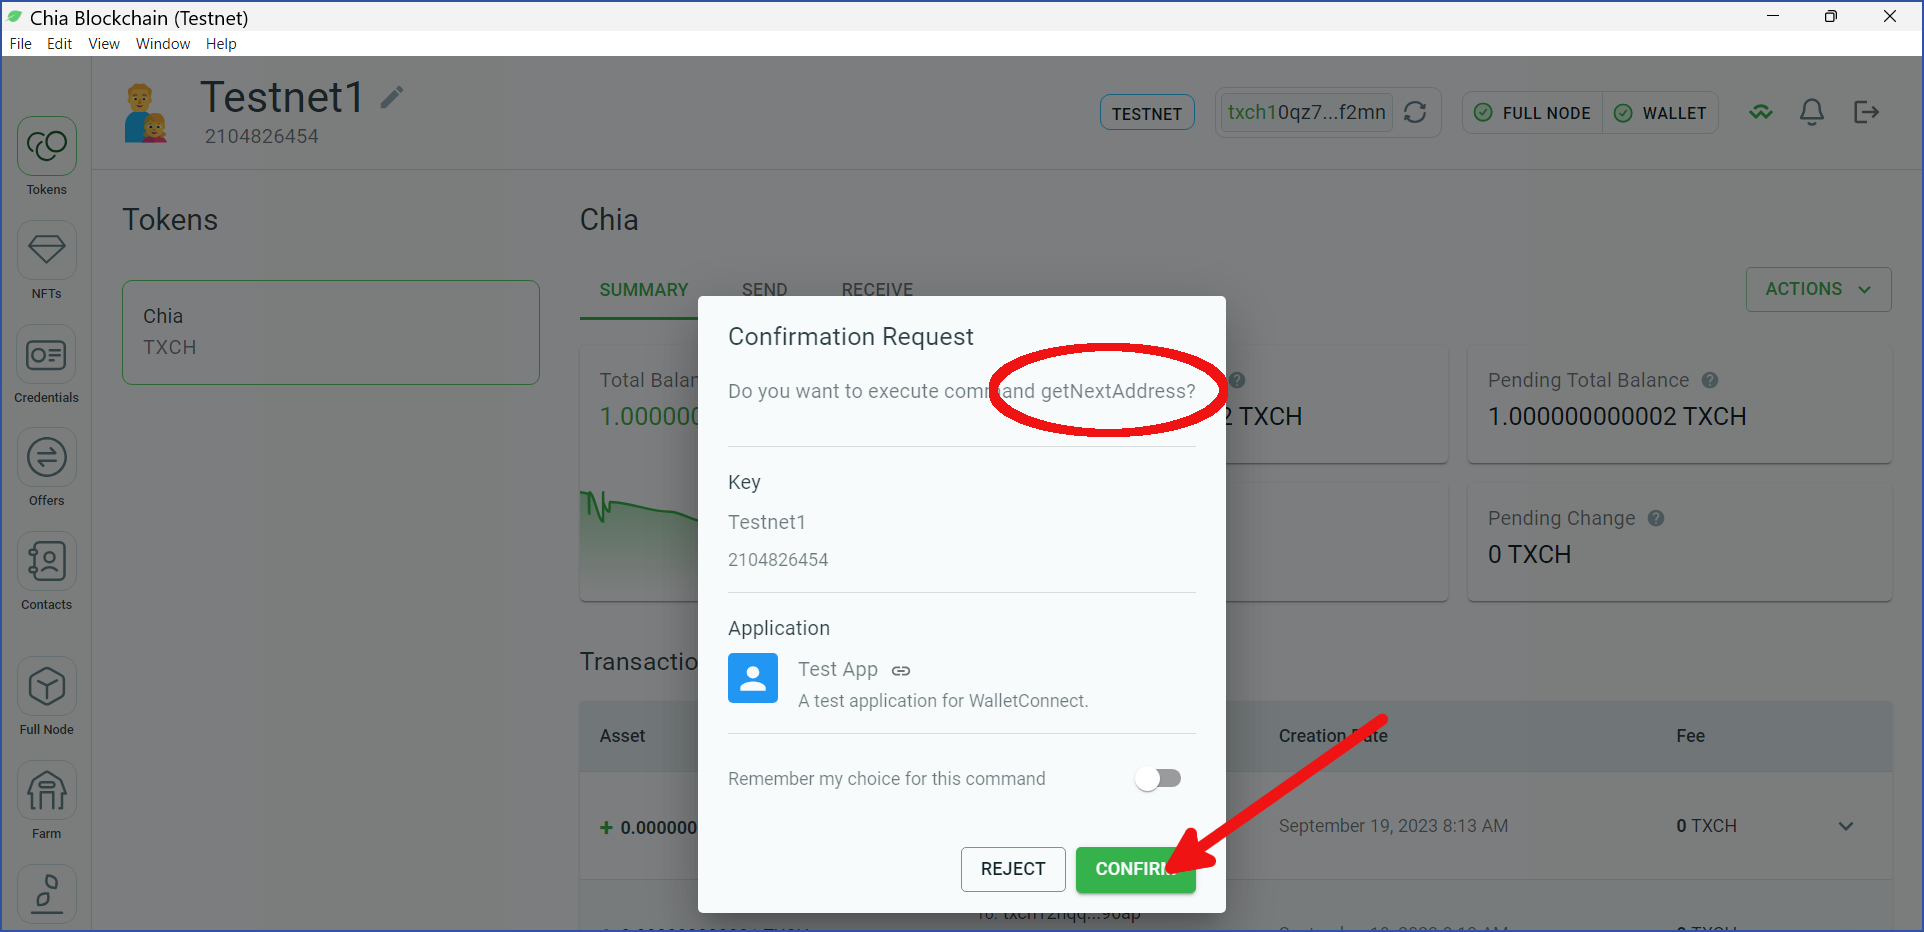
- Confirm the request
Switch back to your Chia reference wallet. You should now see a confirmation dialog with the requested method. Click CONFIRM:
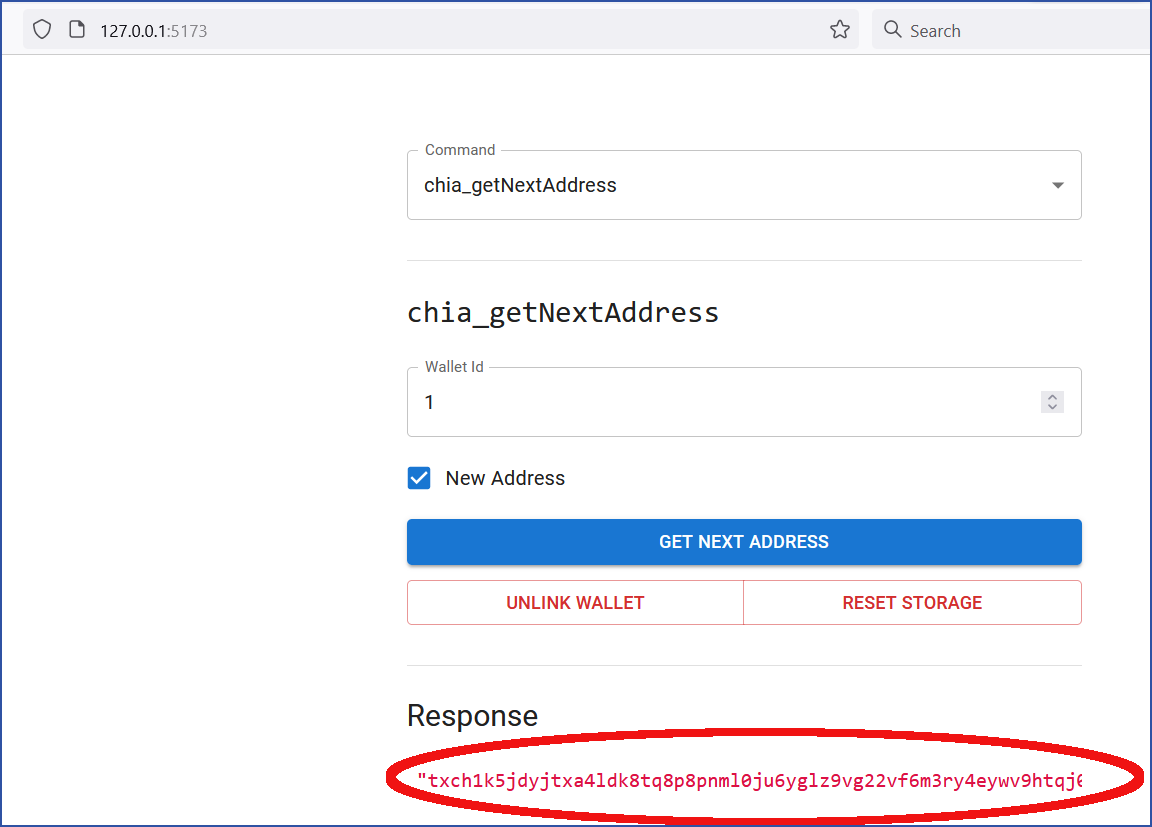
- View the response
Returning to the sample dApp, a new dialog with the response will appear. In this example, a new address will be shown:
You have now installed, configured, and used the sample dApp. Feel free to test the other functions, as well as create your own!
Configure WalletConnect
By default, you can only run dApp methods against the wallet key that is currently synced. This was not an issue in the above example because we only selected one public key to pair with the sample dApp. However, if you want your dApp to be able to interact with multiple keys, you will need to enable an additional setting in the reference wallet.
Click the gear icon in the lower left corner of the reference wallet, then click the INTEGRATION tab. Two switches will appear at the top of this panel:
-
Enable WalletConnect-- This setting was activated when you enabled WalletConnect earlier in the guide. -
Key Switching-- If you activate this setting, your dApp will be able to switch between multiple wallet keys. The selected wallet will need to sync whenever you switch between keys.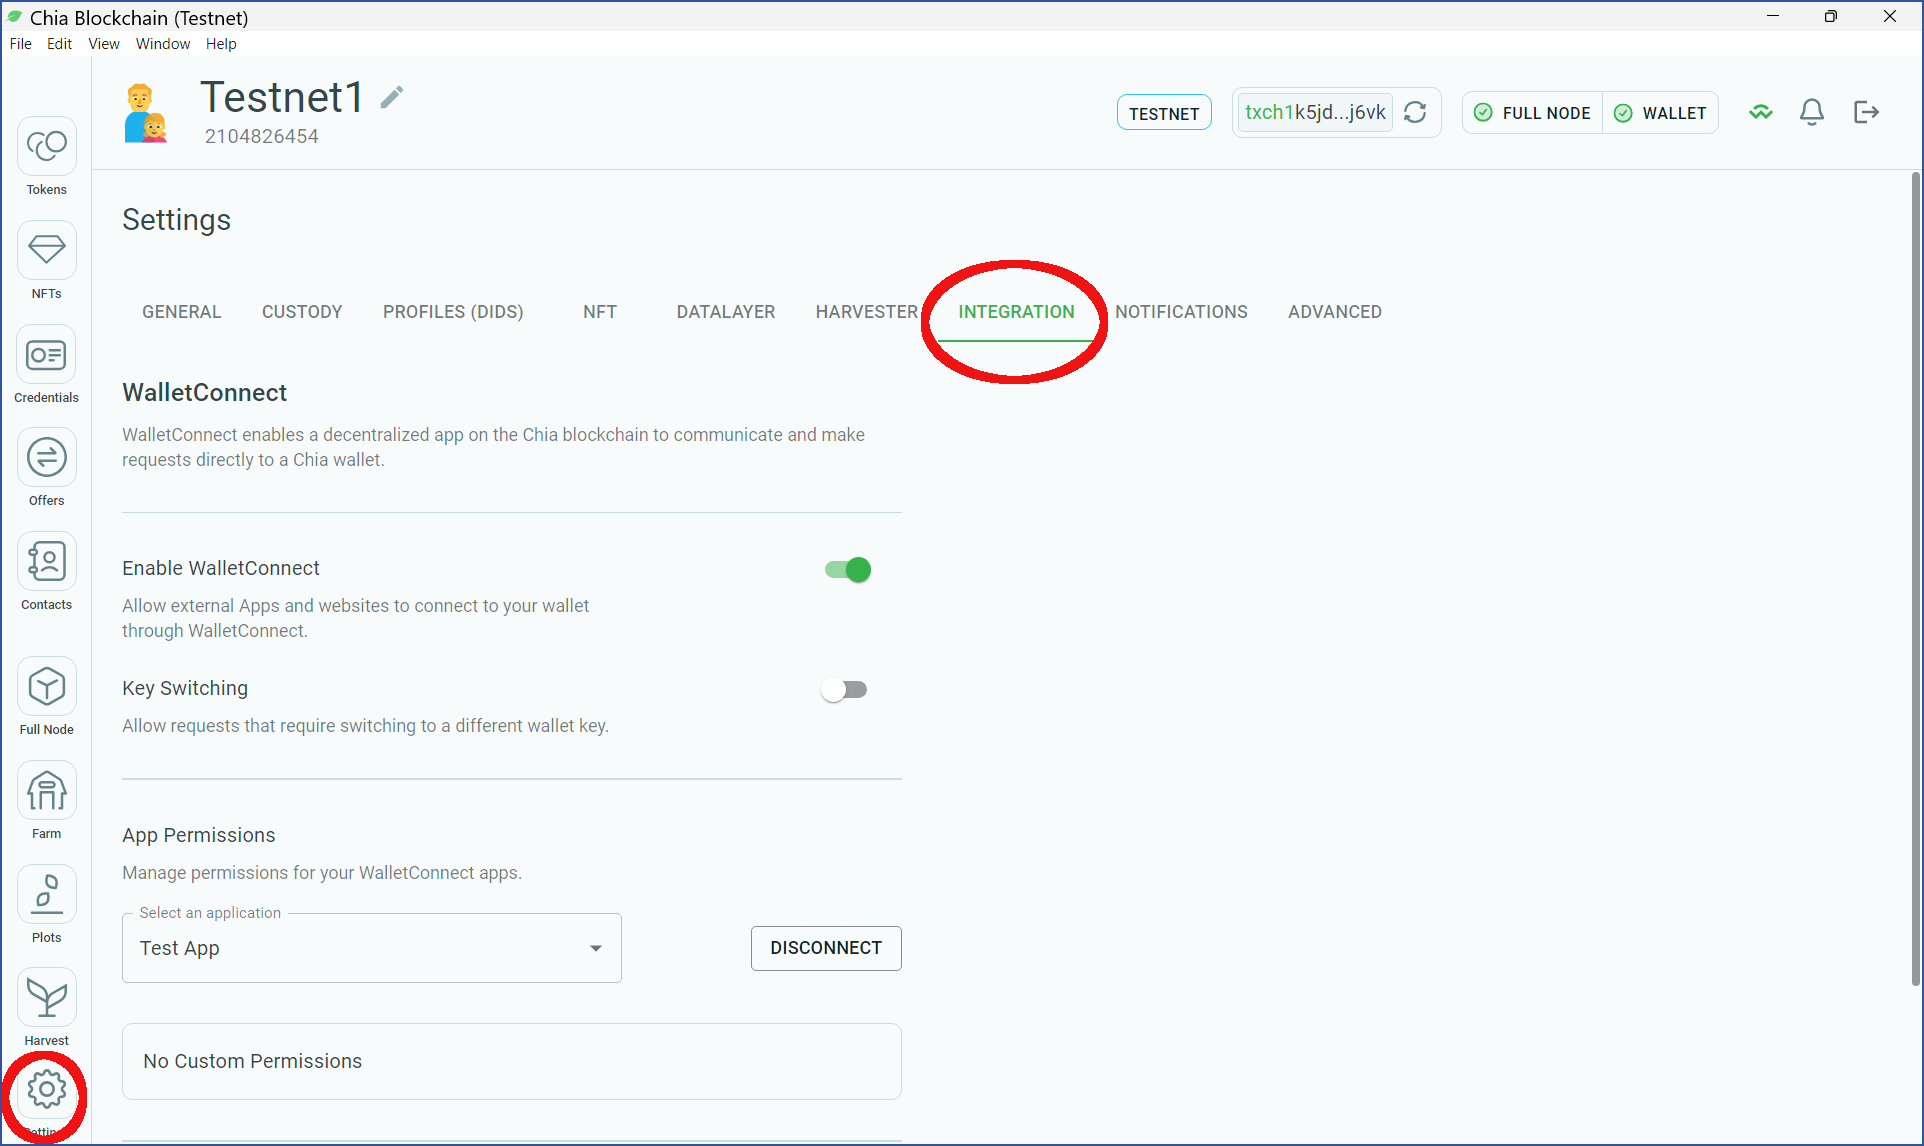
To configure the commands that are provided to dApps, you can edit (locally) chia-blockchain-gui/blob/main/packages/gui/src/constants/WalletConnectCommands.tsx. This file acts as a middle layer between the wallet and the dApp. It can also be used to control privacy settings.
FAQ
What is the main use case for WalletConnect?
WalletConnect allows end users to connect their wallet to a dApp.
What WalletConnect functionality might be enabled in the future?
WalletConnect is currently supported in Chia's reference wallet. It is also used in Chia TCG, a trading card game that uses Chia NFTs.
In the future, it could also be supported in other Chia wallets, as well as in other mobile- and web-based dApps. For example, mobile wallet providers will be able to integrate with WalletConnect to connect directly to dApp providers.
WalletConnect will aslo be used for initiating signing requests from within a dApp. This will enable interactions with all types of assets on Chia, including XCH, CATs, and NFTs. It will aslo enable using Chia Offers.
What is the difference between WalletConnect and CHIP-2?
WalletConnect is generalized to allow any dApp to connect to any Chia wallet. CHIP-2 (dApp protocol) is specific to browser extensions.
How can WalletConnect connect to remote wallets?
In the example from this tutorial, both the reference wallet and WalletConnect were running on localhost.
To connect to a mobile phone, you can scan the provided QR code. To connect to remote browser-based dapps, simply navigate to the remote URI from a web browser.
Also note that all connections (local and remote) between wallets and dApps are end-to-end encrypted.